
Summary of Arduino MP3 Player
This article details a standalone Arduino-based MP3 player designed to resemble vintage radios. It utilizes a VS1002d module (or compatible VS1003/VS1053) connected via SPI alongside an SD card for storage. The system features a 4x20 LCD, control buttons, and an encoder, all interfaced with the Arduino through specific pin configurations. Voltage dividers are recommended to manage 3.3V logic levels between the modules and the 5V microcontroller.
Parts used in the Arduino MP3 Player:
- Arduino
- MP3 module based on VS1XXX chip
- SD Module
- 4x20 characters LCD
- Small amplifier
- 2 speakers
- Resistors (for voltage dividers)
- Buttons (Forward, Back)
- Encoder (A and B pins)
I present this new Arduino project: A full MP3 player based on Arduino.
As you can see in the photo, the idea was to build a standalone player, in the style of antique radios or ‘tapes’, in the age of Iphones ….
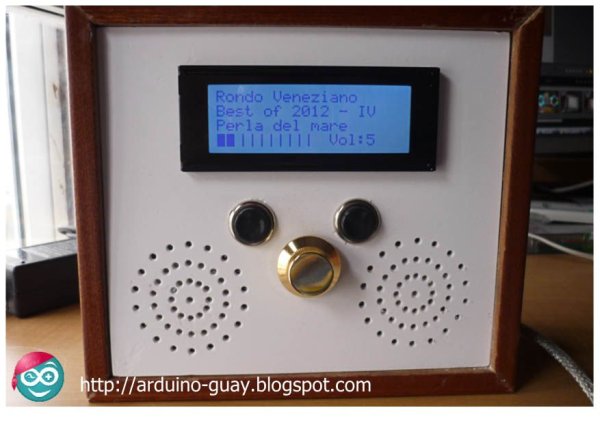
The player uses a small module based on the VS1002d chip (now discontinued, but who had a drawer). The module in question I bought at Futurlec . Currently you can get similar modules on ebay for a bit more than 10$, although the chip is the VS1003 o VS1053. You can also use a SparkFun MP3 shield, but significantly more expensive (this shield already includes an SD slot).
The three chips are quite compatible in terms of programming, and indeed almost all initialization the I have taken from the library to the SparkFun MP3 Shield 😉
Both the SD as the MP3 module are connected to the Arduino using the SPI bus. The LCD is connected in 4 bits mode to save Arduino pins.
This is a table with the connections between Arduino and the other components. In parentheses, the name of the individual connections on modules (and the pin in the SD card).
This is a table with the connections between Arduino and the other components. In parentheses, the name of the individual connections on modules (and the pin in the SD card).
| PIN Arduino | MP3 Module | SD Card | LCD | Buttons |
| 0 | — | — | — | Forward |
| 1 | — | — | — | Back |
| 2 | DREQ | — | — | — |
| 3 | — | — | RS | — |
| 4 | — | — | ENABLE | — |
| 5 | (RESET) | — | — | — |
| 6 | CS (XCS) | — | — | — |
| 7 | DCS (BSYNC) | — | — | — |
| 8 | — | — | — | Encoder A |
| 9 | — | CS (CD/DAT3-1) | — | — |
| 10 | — | — | — | Encoder B |
| 11 | MOSI (SI) | MOSI (CMD-2) | — | — |
| 12 | MISO (SO) | MISO (DATO-7) | — | — |
| 13 | CLK (SCLK) | CLK (5) | — | — |
| A0 | — | — | D4 | — |
| A1 | — | — | D5 | — |
| A2 | — | — | D6 | — |
| A3 | — | — | D7 | — |
| A4 | — | — | — | — |
| A5 | — | — | — | — |

Both the MP3 module and SD card work with 3.3 V, making it necessary adjust the levels to make them compatible with the Arduino 5V. The simplest option is to use voltage dividers with a pair of resistors. For the signals to the micro is not necessary, the 3.3 V are interpreted as high level without problem.
Major Components in Project
Elements of Arduino mp3 player :
- Arduino
- Mp3 module based on chip VS 1XXX
- SD Module (It is also available on ebay)
- 4×20 characters LCD
- Small amplifier
- 2 speakers.
For more detail: Arduino MP3 Player
- What chip is used in the MP3 module?
The project uses a small module based on the VS1002d chip, though VS1003 or VS1053 chips are also compatible. - How are the SD card and MP3 module connected?
Both the SD card and the MP3 module are connected to the Arduino using the SPI bus. - Why is the LCD connected in 4 bits mode?
The LCD is connected in 4 bits mode to save Arduino pins. - Can I use a SparkFun MP3 shield instead?
Yes, you can use a SparkFun MP3 shield, but it is significantly more expensive than the DIY module approach. - What voltage do the MP3 module and SD card require?
Both the MP3 module and the SD card work with 3.3 V. - How should I handle voltage level differences between components?
You must adjust the levels to make them compatible with the Arduino 5V, typically by using voltage dividers with a pair of resistors. - Do signals going to the microcontroller need voltage adjustment?
No, the 3.3 V signals to the microcontroller are interpreted as high level without problem. - Where can I purchase the VS1002d module?
The author bought the module at Futurlec, while similar modules can be found on eBay.
