Summary of The morse code generator by a PS\2 keyboard using Arduino
Summary: A PS/2 keyboard is connected to an Arduino using the PS2Keyboard library to read keystrokes and convert them into Morse code. The Arduino generates dots and dashes to drive a small speaker and a 5V relay (via a BC547 transistor and a recirculation diode). Hardware connections place keyboard data on Arduino pin 8, clock on pin 2, 5V to 5V and GND to GND. The provided sketch maps keys and numbers to Morse sequences and plays an error tone for unsupported input.
Parts used in the morse code generator by a PS2 keyboard:
- PS/2 keyboard
- Arduino Uno (or other Arduino)
- Wires
- 5V relay
- BC547 transistor
- Small speaker
- Recirculation diode (flyback diode)
- Female PS/2 connector or improvised metal connector
Hi, all!
Today I’ m trying to explain you my last project: “The morse code generator by a PS\2 keyboard”
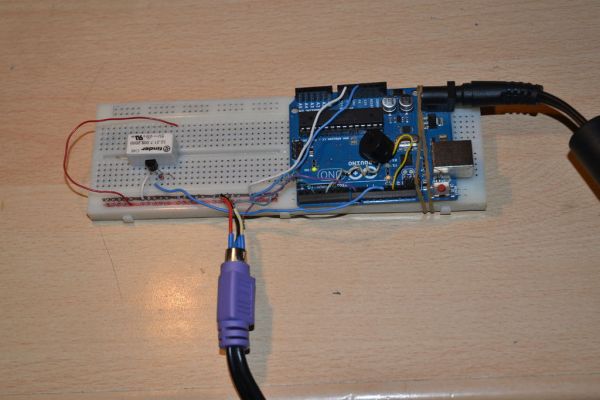
I’ ve used an PS/2 keyboard to send input to my Arduino board (like described in here) and transform it in morse code that activate a speaker and a relay.
Components:
– PS\2 keyboard
– Arduino Uno(or others)
– Wires
– 5V relay
– BC547 transistor
– Small speaker
– Recirculation Diode
Step 1: Setting hardware
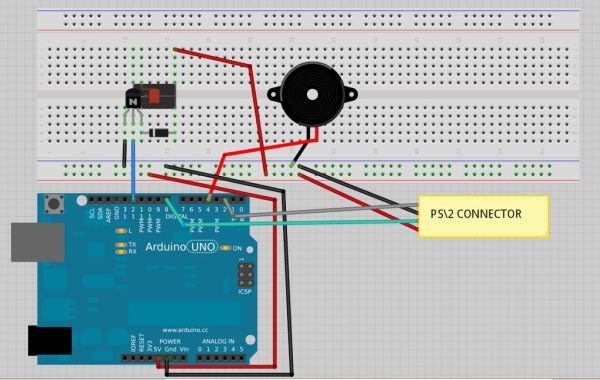
The Fritzing project image below can explain almost all, but the hardest thing is connect the keyboard to the Arduino board. As explained here, we must connect the PS\2 connector data pin to the Arduino pin 8, the clock pin to the 2nd, 5V pin to a 5V source and GND pin to GND. If you find a female PS\2 connector you are very lucky and can use it but others can do like me: I’ve use as replacement the metal part, covered by insulating tape, of connectors that are used on the mother boards (for wires of: power and HDD LEDs, power and reset buttons, USB face connectors , ecc. ecc.) .
Step 2: Software and Conclusions
Here is attached the ‘.ino’ file I’ve made. You’ll find the ‘PS2Keyboard.h’ library in here. Enjoy it.
/**********
morse.ino
**********/
#include <PS2Keyboard.h>
const int DataPin = 8;
const int IRQpin = 2;
PS2Keyboard keyboard;
void setup() {
delay(1000);
keyboard.begin(DataPin, IRQpin);
}
void loop() {
if (keyboard.available()) {
char c = keyboard.read();
if (c == ‘a’) {
p();l();
} else if (c == ‘b’) {
l();p();p();p();
} else if (c == ‘c’) {
l();p();l();p();
} else if (c == ‘d’) {
l();p();p();
} else if (c == ‘e’) {
p();
} else if (c == ‘f’) {
p();p();l();p();
} else if (c == ‘g’) {
l();l();p();
} else if (c == ‘h’) {
p();p();p();p();
} else if (c == ‘i’) {
p();p();
} else if (c == ‘j’) {
p();l();l();l();
} else if (c == ‘k’) {
l();p();l();
} else if (c == ‘l’) {
p();l();p();p();
} else if (c == ‘m’) {
l();l();
} else if (c == ‘n’) {
l();p();
} else if (c == ‘o’) {
l();l();l();
} else if (c == ‘p’) {
p();l();l();p();
} else if (c == ‘q’) {
l();l();p();l();
} else if (c == ‘r’) {
p();l();p();
} else if (c == ‘s’) {
p();p();p();
} else if (c == ‘t’) {
l();
} else if (c == ‘u’) {
p();p();l();
} else if (c == ‘v’) {
p();p();p();l();
} else if (c == ‘w’) {
p();l();l();
} else if (c == ‘x’) {
l();p();p();l();
} else if (c == ‘y’) {
l();p();l();l();
} else if (c == ‘z’) {
l();l();p();p();
} else if (c == ‘1’) {
p();l();l();l();l();
} else if (c == ‘2’) {
p();p();l();l();l();
} else if (c == ‘3’) {
p();p();p();l();l();
} else if (c == ‘4’) {
p();p();p();p();l();
} else if (c == ‘5’) {
p();p();p();p();p();
} else if (c == ‘6’) {
l();p();p();p();p();
} else if (c == ‘7’) {
l();l();p();p();p();
} else if (c == ‘8’) {
l();l();l();p();p();
} else if (c == ‘9’) {
l();l();l();l();p();
} else if (c == ‘0’) {
l();l();l();l();l();
} else if (c == ‘ ‘) {
pausa();
} else {
tone(4, 300, 250); //error tone
}
}
}
– Arduino Uno
– Wires
For more detail: The morse code generator by a PS\2 keyboard using Arduino
- How is the PS/2 keyboard connected to the Arduino?
Connect keyboard data pin to Arduino pin 8, clock pin to pin 2, 5V to Arduino 5V, and GND to GND as described in the article. - Can I use a replacement connector if I don't have a female PS/2 connector?
Yes, the author used the metal parts from motherboard front-panel connectors covered with insulating tape as a replacement. - What library is used to read the PS/2 keyboard in the project?
The PS2Keyboard.h library is used to read keyboard input in the sketch included with the project. - What does the Arduino do with the keyboard input?
The Arduino maps typed characters to Morse code sequences and activates the speaker and relay accordingly. - Which Arduino pins are referenced in the sketch?
The sketch references DataPin as 8 and IRQpin as 2 for the PS/2 keyboard connection. - How does the project indicate unsupported input?
Unsupported characters trigger an error tone using tone(4, 300, 250) in the sketch. - What components drive the relay and speaker safely?
The design uses a BC547 transistor to drive the relay and a recirculation diode as a flyback diode across the relay. - Does the project support letters, numbers, and spaces?
Yes, the sketch includes mappings for letters a to z, digits 0 to 9, and space which calls pausa().