We always need to see the temperature and humidity when we sitting in our house to know whether we need to turn on/off AC, heater,cooler,etc.

So here we have build this circuit to display temperature and humidity on the 7-segment displays, and we have used DHT22 to bring out the temperatures and humidity and a MAX7219 7-segment display driver to display the data. An Arduino uno here is the brains of the organisations.
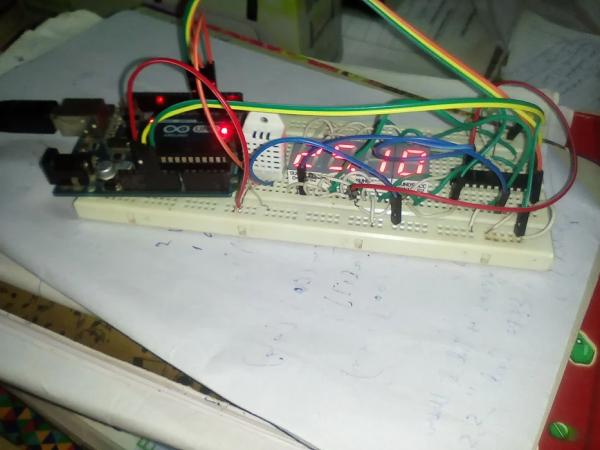
This system will show the temperature for 2sec and humidity for 2sec and this cycle repeats again..you can change that too in the sketch attached here..
Step 1: Parts List
1. 4 common cathode 7-segment displays
2. 1 MAX7219
3. 1 DHT22/DHT11
4. Arduino Uno/nano/mega/micro
5. Wires
6. Breadboard
7. solder kits and perfboard(optional, required when you will PCBfy it)
8. 1 33K resistor
9. 1 10K resistor
Step 2: Theory of Operation
The above circuit has an Arduino micocontroller board. Arduino IDE is used here to program the microcontroller..
DHT22/DHT11 is a temperature and humidity sensor. The data line of the sensor is connected to a GPIO of the microcontroller and the required calculations to find out the temperature and humidity data is done by the DHT library which I will give in the upcoming steps..
MAX7219 are compact, serial input/output common-cathode display drivers that interface microprocessors (µPs) to 7-segment numeric LED displays of up to 8 digits, bar-graph displays, or 64 individual LEDs. Included on-chip are a BCD code-B decoder, multiplex scan circuitry, segment and digit drivers, and an 8×8 static RAM that stores each digit. Only one external resistor is required to set the segment current for all LEDs.
So DHT is used to get temperature and humidity data and MAX7219 driver is responsible to display the data. We use LedControl library to make our task easy..
The Arduino is responsible for handling all the input output tasks and is the main brain of all calculations and output.
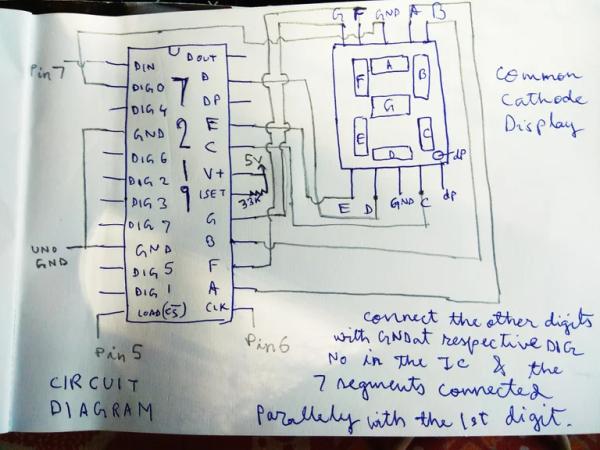
The circuit diagram above represents how to use the MAX7219 and DHT22 and connect each of them to arduino. I have shown one 7 segment display with MAX7219 .The Other 7-displays can be connected parallely with the first one and the GND of each display is to be connected with respective digit pins of the MAX7219..
See here for MAX7219 datasheet .. https://datasheets.maximintegrated.com/en/ds/MAX72…
Step 3: Building on Breadboard
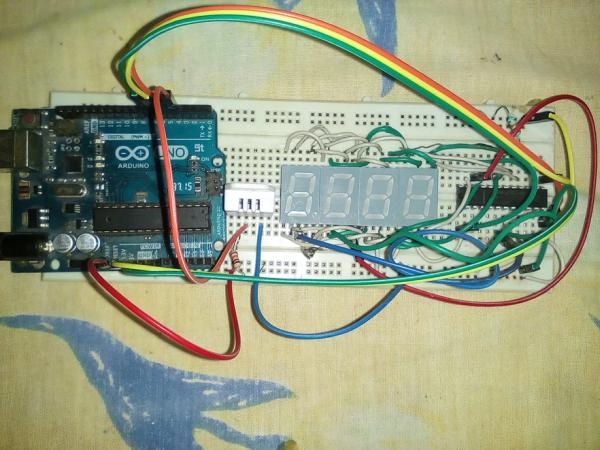
Now build up the circuit on breadboard.Circuit diagram is in previous step. Connect the other displays parallely with the first display and the Gnd of each display to the respective digit numbers of the max7219 ic.. The connections are rather easy and only 4 digital IO lines of Arduino uno are being used..give 5V supply to the MAX7219 and 3.3v/5v to the DHT…also connect the dp point of each display to the dp pin of Max7219.
See the video here for reference..
Step 4: Programming the UNO
https://github.com/wayoda/LedControl
http://playground.arduino.cc/Main/DHTLib
download the two libraries and extract in the library folder of arduino
Then open the arduino ide and paste the code given here…it must work
See a video attached here..it’s just what I’ve build..
So you are all set and keep this in an enclosure and keep it in your room. You can even solder it too.Contact me at [email protected] for any problems or comment here..
Source: Temperature and Humidity Monitor Using DHT22 & MAX7219