Summary of Soldering Station
This article describes a DIY Weller soldering station project based on an Arduino shield design by Martin Kumm. The authors enhanced the original concept with a 1.8-inch SPI TFT color display, a potentiometer for temperature adjustment instead of buttons, and a standby mode that lowers the temperature to 170°C when the tip is in the holder. Developed collaboratively with a friend who owns a 3D printer, the project eventually evolved into a DIY kit due to high interest from friends.
Parts used in theDIY Weller Soldering Station:
- Arduino shield
- Precision OpAmp
- Power MOSFET
- 1.8 inch SPI TFT Display
- Potentiometer
- Digital input pin
- Pullup resistor
- Metal holder pipe
At the fpv-community.de Forum I read about a DIY Weller station designed by Martin Kumm. Basically an Arduino shield to drive a Weller soldering tip. As there is not much to it, the board simply contains an precision OpAmp, a power MOSFET, 2 buttons for adjusting the temperature and a display to show the current values. This design looks like a good starting point for my own advanced project. As I have lately discovered a 1,8 inch SPI TFT at banggood.com for an amazing price ( ~ 4.60 $ / 3,70 €), I started using them regularly in my projects. So I surely wanted to use it with this soldering station as well.
The hardware design was rather hobbyish and needed to be tuned to provide the security not to kill your soldering tip while starting up or in case of a software/hardware fail. The bigger changes I made to the original design were the nice color Display, a poti instead of the buttons (I think it’s easier to adjust) and a standby mode.
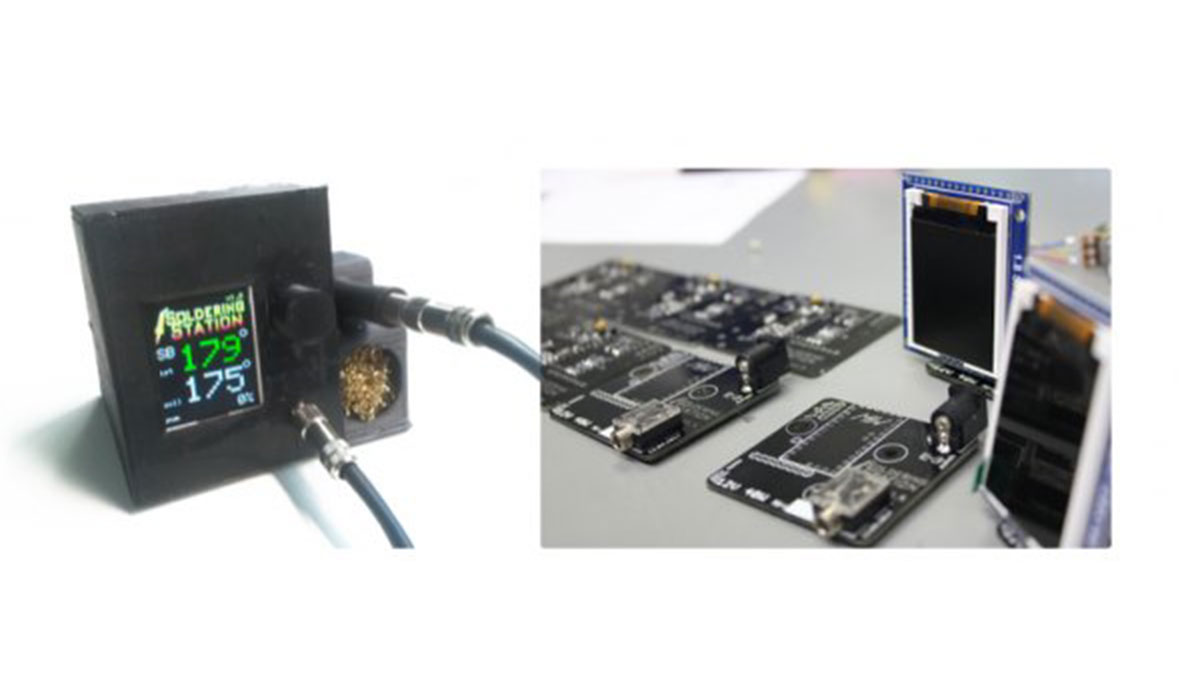
The standby mode will decrease the temperature to a 170°C value when the soldering tip is in the holder. This works simply by having a pullup resistor connected to the metal holder pipe which is connected to a digital input. The soldering tip itself is connected to ground potential and will put the digital input to ground level as well when placed in holding position. For reheating the station only takes about 3 seconds which is fast enough in most cases.
The station in the picture above is the result of a long prototyping period together with Albert – a friend of mine from university – who owns a 3d printer and wanted to have a station as well. As we started with the development of the station some friends asked us if they can by a station from us. So we decided to ask around if anyone is interested in buying this station as a DIY kit. After a short time we had 10 stations to build and a lot of money to spend on the parts.
For More Details: Soldering Station
- What is the core function of the Arduino shield?
The board drives a Weller soldering tip using components like a precision OpAmp and a power MOSFET. - Can I use a 1.8 inch SPI TFT display with this project?
Yes, the authors successfully integrated a 1.8 inch SPI TFT display purchased from banggood.com into their design. - How does the standby mode work?
The mode decreases the temperature to 170°C when the soldering tip is placed in the holder, detected via a pullup resistor connected to the metal holder pipe. - Why was a potentiometer chosen over buttons?
The author believes using a potentiometer is easier for adjusting the temperature compared to two buttons. - How long does it take to reheat the station?
Reheating the station after entering standby mode takes about 3 seconds. - What security feature prevents damage during startup?
The hardware design was tuned specifically to provide security against killing the soldering tip during startup or in case of software failure. - Who collaborated on the development of this station?
The project was developed together with Albert, a university friend who owns a 3D printer. - Did the project become available as a commercial product?
No, the authors decided to sell the stations as a DIY kit after receiving requests from friends interested in buying one.