For 3D makers the worst thing is running out filament in the middle of a hours long print. This device will order for you when it is low!
Introduction
The FilamentBot is a Amazon Dash Replenishment Service (DRS) enabled smart filament counter that will contentiously track the filament usage by measuring the actual length of the filament that has been dispensed on any 3D printer, and automatically re-order the filament through Amazon DRS service when the filament is running low. It also features a Amazon Dash button that allows the user to manually order filament at any time.

The FilamentBot consists of a Filament Sensor Unit and a Controller. The Filament Sensor is designed to be clipped onto the filament line between the spool and the extruder. The Controller is Wi-Fi enabled and features a large back-lit LCD screen and can be placed nearby the the 3D printer control panel for easy access.
Motivation
I own several 3D printers myself and go through many rolls of filament every month. It is difficult to track how much filament have been used on each printer, especially those have close filament compartment. I wish to have a device that can automatically track the filament usage physically.
There are in general two ways to track the physical usage of the filament: by weight, or by length. The weight of filament roll fluctuates a lot due to the pulling force of the extruder especially near the end of the roll, so the measurement by weight is not accurate (If you’re interested, I have made a filament scale as well and can be found here). It is more accurate to track the extrusion length but there’s lack of low-cost solution. People have tried different ideas such as Arduino rotary encoders or optical sensors but their use is limited, mainly due to the complex electronics required to make them work. Then I realized that the old PS/2 mechanic mouse is a perfect candidate to be hacked into a practical filament sensor with the help of Arduino due to its simplicity. The mechanic mouse seems a bit dated but it has all the electronic circuit and requires minimum hardware support from the host.
I published the original filament counter project last year, and one of the visitor commented:
Great design, we need one of these for the printer at the library :)
We have a number of ‘maker space’ at local public library and schools. Imaging how much work it would be if you have to keep eyes on the printer farm, track the filament usage and make sure that the filament is always in stock. With the help of the FilamentBot, all these tasks can be handled automatically.
The Hardware Design – Hacking the PS/2 Mouse
A mouse has two axes: `X` and `Y`. The mechanical mouse utilizes encoder wheels to track the movement. When the wheel rotates, the infra-red (IR) light emitted by an IR Light Emitting Diode (LED) is interrupted repeatedly, at a rate proportional to the rate of wheel rotation. A pair of detectors is used on another side the wheel which generate quadrature encoding, so that mouse knows the direction of rotation.
The PS/2 mouse can communicate with a host device using the PS/2 protocol. It can be connected to a host device using the 6 pin mini DIN connector. The PS/2 connector has one pin for Data and another pin for Clock and using only these two pins the mouse communicate with the host device with PS/2 protocol at TTL voltage. The mouse also also takes care of the modulation of the IR signal to prevent the interference from ambient light.
The mouse will continuously give output which can be decoded to get the movement in the X-Y plane and also the status of the buttons on the mouse. The Arduino then can decode the transmission into the actual movement information, essentially the direction and the distance of movement. This is great for tracking the usage of filament since the filament may move in both directions during extrusion and retraction.
In this project, only the parts for X axis is utilized, but the filamentbot can be easily expended to have second channel (thinking of a dual-extruder printer) by moving the Y axis IR transmitter and sensor as well as the encoder wheel to a secondary filament sensor. The Arduino sketch needs to be modified to monitor the X and Y movement separately in this case.
The filament sensor unit is 3D printed. The detailed assembly instructions can be found at my project page for the original digital filament counter.
For the FilamentBot control unit, I chose to use the Arduino MKR1000 instead of UNO in original design as the hardware platform for following reasons:
- 100% Arduino IDE compatible.
- Utilizes the Atmel ATWINC1500 WiFi Module(TLS capable w/ onboard SHA-256 encryption).
- Small form factor
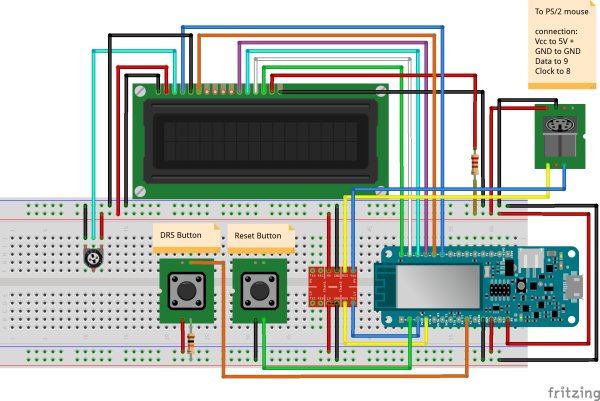
However, a logic level converter is needed to match the mouse interface voltage at TTL level. Below is the part list and how it looks on the breadboard.
Read more: Smart 3D Printer Filament Counter (FilamentBot)