Summary of Simple keyboard using the tone() function using Arduino
This project demonstrates an Arduino-based simple keyboard that generates different pitches using the `tone()` function. It reads three force-sensing resistors (FSRs) connected to analog pins; when a sensor's value exceeds a threshold, the corresponding note from a predefined array is played through an 8-ohm speaker. The circuit uses pull-down resistors for the sensors and a current-limiting resistor for the speaker.
Parts used in the Simple Keyboard Project:
- 8-ohm speaker
- Three force sensing resistors
- Three 10k ohm resistors
- One 100 ohm resistor
- Breadboard
- Hook up wire
This example shows how to use the tone() command to generate different pitches depending on which sensor is pressed.
Circuit
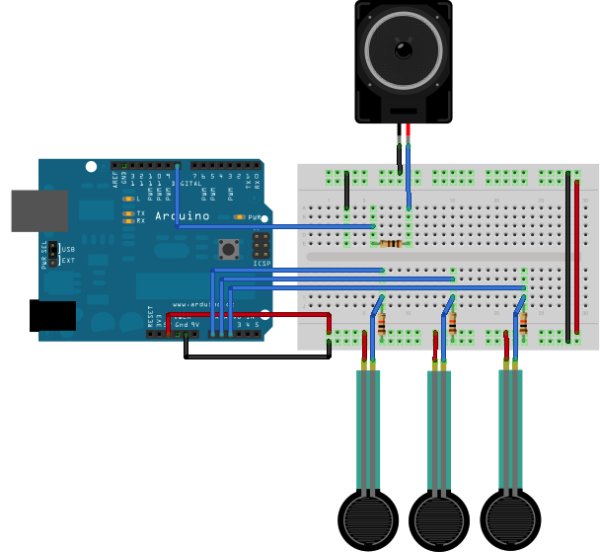
Connect one terminal of your speaker to digital pin 8 through a 100 ohm resistor, and its other terminal to ground.
Power your three FSRs (or any other analog sensor) with 5V in parallel. Connect each sensor to analog pins 0-2, using a 10K resistor as a reference to groud on each input line.
image developed using Fritzing. For more circuit examples, see the Fritzing project page
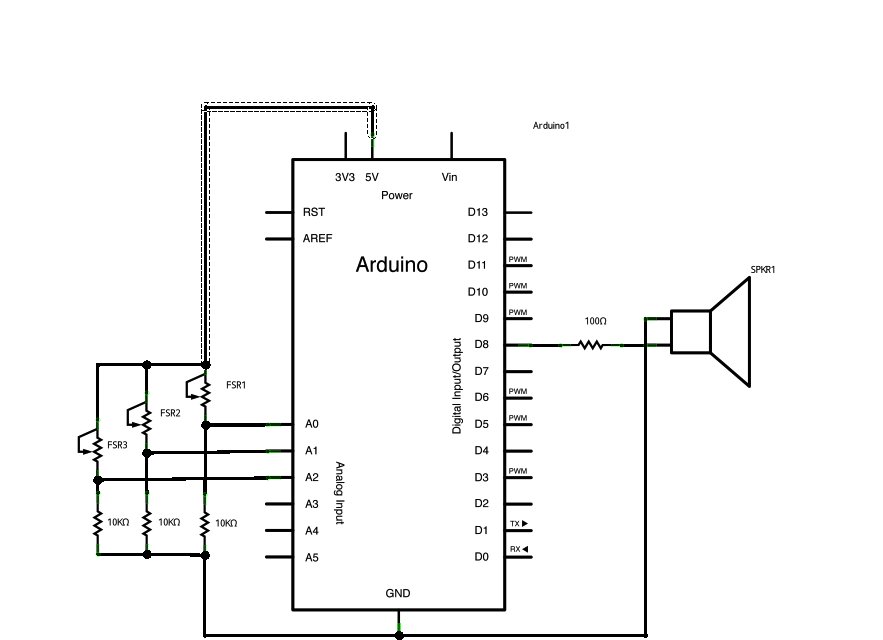
Schematic
Code
The sketch below reads three analog sensors. Each corresponds to a note value in an array of notes. IF any of the sensors is above a given threshold, the corresponding note is played.
Here’s the main sketch:
keyboard
Plays a pitch that changes based on a changing analog input
circuit:
* 3 force-sensing resistors from +5V to analog in 0 through 5
* 3 10K resistors from analog in 0 through 5 to ground
* 8-ohm speaker on digital pin 8
created 21 Jan 2010
modified 9 Apr 2012
by Tom Igoe
This example code is in the public domain.
http://arduino.cc/en/Tutorial/Tone3
*/
Hardware Required
- 8-ohm speaker
- (3) force sensing resistors
- (3) 10k ohm resistors
- (1) 100 ohm resistor
- breadboard
- hook up wire
- How does the tone() command work in this project?
The tone() command generates different pitches depending on which of the three sensors is pressed. - Can I use other analog sensors instead of FSRs?
Yes, the text states you can use any other analog sensor in place of the three FSRs. - What voltage powers the sensors?
The three FSRs are powered with 5V in parallel. - Which digital pin connects to the speaker?
The speaker is connected to digital pin 8. - Does the code play a note if the sensor value is below the threshold?
No, the sketch only plays the corresponding note if the sensor value is above a given threshold. - What is the role of the 10K resistor in the circuit?
The 10K resistor acts as a reference to ground on each input line for the sensors. - Where should the speaker be grounded?
One terminal of the speaker goes to digital pin 8 via a 100 ohm resistor, and its other terminal goes to ground. - What is the purpose of the 100 ohm resistor?
The 100 ohm resistor connects the speaker to digital pin 8 to limit current.