Summary of Sign Language Translator using Arduino
This article describes an unfinished Sign Language Translation Glove project by two 15-year-olds. The glove uses flexible potentiometers to detect finger positions for translating Brazilian Sign Language letters "A" through "E". It also features wireless control of a LEGO wheelchair using XBee modules and an Arduino UNO. The creators note ongoing issues with letter identification accuracy and are still refining the electronics and code.
Parts used in the Sign Language Translation Glove:
- Glove (Nike Dry Fit Tour Golf)
- Arduino Mega 2560
- Arduino UNO (Optional)
- Flexible potentiometers (5 units)
- 10K Resistors (5 units)
- 2.2K Resistors (2 units, Optional)
- 2N2222 Transistors (2 units, Optional)
- Breadboard
- XBee Series 1 Modules (2 units)
- XBee Explorer Regulated (2 units)
- Soldering Iron
- Solder
- Stranded wire
First of all, this project is not finished. We’re still trying to improve and fix some problems. Right now, we’re only able to translate letters from “A” to “E”. The program still have problems while identificating those letters, the values for each of them match sometimes, so we’re still trying to fix this.
Many people around the world suffer from speech problems, and can’t communicate with others in the same way we do it. To solve that problem, I, Bruno Moraes, and my research partner, Pedro Jorge, developed a Sign Language Translation Glove. Acctually, it only works with Brazillian Sign Language.
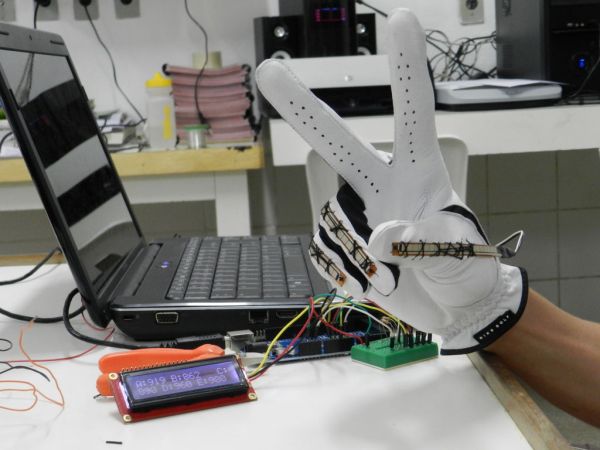
The Glove is also able to control a LEGO Wheelchair wirelessly with the movement of your fingers.
We’re both 15, we don’t know that much about electronics and programming, so go easy.
For this project, we made use of flexible potentiometers (available at sparkfun) to measure each finger’s position. This potentiometer, together with a 10K resistor form a Voltage Divider, that feeds de Arduino ADC. We used an Arduino Mega 2560, but UNO or similars is ok.
Bill of Materials:
1 – Glove ( We used a Nike Dry Fit Tour Golf )
1 – Arduino Mega 2560 (http://www.sparkfun.com/products/9949)
1 Arduino UNO ( Optional, used for the wheelchair side control)
5 – Flexible potentiometers (http://www.sparkfun.com/products/8606)
5 – 10K Resistors
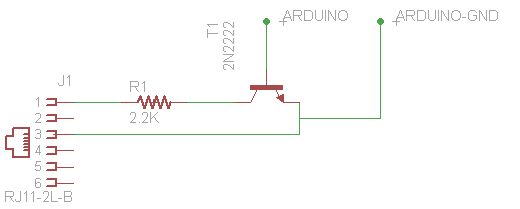
2 – 2.2K Resistors (Optional, used for the wheelchair side control)
2 – 2N2222 Transistors (Optional, used for the wheelchair side control)
1 – Breadboard
2 – XBee Series 1 Modules
2 – XBee Explorer Regulated
1 – Soldering Iron
1 – Solder
1 – Stranded wire
Step 1: Attach the Sensors
Sew the five sensors to the glove. Make sure they’re all fixed, but not too tight.
After, solder 15cm stranded wire pieces to each of the sensor leads.
Remember to reinforce de pin-end of the sensor, this area is susceptible to kinking and eventual failure. Electrical tape ou heatshrink is fine.
Step 2: Voltage Divider Circuit
To interface the sensors with Arduino, we used a Voltage Divider Circuit ( more on http://www.sparkfun.com/tutorials/270).
The sensor, when it’s straight, has a resistence of 30K. When bent 90º, 50K. If we just conected the sensor pinends to VCC and to an analog input, the output boltage woudn’t be enough to feed the Arduino’s ADC. To solve this, we used a Voltage Divider Circuit. This circuit makes the opposite, the higher resistence, higher is the ouput voltage.
the ouput voltage VOUT is give by the expression in picture 3.
See picture 4. R1 is our sensor, and R2 is a 10K resistor. Using 5V from Arduino, when the sensor is straight, VOUT will be 3,75V, and when the sensor is bent 90º, VOUT will be 4,17V.
The Arduino Analog/Digital Converter will assign a number for the input voltage. As it has 10-bit resolution, this number will be between 0 and 1023 (2^10). Acctually, as the Voltage Divider output is inversly proportional to the resistance, this ADC output is somewhere between 780~805 when the sensor is straight.
Connect the respective VOUT’s to Arduino’s Analog Inputs, starting from the thumb, Analog input 5 to 1.
Step 3: Programming
The default for our programming is, starting from the thumb, Analog Input 5 to 1.
We gathered some Reference Values, that we use as base to compare with the sensor readings. Just remebering, this is just for letters from “A” to “E”, in Brazilian Sign Language.
UPDATE: As soon as we fix some bugs, we’ll be posting the Arduino Code here.
1 – Arduino Mega 2560
1 Arduino UNO
For more detail: Sign Language Translator using Arduino
- What language does the glove translate?
The glove currently works only with Brazilian Sign Language. - How many letters can the glove translate?
The program is currently able to translate letters from A to E. - Can the glove control a wheelchair?
Yes, the glove controls a LEGO Wheelchair wirelessly via finger movements. - What sensors measure finger position?
The project uses five flexible potentiometers attached to the fingers. - Which Arduino boards are compatible?
The project uses an Arduino Mega 2560, but an Arduino UNO or similar is acceptable. - How do the sensors connect to the Arduino?
Sensors form a voltage divider circuit with a 10K resistor feeding the Arduino ADC. - Is the project finished?
No, the project is not finished and developers are still fixing identification problems. - Who created this project?
The project was developed by Bruno Moraes and his research partner Pedro Jorge.