Which uses more water – a bath or a shower?
I was recently thinking about this question, and I realized that I don’t actually know how much water is used when I shower. I know when I’m in the shower sometimes my mind wanders, thinking about a cool new projects idea or trying to decide what to have for breakfast, while water is just gushing down the drain. It would be a lot easier to reduce my water consumption if I actually knew how many litres I was using each time!
I did a bit of research, and found that different shower heads can use anywhere from 9.5 litres (2.5 gallons) per minute to less than 6 litres (1.6 gallons) per minute, if you have a flow restrictor installed. A very old shower could use even more water.
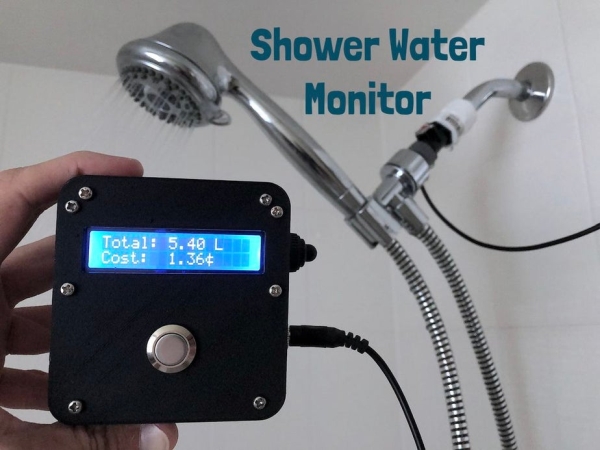
I decided to design and build a device that would display the total volume of water used per shower, the cost of the water, and the flow rate. I’ve had this device installed for a few weeks, and it’s really handy to have a live readout of the amount of water being used.
In this Instructable, I’ll explain how I built this. Of course, you don’t have to follow my steps exactly! It’s always good to make use of parts you have lying around. I’ve included links to all the parts I used, or an equivalent part that will work.
Supplies:
(All Prices in USD)
- Flow Sensor – $3.87
- LCD Screen – $2.29
- Arduino Nano – $1.59
- Boost Converter – $1.88
- LiPo Charger – $1.89
- Waterproof Toggle Switch – $0.93 (Not the exact one I used, but it should work)
- Waterproof Pushbutton – $1.64
- Standoffs, M3 Screws & Nuts – $6.99
- 2X Female 3.5mm Jack – $2.86 ea.
- Male 3.5mm Plug – $1.48
- 3.5mm 3′ Cable Assembly – $3.57
- USB Cable Assembly – $1.74
- 1/2″ NPS Female-to-Female Coupling – $1.88
- 500mAh 3.7V LiPo Battery – $3.91
Tools & Common Supplies
- Soldering Iron & Solder
- Wire
- Wire Cutters
- Wire Strippers
- Double-Sided Tape
- Phillips Screwdriver
- 3D Printer (Optional)
Step 1: Waterproofing
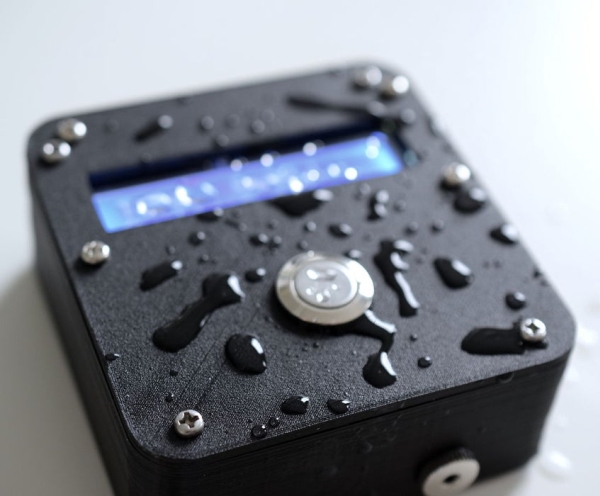
The most difficult aspect of this project is making the whole thing waterproof. Since it will reside in a shower, it must be able to survive extreme humidity and the occasional splash. About 75% of the total time spent on this project was figuring this part out.
The way I see it, there are two choices: design a custom 3D printed enclosure, or try to make it work with an off-the-shelf enclosure. Since I recently got my own 3D printer, I decided to go with the first option.
If you don’t have access to a 3D printer, here are some off-the-shelf enclosures I’ve found that claim to be waterproof, and would probably work. Please note I have not purchased either of these enclosures so I make no guarantees that all the components will fit inside!
Banggood – 100x68x50mm Box with Transparent Lid – $5.35
Digikey – 130x80x70mm Box with Transparent Lid – $11.65
For this point onward, when I refer to the enclosure, I am talking about my 3D printed one.
Step 2: My Custom 3D Printed Enclosure!
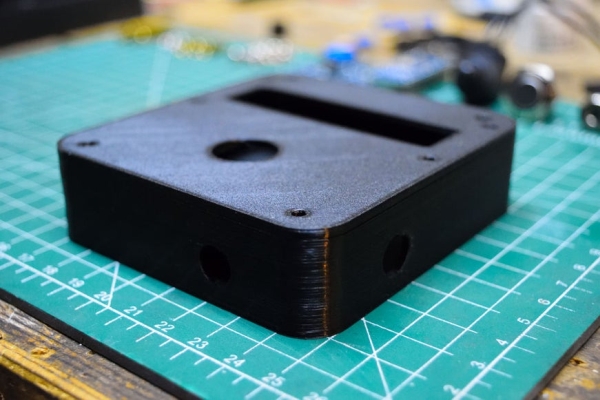
After working in Fusion 360 for several hours, I came up with this enclosure. It has three circular cutouts to fit two female 3.5mm jacks and one toggle switch. The lid has a 16mm hole for the momentary pushbutton, and a rectangular cutout for the screen, as well as the four mounting holes to hold the screen in place. The lid is a separate part and has a lip to help prevent moisture ingress through the seam. The four holes on the corners of the box are to hold the lid on with 30mm standoffs. All the screw holes are 3mm in diameter, which fits an M3 screw.
You can download the STL files from my Thingiverse page. It can be printed without any rafts or supports, but I used supports just to be safe. I also used 100% infill. Since the walls are so thin, reducing the infill percentage doesn’t really change the total print time or total material, so I just kept it at 100%.
To make the screen visible, it could either protrude through a cutout in the lid of the enclosure, or be placed behind a transparent window. Since the screen shouldn’t be exposed to moisture, we’re stuck with the second option. Unfortunately 3D printing with transparent filament is still in its infancy, so we’ll have to get a bit creative.
My solution was to create a rectangular cutout in the lid, and glue in a piece of transparent plastic from some vegetable packaging. This technique can be used even if you aren’t using my custom enclosure; simply cut out a rectangle with a utility knife or a Dremel. Of course, if you’re using an enclosure with a transparent lid, this isn’t needed at all.
The best source for transparent plastic that I’ve found is produce packaging. Usually spinach or other leafy vegetables come in large clear plastic containers. In my case, I used the packaging from a “pepper medley”.
I wanted an overhang of 5mm to give plenty of surface area for gluing, so I cut out a 27x77mm rectangle of clear plastic. I had to trim the corners a bit so that the screws would fit. I squirted a line of superglue around the perimeter of the cutout, and then placed the clear plastic on. I added a bit more superglue around the edge after just to make sure it was sealed.
Pro-Tip: Place the part in front of a small fan while the glue is drying. As superglue dries, it tends to leave a vile white residue behind, which we certainly don’t want on our transparent window. I used an old 12V fan from a computer power supply. I let the glue sit for 12 hours to make sure it was completely dry.
Step 3: Mounting the LCD Screen
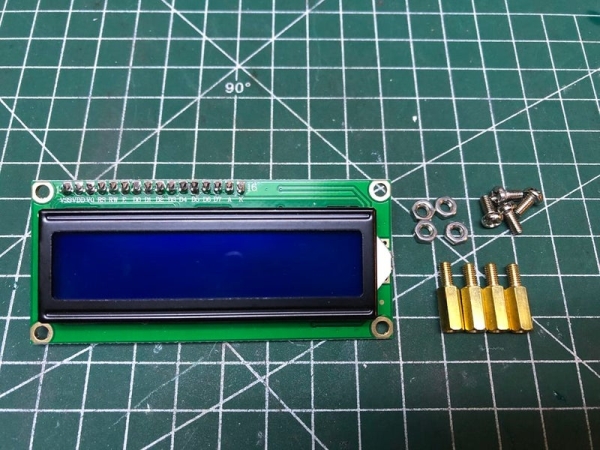
Once the transparent window has dried, the LCD can be mounted. The LCD is a super popular 16×2 character display, with the I²C “backpack” pre-soldered to the back. I highly recommend getting this screen with the I²C interface. Wiring all the parallel lines is quite annoying and introduces more potential for mistakes – the I²C version only has two wires for power and two wires for signal.
I used four 10mm standoffs to mount the screen. The standoffs each have a male thread on one end and a female thread on the other. I put the male thread through the holes in the LCD and tightened an M3 nut to each one. Then I used four M3 screws to secure the female ends of the standoffs through the lid of the enclosure. I got this package of standoffs which has the 10mm ones to mount the LCD, and longer ones to hold the lid to the base. Plus, there are M3 screws and nuts, so you don’t need to buy any additional hardware.
Be sure the nuts are very tight so that when you tighten the screws, the standoffs don’t turn. Also, make sure you don’t over-tighten the screws, or the plastic lid could deform and not seal properly.
The row of 16 header pins on the LCD should be on the top – make sure you don’t mount the LCD upside down!
Step 4: Mounting the Momentary Button
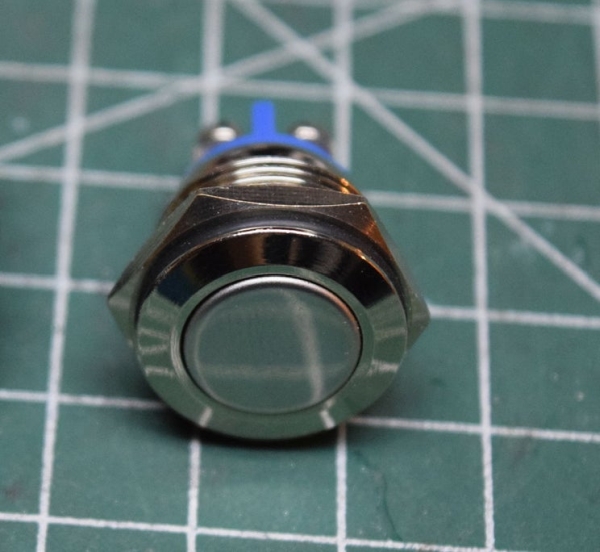
I decided to use this sick-looking chrome button on the front panel. I’ve used them in previous projects and I really like the way they look. They’re supposed to be waterproof, and they come with a rubber ring to prevent moisture from entering the enclosure through the threads.
This step is pretty straightforward. Undo the nut, but keep the rubber ring on. Insert the button through the hole in the lid, and tighten the nut from the back side. Avoid over-tightening the nut, or the rubber ring will be crushed and won’t serve its purpose.
Read more: Save Water & Money With the Shower Water Monitor