I wanted a simple way of quickly logging on to my computer without having to typing my password in and did not want to have no security either.
There are various products on the market that would solve this problem from fingerprint readers to proximity dongles but I decided to see what I could knock up with parts I mainly already had.
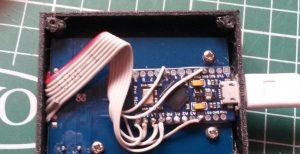
Looking in my micro stuff I had a RC522 RFID tag reader 3.3v :
Also an 3.3v Arduino Leonardo clone as well based on a Sparkfun pro micro which also can act as a USB device such as a keyboard. This is useful as if a 5v Arduino was used a level shifter would be required due to the RC522 not being 5v torrent.
How it works
When the chosen cards is presented the Arduino will act as a keyboard and simply type the stored password in followed by a carriage return .
Wiring
As mentioned, both devices being the same voltage ,3.3v made wiring so easy !.
Code
I used the Arduino library for MFRC522 by Miguel Balboa , so you will need to add this library to Arduino.
Please note this is only a very basic example and the password is stored in plain text in your Arduino document , so this is very much proof of concept and has just been thrown together. It may also be a good idea after uploading to Arduino to and save your Arduino document with the password blank.
UPDATE! Please also see RFID Login software Update ! for the latest software example .
1 2 3 4 5 6 7 8 9 10 11 12 13 14 15 16 17 18 19 20 21 22 23 24 25 26 27 28 29 30 31 32 33 34 35 36 37 38 39 40 41 42 43 44 45 46 47 48 49 50 51 52 53 54 55 56 57 58 59 60 61 62 63 64 65 66 67 68 69 70 71 72 73 74 75 76 77 78 79 80 81 82 83 84 85 86 87 88 89 90 91 92 93 94 95 96 97 98 99 100 101 102 103 104 105 106 107 108 109 110 111 112 113 114 115 116 117 118 119 120 121 122 123 124 125 126 127 128 129 130 131 132 133 134 135 136 137 138 139 | // // Example By Luke (www.ls-homeprojects.co.uk) // Free to use this code how you like but please link my site // Modified example for Arduino library for MFRC522. // Credit to Miguel Balboa for provided a great library and examples ! https://github.com/miguelbalboa/rfid. // Please note this is just a proof of concept Example and should not be used for security applications ! #include “Keyboard.h” #include “HID.h” // This is required for this to work with window 10 #include <SPI.h> #include <MFRC522.h> // This can be #define SS_PIN 10 #define RST_PIN 5 MFRC522 rfid(SS_PIN, RST_PIN); // Instance of the class MFRC522::MIFARE_Key key; //———– settings ———————————— #define enable_serial 0 // set this to “1” to enable serial port unsigned long my_UID = 12345; // This is the id of your card displayed in serial terminal //// // Init array that will store new NUID byte nuidPICC[3]; void setup() { if (enable_serial == 1){ // Enable serial port for getting code Serial.begin(9600); while (!Serial) { ; // wait for serial port to connect. Needed for native USB port only } } delay(500); Keyboard.begin(); delay(500); SPI.begin(); // Init SPI bus rfid.PCD_Init(); // Init MFRC522 } void loop() { // Look for new cards if ( ! rfid.PICC_IsNewCardPresent()) return; // Verify if the NUID has been readed if ( ! rfid.PICC_ReadCardSerial()) return; // Serial.print(F(“PICC type: “)); MFRC522::PICC_Type piccType = rfid.PICC_GetType(rfid.uid.sak); //Serial.println(rfid.PICC_GetTypeName(piccType)); if (rfid.uid.uidByte[0] != nuidPICC[0] || rfid.uid.uidByte[1] != nuidPICC[1] || rfid.uid.uidByte[2] != nuidPICC[2] || rfid.uid.uidByte[3] != nuidPICC[3] ) { // Serial.println(F(“A new card has been detected.”)); // Store NUID into nuidPICC array for (byte i = 0; i < 4; i++) { nuidPICC[i] = rfid.uid.uidByte[i]; } // CONVERT UID into Unsigned int as easier to match up to a saved value. unsigned long UID_unsigned; UID_unsigned = rfid.uid.uidByte[0] << 24; UID_unsigned += rfid.uid.uidByte[1] << 16; UID_unsigned += rfid.uid.uidByte[2] << 8; UID_unsigned += rfid.uid.uidByte[3]; long UID_LONG=(long)UID_unsigned; if (enable_serial == 1){ // Enable serial port for getting code Serial.println(“UID as a Long int , please make a note of this and :”); Serial.println(UID_LONG); } if (UID_LONG == my_UID) { // IF Presented card = uid in settings then… type password in ! delay(100); Keyboard.write(KEY_RETURN); // modify key squence here for other logins other than windows 8/10 ! delay(1200); Keyboard.print(“my_password”); //As this is plain text may be a good idea to delete after compiled . delay(400); Keyboard.write(KEY_RETURN); delay(400); nuidPICC[0] = 0; // Simple fix to allow the same card to work with this rc522 Example } } else //Serial.println(F(“Card read previously.”)); // Halt PICC rfid.PICC_HaltA(); // Stop encryption on PCD rfid.PCD_StopCrypto1(); } |
How to use
1) First Set “#define enable_serial” = 1 to enable serial output.
2) Open a serial terminal with 9600 baud
3) Swipe a card and make a note of UIDs .
4) Add recorded card UID to line 27.
5) Add login information to the keyboard section line 113 , modify the key squence for other OS’s and applications .
Read more: RFID Computer login