
Over the years, I have built many robotic projects and most of it run by an Arduino so let me explain a little bit about this amazing technology. Arduino is a microcontroller board, has up to 14 digital input/output pins (of which 6 can be used as PWM outputs), 6 analog inputs or more, this allows Arduino to read the input from sensors in the real world in real time and react accordingly by controlling a servo motor or DC motor.
During the programming phase of the project, sometimes I want to test out a new algorism during lunch break or I have some free time to mess around with the data but I do not want to carry the current project around due to its size or its stage of completion. There are many files on Thingiverse for Arduino cases, however, I don’t want to wire an LED or a switch mess when I do some coding so that I can test the new code to see how it would work in the real world.
With that goal in mind, I have designed this Portable Arduino Bot. This robot is small, compact, durable and fully equid with LEDs, switch, buzzer, etc. you can also equip the bot with the sensor that would work with your project. I also want to encourage kids to program and what is a better way to do so by infusing the project with the Star War themes.
I will do my best so that if you have done Arduino project can just follow through with picture. I will also do my best to explain what I have done in words for those want to learn something about Arduino.
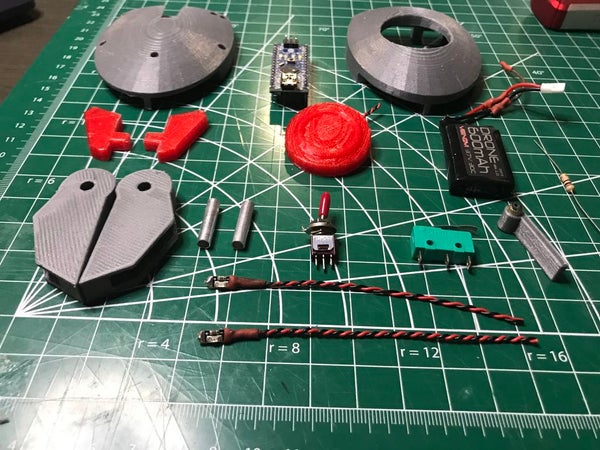
Supplies:
1 Arduino Nano – link
1 600 mAh Venom Battery – link
1 Circuit Specialists Microswitch – link
1 Circuit Specialists On/Off switch – link
1 10K Ohm resistor – link
3 Adafruit LED – link
6 2×4 hex screw – link
Step 1: 3D Printing
All the STL files for this project will be included below, I will also share the setup and the type of material that I used in this project. The usage of different material may not gain the same result shown in the picture.
The Bot housing and the Bot’s legs should be printed with support, however, since the support would only be internal this will keep the Bot look better when it has done.
I use CEL Robox 3D printer to print all parts for this project. All parts are printed with 30% fill, I use CEL PETG HD Glass Designer Gray, CEL PETG HD Glass Transparent Red.
Step 2: Microswitch
Microswitches have been around, however, it got its spotlight recently. Now we can find these microswitches in a 3D printer, robotic projects, vacuum robot, etc. One might argue that you don’t need a switch for such a small project, however, I bet the different. A switch can be used for many purposes, it could be used as a representation for a sensor to test out, or a AI trainer ;D. I will talk about this AI trainer later.
At first, when I read about microswitches, I thought it would operate just like a normal on/off switch, I was wrong the microswitch require a little bit of work and not just a straight up plug and play. If you are new with all of these, do not worry I was new too if I can do it you can do it :).
From my own experience then the confusing part is that the switch has 3 legs, we only use 2, but at the end, we will have 3 wires come out from the switch. However, after many trial and error, I think I got it down and I will make sure it as straight forward as it can be. If you want to know more on how Microswitch work, I found this website to be trusted http://www.me.umn.edu/courses/me2011/arduino/technotes/microswitch/
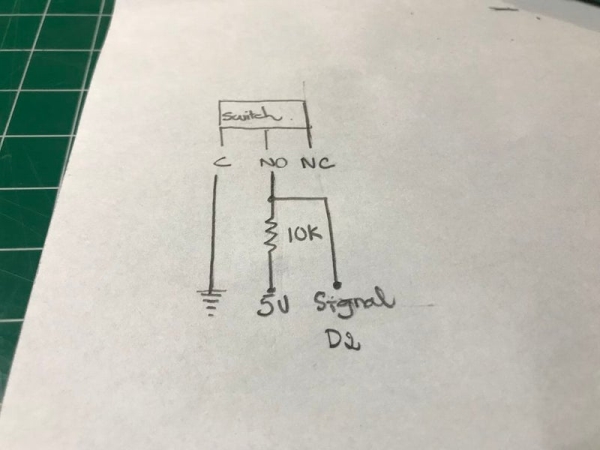
The switch has 3 pins: C, N0, NC. We only use C and N0.
1. C for the ground wire
2. Read note before continuing: N0 will have 1 wire come out from it not 2. I have made this mistake many times and ended up with a bad signal. There is the main wire and a side wire, if you solder these 2 wire at N0, there will be a big chance that your signal will be unreadable or unstable.
3. The main wire will connect N0 to a 10K resistor, then after the 10K resistor will be the power source for the switch.
4. The side wire will be connected to the main wire which between the 10K resistor and N0. This is where we will collect our signal so that why it is important to keep the data line clean.
5. Glue the microswitch in place and make sure give it time to dry completely.
Read more: Portable Arduino Bot