This Instructables show how to create a tailor-made breadboard for dev board.
Step 1: Current Breadboard
Breadboard (solderless breadboards) is a very import component for prototyping of electronics.
It can help you test the circuit before soldering it. Since the connection not require soldering, after the prototyping, all components can be reusable for next projects.
There are various size of breadboard, all of them have similar arrangement. A notch in the middle, 2 groups of terminal strips besides the notch and some breadboard have Bus strips on both side. The pitch of the pins is 0.1 inches (2.54 mm).
The size of the notch is always 2 pins width because this size can just fit for all DIP (Dual in-line package) chips plug in the middle. This is a very good design because most Integrated circuit (IC) have DIP version.
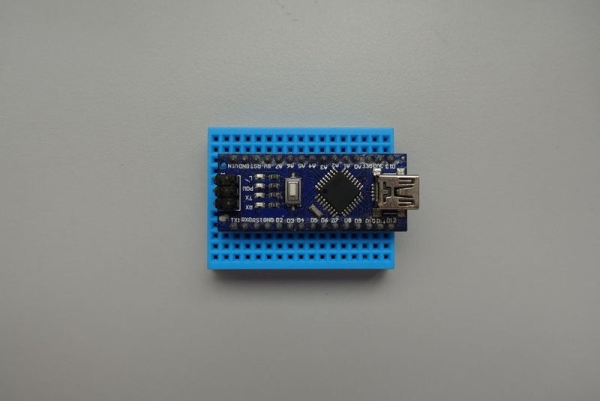
For simplify the development work, there are more and more Integrated circuit board appears in the market, it is called development (dev) board. Dev board help to reduce the connection work for the general common components. E.g. Arduino Nano dev board integrated USB to Serial adaptor, power regulator, Crystal oscillator, essential capacitors and resistors with the ATMega328 chips. It can reduce much of work for the connection by developer.
However, the dev board is much wider than a DIP chip, it reduced the accessible pins for each terminal strips. Arduino family dev board remain 2 or 3 pins for each terminal strips. Most ESP8266 and ESP32 family dev board only remain 1 pin for each terminal strips. At worst case (one of my ESP32 dev board), all pins on one side totally hided under the dev board and the other side only remain 1 pin for each terminal strip.
Current breadboard is not so dev board friendly, so it is the time to make a wider breadboard for dev board.
Ref.:
https://en.wikipedia.org/wiki/Breadboard
https://en.wikipedia.org/wiki/Dual_in-line_package
Step 2: Dev Board Size Research
Before design work, let’s check the pin size (unit in pins) of some common dev board:
- Arduino Nano, 15 x 7
- Arduino Pro Micro, 12 x 7
- Arduino Pro Mini, 12 x 7
- WEMOS D1 Mini, 8 x 10
- WEMOS D1 Mini Pro, 8 x 10
- NodeMCU ESP8266 compatible, 15 x 10
- Widora air, 20 x 7
- ESP32KIT, 19 x 10
- ESP32 DEVKIT, 19 x 11
- WiFi Kit 32, 18 x 10
- ESP8266KIT, 19 x 10
- NodeMCU ESP-32S, 19 x 10
The dev board width is 7-11 pins, so extend the notch to 5 pins width should fit all dev board. And it require at least 19 pairs of terminal strips to fit all dev board.
Step 3: Redesign Notch
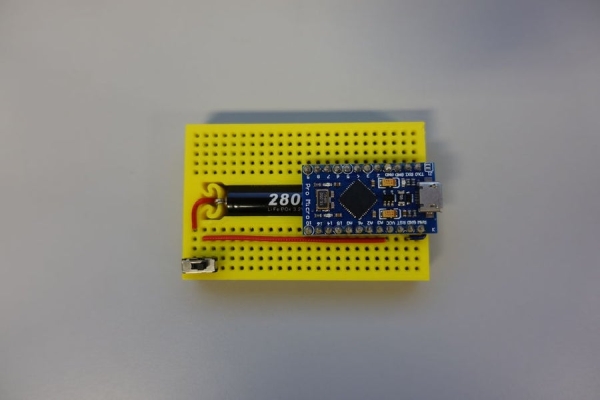
Since the notch become wider, we can place something useful in it. While development, one of the important component is the power source. Especially while unplugged the USB power to make it portable. But there are seldom found breadboard friendly battery holder in the market. Lets try to fit a battery holder in this wider notch.
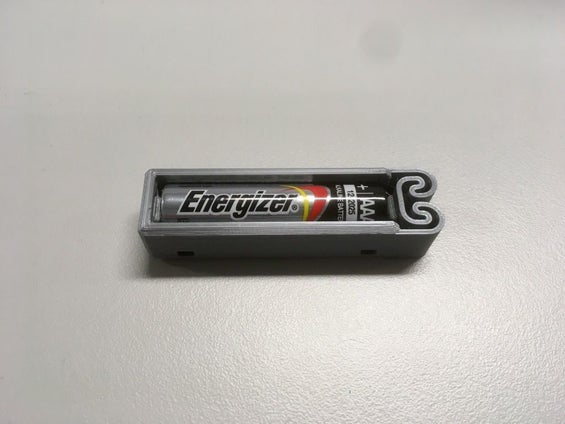
5 pins size can just fit a AAA battery.
- Normal 1.5 V AAA battery cannot direct power most dev board, so this is not an good option.
- Lithium ion battery have AAA size (10440) in the market, you can connect it to a 3.3 V regulator to power 3.3 V dev board. Or you can connect it to a 5 V step-up board to power 5 V dev board.
- Lithium iron phosphate battery (LiFePO4 battery) also have AAA size in the market. The voltage range is 2.5 – 3.65 V, it can direct power ESP8266 and ESP32 or other 3.3 V dev board. Or you can connect it to a 5 V step-up board to power 5 V dev board.
Note: If your project is voltage aware, you can use a 3.3 / 5 V auto step-up step-down module for better regulation of the power source.
Ref.:
https://www.thingiverse.com/thing:456900
https://en.wikipedia.org/wiki/Lithium_iron_phospha…
Step 4: Preparation
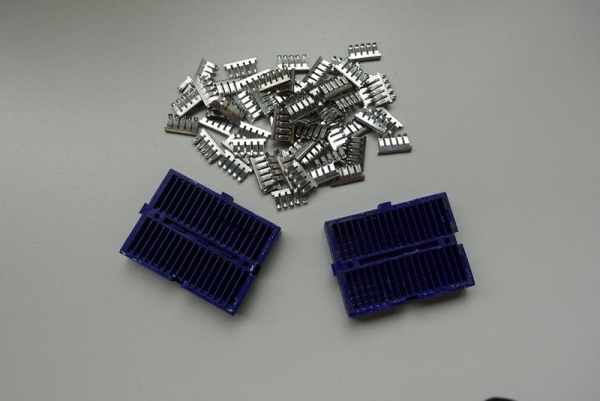
Terminal Strip Metal Plate
I cannot find a way direct buy the metal plate inside the terminal strip, so I simply disassembly some of my old breadboard to get it. If you know how to buy some, please leave it in below comment area.
Breadboard Wire
The best friend of breadboard ;>
Lithium Ion or LiFePO4 Battery
The battery is optional, depends on the probability requirement.
Power Switch
A breadboard friendly power switch is also optional for controlling the battery power supply.
Sponge Adhesive
Sponge adhesive is preferred to seal the metal plate, if you do not have it in hand you may use some masking tape instead.
Read more: Dev Board Breadboard