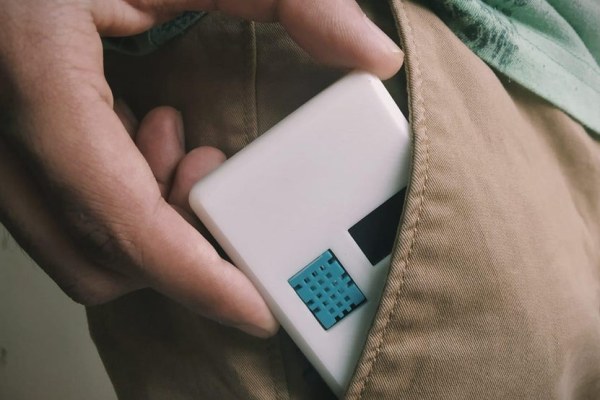
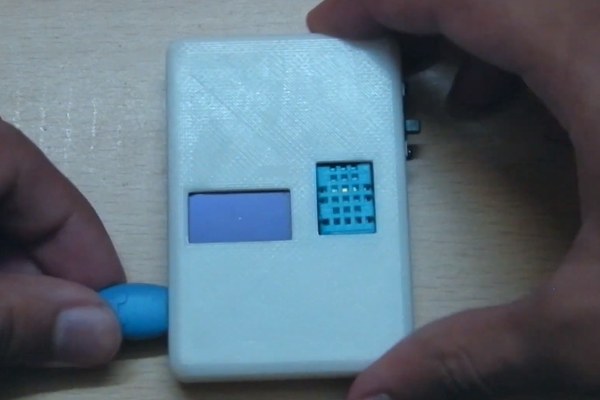
Hi, in this instructable, you will learn to build a pocket weather station using an Arduino Nano board. It will be a compact device that you can carry anywhere around, right in your pocket and will be capable of displaying the live temperature and humidity on the OLED display present on it. This is a great self-care device as you will always know when to take an umbrella out with you, both for the rain and the scorching heat!
You can carry it around as it has an inbuilt rechargeable 160mAh lipo battery. It is a really great project for learning and is also really fun to make. It might come out really handy sometimes.
When we start experimenting with a DHT11 temperature sensor, what we do is take a breadboard and some jumper wires and some kind of a display and start experimenting with some random code. Instead of doing that, I gave the DHT11 module a professional and comfortable home and made a much more realistic project for learning.
Sounds interesting? Let’s dive right in!
Subscribe to my channel for more updates!
Step 1: Gather Components
The first thing to do when beginning with any project is gathering the required components. The required components for this project are as follows:
1.1 Components:
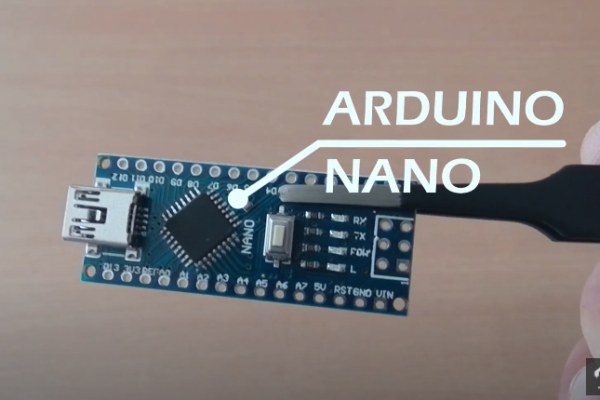
- Arduino Nano with Cable
- DHT11 Temperature Sensor Module
- 0.96″ OLED Display
- TP4056 Battery Charging Module
- Small Battery (I used 160mAh lipo battery)
- Slide Switch
1.2 Tools (according to need / optional):
- Soldering Iron
- Jumper Wires
- Hot Glue Gun
- 3D Printer (for enclosure – highly optional)
I always prefer Quartz Components to buy all kinds of electronic components and tools!
Gather all the required stuff and move ahead to the next step!
Step 2: Stacking Components
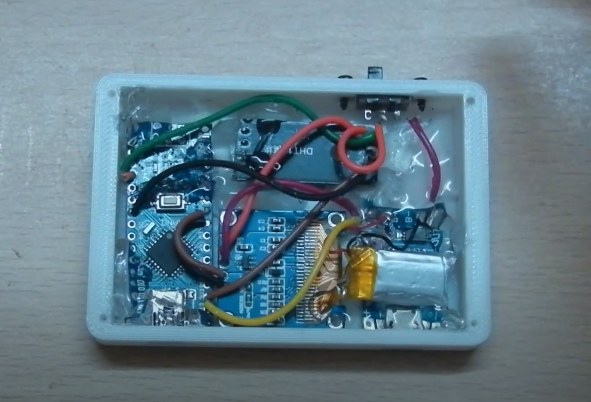
Now we need to plan the position of all the components inside the enclosure. I wanted to keep the device as thin as possible so it is actually convenient to carry in a pocket. Thus I spread all the components out and did not go with a multiple component-layer structure as that would decrease the X and Y dimensions of the device but eventually increase the Z dimension which is nothing but the thickness of the device!
You can refer to the image attached above to check how I have stacked the components inside my pocket weather station or you can also come up with your own unique and creative ideas ? of stacking the components in ways that reduce the size of the device even further!
After you are done planning your preferred arrangement, head straight over to the next step!
Step 3: Schematic
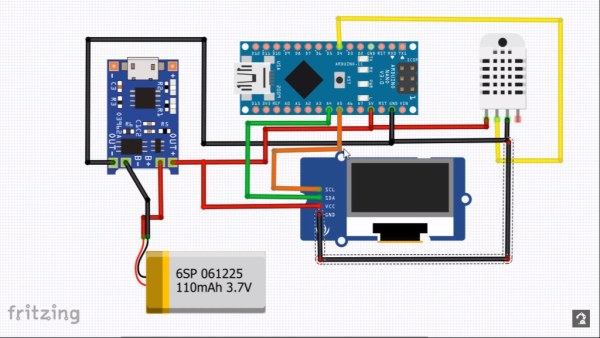
Now we need to draft out a schematic for our pocket weather station. The schematic for this project is very simple as there are very few modules and have to be just connected together without the need for any external modifiers. I have attached the schematic diagram above, as an image. You can refer to it if required.
We need to connect the battery to the battery charging module and the output of the battery charging module to the Arduino Nano board. I have used an Arduino Nano board because of its size which is perfect and preferable for this project!
Next, connect the temperature sensor module and the OLED display to the Arduino board.
After completing the schematic, move ahead to the next step.
Step 4: Soldering / Making Connections
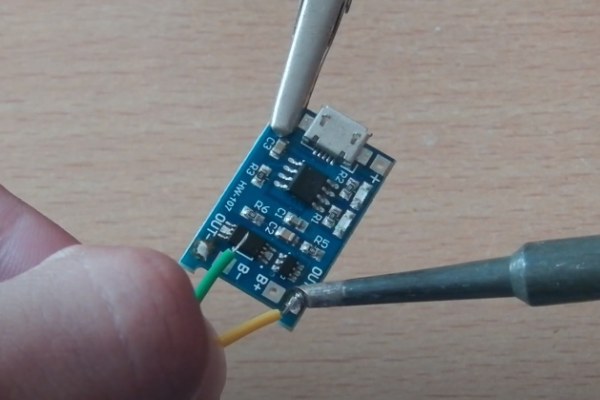
Now, we just need to solder all the components together according to the schematic that we previously drafted. Try keeping the length of the wires cut-to-fit to prevent a mess of wires later on.
Also, try to solder everything accurately to prevent any kind of short circuit. It might be a tedious process but believe me later on it will feel worth the effort.
After you are done with the soldering, just move on to the next step!
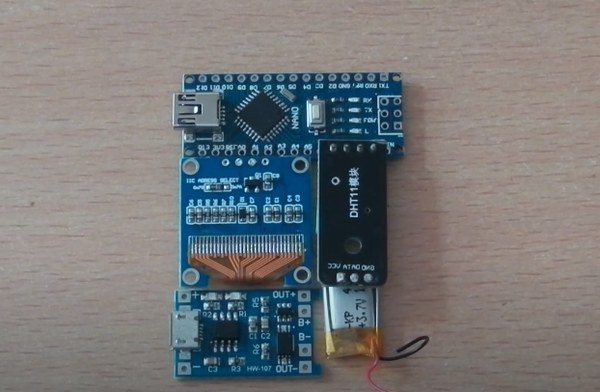
Step 5: After Soldering
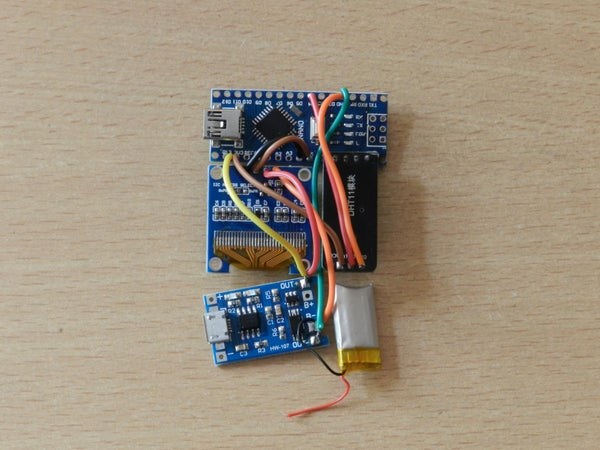
After you are done soldering all the components (excluding the switch), it should look something like the images that I have attached above. Try to keep the length of the wires cut-to-fit so that there is no problem in fitting everything later on.
I am sure we can’t carry this wired mess around like this and so it is pretty clear that we need an enclosure for our pocket weather station to give it that proper professional look. And the best option that we have here is 3D printing.
So, move on to the next step to design the enclosure and print it!
Step 6: Making Enclosure

I went ahead and designed the enclosure for the pocket weather station in Tinkercad which is an amazing CAD software. It supports all skill levels so if you are a beginner at CAD, it shouldn’t be a problem.
I do not have a 3D printer so I went to IAmRapid and uploaded my .stl files to get an instant quote, and ordered the parts right away. The enclosure has a great build quality.
Fortunately, all the cutouts that I had made in the design for different modules and ports, turned out to be 100% perfect. I have attached the 3D files below for you!
Now, let’s move on to placing the whole circuit inside the enclosure and fixing it in place!
Step 7: Placing Circuit in Enclosure
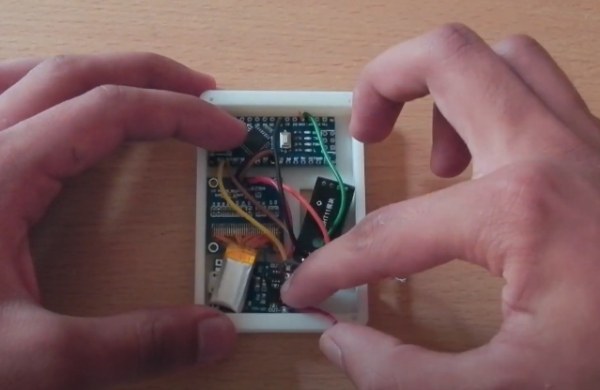
Now, we need to place the whole circuit inside the enclosure that we earlier designed and 3d printed. It is very important the all the ports go in their respective cutouts to give the device the much needed professional look. Also, it is important that all the components are firmly fixed in their place and do not move inside the enclosure to ensure proper and smooth functioning of the device!
I used some hot glue for fixing the circuit in the proper way.
After you are done with this, move on to the next step!
Step 8: Adding the Switch
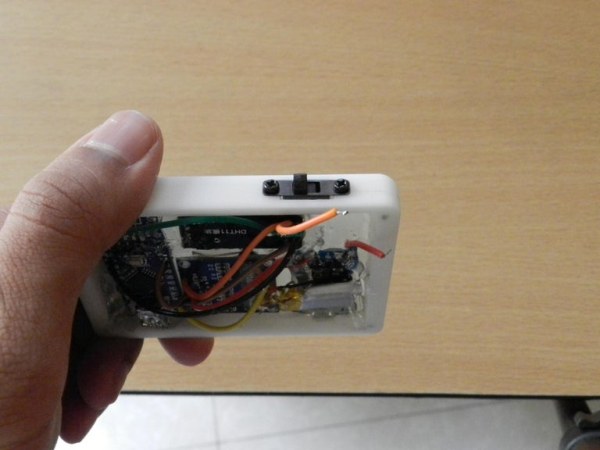
Now after you are done placing the circuit inside the enclosure, it is time to add the slide switch in its dedicated slot. We did not connect the switch previously in the circuit itself because the switch needs to be inserted into the enclosure from the outside.
After inserting the switch into its slot, use two small screws to fix it in place. Then connect the two wires, one from the VCC of the Arduino board and one wire from the positive output of the battery charging module. In this way, we will be able to turn the complete circuit ON when we turn the switch ON.
After finishing the switch work, move on towards closing the enclosure!
Step 9: Closing the Enclosure
Now, we need to close the enclosure. I used some screws to fix the lid of the enclosure in place. I had already made screw holes in the design of the enclosure so there is no problem later on!
Just make sure that the lid is in place so the device even looks professional and is convenient to carry! I have put my logo on the lid design to give it a more aesthetic and customized look ?
After closing the enclosure, move on to coding the weather station!
Step 10: Coding Battle!
Now, we need to do something very important and that is coding our pocket weather station because without the code running in the Arduino which in turn runs everything, our device is just a plastic box with no functionality.
So let’s program our pocket weather station for functionality and maximum efficiency. I have attached the code below for you to make use of. If you wish to, you can also get your hands dirty and write the code down yourself!
After completing the step, move ahead!
Code for Pocket Weather Station:
  ////////////////////////////////////////////////////////
  //                Pocket Weather Station              //
 //              By Aarav Garg - Tech Nuttiez          //
////////////////////////////////////////////////////////

#include <SPI.h>
#include <Wire.h>
#include <Adafruit_GFX.h>
#include <Adafruit_SSD1306.h>
#include <DHT.h>
#include <Adafruit_Sensor.h>
#include <Fonts/FreeSans9pt7b.h>
#include <Fonts/FreeSansBold9pt7b.h>

#define dataPin 4
#define DHTTYPE DHT11
DHT dht(dataPin, DHTTYPE);

#define SCREEN_WIDTH 128 // OLED display width, in pixels
#define SCREEN_HEIGHT 64 // OLED display height, in pixels

#define OLED_RESET 5
Adafruit_SSD1306 display(SCREEN_WIDTH, SCREEN_HEIGHT, &Wire, OLED_RESET);

#define LOGO_HEIGHT   64
#define LOGO_WIDTH    128

//image bitmap data
const unsigned char logo_bmp [] PROGMEM = {
  0x00, 0x00, 0x00, 0x00, 0x00, 0x00, 0x00, 0x01, 0xf0, 0x00, 0x00, 0x00, 0x00, 0x00, 0x00, 0x00,
  0x00, 0x00, 0x00, 0x00, 0x00, 0x00, 0x00, 0x07, 0xfc, 0x00, 0x00, 0x00, 0x00, 0x00, 0x00, 0x00,
  0x00, 0x00, 0x00, 0x00, 0x00, 0x00, 0x00, 0x0f, 0xfe, 0x00, 0x00, 0x00, 0x00, 0x00, 0x00, 0x00,
  0x00, 0x00, 0x00, 0x00, 0x00, 0x00, 0x00, 0x1f, 0xff, 0x00, 0x00, 0x00, 0x00, 0x00, 0x00, 0x00,
  0x00, 0x00, 0x00, 0x00, 0x00, 0x00, 0x00, 0x3f, 0x0f, 0xc0, 0x00, 0x00, 0x00, 0x00, 0x00, 0x00,
  0x00, 0x00, 0x00, 0x00, 0x00, 0x00, 0x00, 0xfe, 0x0f, 0xe0, 0x00, 0x00, 0x00, 0x00, 0x00, 0x00,
  0x00, 0x00, 0x00, 0x00, 0x00, 0x00, 0x01, 0xfe, 0x07, 0xf0, 0x00, 0x00, 0x00, 0x00, 0x00, 0x00,
  0x00, 0x00, 0x00, 0x00, 0x00, 0x00, 0x03, 0xfe, 0x07, 0xf8, 0x00, 0x00, 0x00, 0x00, 0x00, 0x00,
  0x00, 0x00, 0x00, 0x00, 0x00, 0x00, 0x07, 0xfe, 0x0f, 0xfe, 0x00, 0x00, 0x00, 0x00, 0x00, 0x00,
  0x00, 0x00, 0x00, 0x00, 0x00, 0x00, 0x1f, 0xff, 0x1f, 0xff, 0x00, 0x00, 0x00, 0x00, 0x00, 0x00,
  0x00, 0x00, 0x00, 0x00, 0x00, 0x00, 0x3f, 0xff, 0xff, 0xff, 0x80, 0x00, 0x00, 0x00, 0x00, 0x00,
  0x00, 0x00, 0x00, 0x00, 0x00, 0x00, 0x7f, 0xff, 0xff, 0xff, 0xc0, 0x00, 0x00, 0x00, 0x00, 0x00,
  0x00, 0x00, 0x00, 0x00, 0x00, 0x00, 0xff, 0xff, 0xff, 0xff, 0xe0, 0x00, 0x00, 0x00, 0x00, 0x00,
  0x00, 0x00, 0x00, 0x00, 0x00, 0x03, 0xff, 0xfd, 0xff, 0xff, 0xf8, 0x00, 0x00, 0x00, 0x00, 0x00,
  0x00, 0x00, 0x00, 0x00, 0x00, 0x07, 0xff, 0xf0, 0xff, 0xff, 0xfc, 0x00, 0x00, 0x00, 0x00, 0x00,
  0x00, 0x00, 0x00, 0x00, 0x00, 0x0f, 0xff, 0xc0, 0x7f, 0xff, 0xfe, 0x00, 0x00, 0x00, 0x00, 0x00,
  0x00, 0x00, 0x00, 0x00, 0x00, 0x3f, 0xff, 0x80, 0x1f, 0xff, 0xff, 0x00, 0x00, 0x00, 0x00, 0x00,
  0x00, 0x00, 0x00, 0x00, 0x00, 0x7f, 0xfe, 0x00, 0x0f, 0xff, 0xff, 0x80, 0x00, 0x00, 0x00, 0x00,
  0x00, 0x00, 0x00, 0x00, 0x00, 0xff, 0xf8, 0x00, 0x07, 0xff, 0xff, 0xc0, 0x00, 0x00, 0x00, 0x00,
  0x00, 0x00, 0x00, 0x00, 0x01, 0xff, 0xf0, 0x00, 0x03, 0xff, 0xc3, 0xc0, 0x00, 0x00, 0x00, 0x00,
  0x00, 0x00, 0x00, 0x00, 0x03, 0xff, 0xc0, 0x00, 0x01, 0xff, 0x81, 0xe0, 0x00, 0x00, 0x00, 0x00,
  0x00, 0x00, 0x00, 0x00, 0x03, 0xff, 0x80, 0x00, 0x00, 0x7f, 0x81, 0xe0, 0x00, 0x00, 0x00, 0x00,
  0x00, 0x00, 0x00, 0x00, 0x07, 0xff, 0x80, 0x00, 0x00, 0x3f, 0x81, 0xe0, 0x00, 0x00, 0x00, 0x00,
  0x00, 0x00, 0x00, 0x00, 0x07, 0xff, 0x80, 0x00, 0x00, 0x1f, 0x83, 0xc0, 0x00, 0x00, 0x00, 0x00,
  0x00, 0x00, 0x00, 0x00, 0x07, 0xff, 0x80, 0x00, 0x00, 0x1f, 0xc7, 0xc0, 0x00, 0x00, 0x00, 0x00,
  0x00, 0x00, 0x00, 0x00, 0x07, 0xff, 0x80, 0x00, 0x00, 0x1f, 0xff, 0xc0, 0x00, 0x00, 0x00, 0x00,
  0x00, 0x00, 0x00, 0x00, 0x07, 0xff, 0x80, 0x00, 0x00, 0x1f, 0xff, 0x80, 0x00, 0x00, 0x00, 0x00,
  0x00, 0x00, 0x00, 0x00, 0x07, 0xff, 0x80, 0x00, 0x00, 0x3f, 0xff, 0x80, 0x00, 0x00, 0x00, 0x00,
  0x00, 0x00, 0x00, 0x00, 0x07, 0xff, 0x80, 0x00, 0x00, 0x3f, 0xff, 0x80, 0x00, 0x00, 0x00, 0x00,
  0x00, 0x00, 0x00, 0x00, 0x07, 0xff, 0x80, 0x00, 0x00, 0x3f, 0xff, 0x00, 0x00, 0x00, 0x00, 0x00,
  0x00, 0x00, 0x00, 0x00, 0x07, 0xff, 0x80, 0x00, 0x00, 0x7f, 0xff, 0x00, 0x00, 0x00, 0x00, 0x00,
  0x00, 0x00, 0x00, 0x00, 0x07, 0xff, 0x80, 0x00, 0x00, 0x7f, 0xff, 0x00, 0x00, 0x00, 0x00, 0x00,
  0x00, 0x00, 0x00, 0x00, 0x03, 0xff, 0x00, 0x00, 0x00, 0x7f, 0xfe, 0x00, 0x00, 0x00, 0x00, 0x00,
  0x00, 0x00, 0x00, 0x00, 0x00, 0x78, 0x00, 0x00, 0x00, 0xff, 0xfe, 0x00, 0x00, 0x00, 0x00, 0x00,
  0x00, 0x00, 0x00, 0x00, 0x00, 0x78, 0x00, 0x00, 0x00, 0xff, 0xfc, 0x00, 0x00, 0x00, 0x00, 0x00,
  0x00, 0x00, 0x00, 0x00, 0x00, 0x78, 0x00, 0x00, 0x01, 0xff, 0xfc, 0x00, 0x00, 0x00, 0x00, 0x00,
  0x00, 0x00, 0x00, 0x00, 0x00, 0x00, 0x00, 0x00, 0x00, 0xff, 0xfc, 0x00, 0x00, 0x00, 0x00, 0x00,
  0x00, 0x00, 0x00, 0x00, 0x00, 0x00, 0x00, 0x00, 0x00, 0x03, 0xf8, 0x00, 0x00, 0x00, 0x00, 0x00,
  0x00, 0x00, 0x00, 0x00, 0x00, 0x00, 0x00, 0x00, 0x00, 0x00, 0xf8, 0x00, 0x00, 0x00, 0x00, 0x00,
  0x00, 0x00, 0x00, 0x00, 0x00, 0x00, 0x00, 0x00, 0x00, 0x00, 0x38, 0x00, 0x00, 0x00, 0x00, 0x00,
  0x00, 0x00, 0x00, 0x00, 0x00, 0x00, 0x00, 0x00, 0x07, 0xc0, 0x10, 0x00, 0x00, 0x00, 0x00, 0x00,
  0x00, 0x00, 0x00, 0x00, 0x00, 0x00, 0x00, 0x00, 0x3f, 0xfc, 0x00, 0x00, 0x00, 0x00, 0x00, 0x00,
  0x00, 0x00, 0x00, 0x00, 0x00, 0x00, 0x00, 0x00, 0xff, 0xff, 0x00, 0x00, 0x00, 0x00, 0x00, 0x00,
  0x00, 0x00, 0x00, 0x00, 0x00, 0x00, 0x00, 0x01, 0xff, 0xff, 0x80, 0x00, 0x00, 0x00, 0x00, 0x00,
  0x00, 0x00, 0x00, 0x00, 0x00, 0x00, 0x00, 0x03, 0xff, 0xff, 0xc0, 0x00, 0x00, 0x00, 0x00, 0x00,
  0x00, 0x00, 0x00, 0x00, 0x00, 0x00, 0x00, 0x07, 0xff, 0xff, 0xe0, 0x00, 0x00, 0x00, 0x00, 0x00,
  0x00, 0x00, 0x00, 0x00, 0x00, 0x00, 0x00, 0x0f, 0xff, 0xff, 0xf0, 0x00, 0x00, 0x00, 0x00, 0x00,
  0x00, 0x00, 0x00, 0x00, 0x00, 0x00, 0x00, 0x1f, 0xff, 0xff, 0xf0, 0x00, 0x00, 0x00, 0x00, 0x00,
  0x00, 0x00, 0x00, 0x00, 0x00, 0x00, 0x00, 0x1f, 0xff, 0xff, 0xf8, 0x00, 0x00, 0x00, 0x00, 0x00,
  0x00, 0x00, 0x00, 0x00, 0x00, 0x00, 0x00, 0x3f, 0xff, 0xff, 0xf8, 0x00, 0x00, 0x00, 0x00, 0x00,
  0x00, 0x00, 0x00, 0x00, 0x00, 0x00, 0x00, 0x3f, 0xfc, 0x3f, 0xfc, 0x00, 0x00, 0x00, 0x00, 0x00,
  0x00, 0x00, 0x00, 0x00, 0x00, 0x00, 0x00, 0x3f, 0xf8, 0x3f, 0xfc, 0x00, 0x00, 0x00, 0x00, 0x00,
  0x00, 0x00, 0x00, 0x00, 0x00, 0x00, 0x00, 0x3f, 0xf8, 0x3f, 0xfc, 0x00, 0x00, 0x00, 0x00, 0x00,
  0x00, 0x00, 0x00, 0x00, 0x00, 0x00, 0x00, 0x3f, 0xfc, 0x3f, 0xfc, 0x00, 0x00, 0x00, 0x00, 0x00,
  0x00, 0x00, 0x00, 0x00, 0x00, 0x00, 0x00, 0x7f, 0xfe, 0x7f, 0xfc, 0x00, 0x00, 0x00, 0x00, 0x00,
  0x00, 0x00, 0x00, 0x00, 0x00, 0x00, 0x00, 0x7f, 0xff, 0xff, 0xfc, 0x00, 0x00, 0x00, 0x00, 0x00,
  0x00, 0x00, 0x00, 0x00, 0x00, 0x00, 0x00, 0x7f, 0xff, 0xff, 0xfc, 0x00, 0x00, 0x00, 0x00, 0x00,
  0x00, 0x00, 0x00, 0x00, 0x00, 0x00, 0x00, 0x7f, 0xff, 0xff, 0xfc, 0x00, 0x00, 0x00, 0x00, 0x00,
  0x00, 0x00, 0x00, 0x00, 0x00, 0x00, 0x00, 0x7f, 0xff, 0xff, 0xfc, 0x00, 0x00, 0x00, 0x00, 0x00,
  0x00, 0x00, 0x00, 0x00, 0x00, 0x00, 0x00, 0x7f, 0xff, 0xff, 0xfc, 0x00, 0x00, 0x00, 0x00, 0x00,
  0x00, 0x00, 0x00, 0x00, 0x00, 0x03, 0xff, 0xff, 0xff, 0xff, 0xff, 0xc0, 0x00, 0x00, 0x00, 0x00,
  0x00, 0x00, 0x00, 0x00, 0x00, 0x03, 0xff, 0xff, 0xff, 0xff, 0xff, 0xc0, 0x00, 0x00, 0x00, 0x00,
  0x00, 0x00, 0x00, 0x00, 0x00, 0x03, 0xff, 0xff, 0xff, 0xff, 0xff, 0xc0, 0x00, 0x00, 0x00, 0x00,
  0x00, 0x00, 0x00, 0x00, 0x00, 0x03, 0xff, 0xff, 0xff, 0xff, 0xff, 0xc0, 0x00, 0x00, 0x00, 0x00
};

void setup() {
  Serial.begin(9600);
  dht.begin();

  // SSD1306_SWITCHCAPVCC = generate display voltage from 3.3V internally
  if(!display.begin(SSD1306_SWITCHCAPVCC, 0x3C)) { // Address 0x3D for 128x64
    Serial.println(F("SSD1306 allocation failed"));
    for(;;); // Don't proceed, loop forever
  }

  testdrawbitmap();    // Draw the required image
  delay(1000);
}

void loop() {
  float h = dht.readHumidity();                    // read humidity
  float t = dht.readTemperature();                 // read temperature
  float hic = dht.computeHeatIndex(t, h, false);   // compute head index for temp in °C

  // Printing the results on the serial monitor
  Serial.print("Temperature = ");
  Serial.print(t);
  Serial.print(" *C ");
  Serial.print("    Humidity = ");
  Serial.print(h);
  Serial.println(" % ");

  display.clearDisplay();
  display.setTextSize(1);             // Draw 2X-scale text
  display.setTextColor(WHITE);
  display.setFont(&FreeSansBold9pt7b);
  display.setCursor(0,13);
  display.print(F("Temp: "));
  display.setFont(&FreeSans9pt7b);
  display.drawCircle(105, 2, 2, WHITE);
  display.print(t);
  display.println(F(" C"));
  display.setFont(&FreeSansBold9pt7b);
  display.print(F("Humid: "));
  display.setFont(&FreeSans9pt7b);
  display.print(h);
  display.println(F("%"));
  display.setFont(&FreeSansBold9pt7b);
  display.print(F("Feels: "));
  display.setFont(&FreeSans9pt7b);
  display.print(hic);
  display.println(F(" C"));
  display.drawCircle(103, 45, 2, WHITE);
  display.display();

  delay(2000); // Delays 2 secods, as the DHT22 sampling rate is 0.5Hz
}

void testdrawbitmap(void) {
  display.clearDisplay();

  display.drawBitmap(
    (display.width()  - LOGO_WIDTH ) / 2,
    (display.height() - LOGO_HEIGHT) / 2,
    logo_bmp, LOGO_WIDTH, LOGO_HEIGHT, 1);
  display.display();
  delay(1000);
}
Source: Pocket Weather Station – Your Weather Assistant on the Go