Naruto is a Japanese manga series written and illustrated by Masashi Kishimoto.It tells the story of Naruto Uzumaki, a young ninja who seeks recognition from his peers and dreams of becoming the Hokage, the leader of his village. One of the most important parts in Naruto are the hand signs or seals. Hand signs are used to perform many ninjutsu, genjutsu, and other secret arts. They are designed to aid people in properly summoning and moulding chakra necessary to perform a technique. By using these signs in a particular order, they can perform various jutsus and techniques. There are different sequences of hand seals for every technique, requiring memorisation. There are 12 basic hand signs and this each named after an animal of the Chinese Astrology.
This project was inspired from Naruto Manga/Anime and I wanted to unlock my safe using naruto hand signs. If the sequence of hand signs was correct, it unlocked solenoid door lock.
Step 1: Hardware and Materials Required
Parts Required For Transmitter :
Arduino Nano
9 V battery
9 V Clip Connector
Switch
Jumper wires
Cardboard
Mini Breadboard
MPU 6050
Flex sensor
10k ohm
resistor
T-Side Double Sided Tape
NRF24L01+ 2.4GHz Wireless RF Transceiver Module
Glove
Zip ties
wristband
Parts Required For Receiver :
9 V battery
9 V Clip Connector
Jumper wires
Arduino Uno + USB Cable
Switch
Male DC Barrel Jack Adapter for Arduino
Female DC Barrel Jack Adapter for Arduino
100 Ohm Resistor
LedNRF24L01+ 2.4GHz Wireless RF Transceiver Module
12 V Solenoid Lock
Ribbon Wires
Tools :
Hot Glue Gun
Soldering Iron Kit
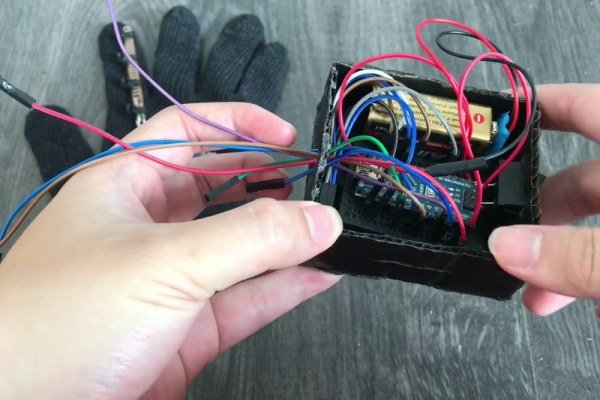
Step 2: Wiring the Transmitter (Glove)
This transmitter section is main part of this project. It consists Arduino nano, 9 V battery, MPU 6050, Flex sensor, and NRF24L01+ 2.4GHz Wireless RF Transceiver Module. The Microcontroller used for the transmitter was arduino nano.The arduino nano will collect all information from sensing unit(Flex sensor and MPU6050) and send a signal to the receiving circuit through the NRF24L01. The 9v battery was used to power arduino nano. Just use the Vin and Ground pin, and you’re ready to go. A regulator exists on the Arduino board to reduce the 9V supply to a steady 5V. Even though most boards are rated for 7-12V, I would not recommend going over 9V, as it can overheat the board.
The MPU6050 consists of a 3-axis Accelerometer and 3-axis Gyroscope inside it. This sensor helps us to measure acceleration, velocity, orientation, displacement and many other motion related parameter of a system or object. This chip uses I2C (inter-integrated circuit) protocol for communication.
A flex sensor is basically a variable resistor that varies in resistance upon bending. Since the resistance is directly proportional to the amount of bending, it is often called a Flexible Potentiometer. We can measure that change using one of the Arduino’s analog pins. But to do that we need a fixed resistor (not changing) that we can use for that comparison (We are using a 10K resistor). This is called a voltage divider and divides the 5v between the flex sensor and the resistor.
NRF24L01 2.4 GHz transceiver module uses the 2.4 GHz band and it can operate with baud rates from 250 kbps up to 2 Mbps and it can be used for wireless communications at up to 100 meters.The operating voltage of the module is from 1.9 to 3.6V, but the good thing is that the other pins tolerate 5V logic.
Step 3: Transmitter Code (Glove)
The MPU6050 consists of a 3-axis Accelerometer and 3-axis Gyroscope inside it.This combination of gyroscopes and accelerometers is commonly referred to as an Inertial Measurement Unit or IMU. This sensor can detect angle changes. The angle readings from an IMU carry much noise. An IMU presents occasionally values that are incoherent and vary unreasonably to one another. To get proper values, clear values, a filter is needed.
To program the arduino nano you will need kalam filter library and RF24 library installed. So download the files below :
Kalman Filter : https://github.com/TKJElectronics/KalmanFilter
RF24 library : https://github.com/TKJElectronics/KalmanFilter
After downloading the files, open arduino IDE. Go to Sketch -> Include Library -> Add.ZIP Library and import ‘.zip’ into there.Next you’ll have to connect the arduino nano and upload ‘Glove_Transmitter.ino’ to the board.
Step 4: Making the Enclosure
After I connected the components and uploaded the code to the board then I inserted the components except flex sensor and MPU 6050 into the enclosure from cardboard and sealed it completely using hotglue. After that, I mounted the enclosure to the wristband using double tape. For MPU 6050, I mounted it to the glove using double tape and for flex sensor I attached via zip ties to the glove.
Step 5: Wiring the Receiver (The Safe)
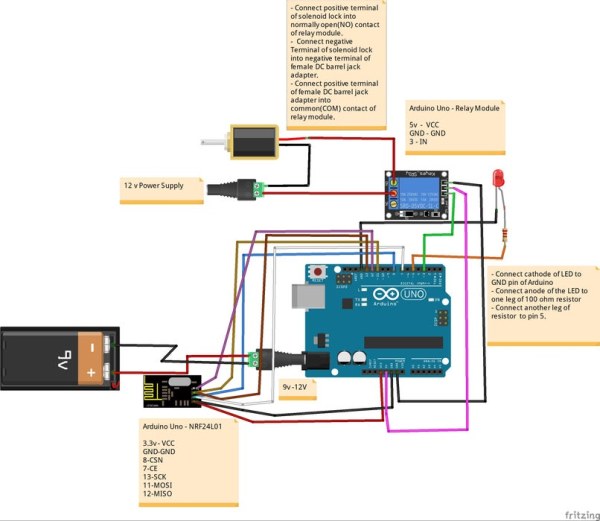
This Section consists Arduino uno, 9 V battery, relay module, solenoid door lock, LED, and NRF24L01+ 2.4GHz Wireless RF Transceiver Module. In this project I used Arduino uno to control the solenoid door lock. Solenoid door lock is electromagnetic lock, it is made of a big coil of copper wire with an armature (a slug of metal) in the middle. When the coil is energized, the slug is pulled into the center of the coil. Making this solenoid able to pull from one end.
The solenoid door lock requires higher current than the arduino can provide, To drive the solenoid door lock you would need a power source that can give 12V, 500mA and the relay module will be driving it. A relay mdule is an electromagnetic switch operated by a relatively small current that can control much larger current like solenoid door lock.
Step 6: Receiver Code (The Safe)
You just connect the Arduino Uno to the PC with USB cable and upload ‘The Safe_Receiver.ino’ to the Arduino. Remember to change the ‘board’ and ‘port’ settings also.
Step 7: Hand Signs
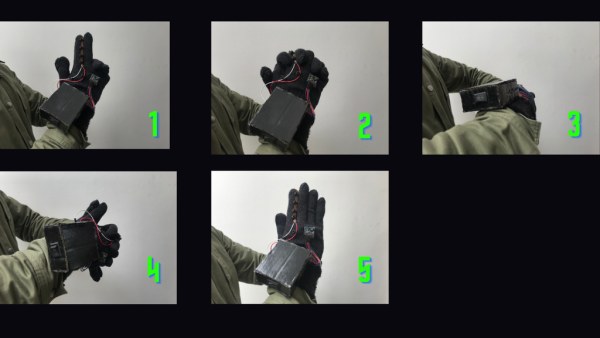
This project used Edo tensei or Reincarnation technique to unlock the safe. In Naruto manga/anime, this technique use a living person as a vessel, a deceased person’s soul can be called back to the world of the living and bound to it.
The sequence of hand signs for this technique is Tiger – Snake – Dog – Dragon – Hand Clap.
Tiger Sign
The first sign is clasping your hands together and intertwine your fingers. From there, just raise your left and right index and ring fingers then keep them together.
Snake Sign
All you have to do is stick your open hands together upright and then intertwine your fingers
Dog Sign
This project I placed my right open palm atop my left fist but in the manga It involves placing left open palm atop right fist. The reason why this project and the manga are different because I forgot.
Dragon Sign
It’s quite difficult for a normal human to perform the hand sign since it requires you stacking four of your half-closed fingers alternately with both of your pinkies sticking out at the bottom and touching at the tips.
Hand Clap
The last sign is just clapping your hand.
This project will make proper for every hand sign, if you use flex sensor on each finger. Thank you for your support. I hope you learn something new.
Source: Using Ninjutsu Hand Signs (Naruto) to Unlock a Safe