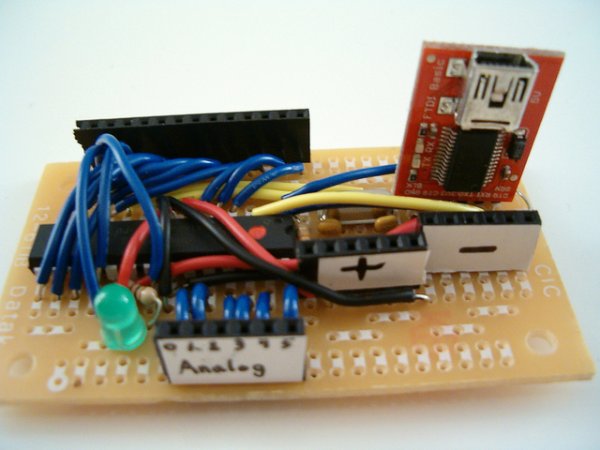
This how-to takes you through all the steps of making your own arduino on a perfboard or perfduino! Arduino microcontrollers are great for learning about physical computing and are very useful for rapid prototyping. Arduino’s simple programming language makes it a favorite of hobbyists and diy-ers around the world. Because arduino boards range in price from 30 to 70 dollars, it can be very cost effective to make your own. This lets you customize the layout of the board and brings down the cost so you can embed your perfduino in a final iteration project without losing your precious professionally made arduino board you had to wait so long for by the mailbox. The perfduino in this tutorial is designed to closely mimic the original arduino functionality without any specific project layout in mind.
Check out the supply section of our Knowledge page for component suppliers.\
Step 2: Breadboard Your Circuit First!
As with every electronics project you undertake, you should test your circuit on a breadboard before soldering anything. Desoldering components is a slow and painful process that is to be avoided whenever possible. For the breadboard circuit you will need the breadboard, the Atmega 328 chip, the 10k resistor, the green LED, the LED resistor (I used a 100 ohm resistor here), some bits of wire, and the ftdi breakout board (you can also use an official arduino board’s ftdi chip if you remove the atmega chip from the official arduino board first).
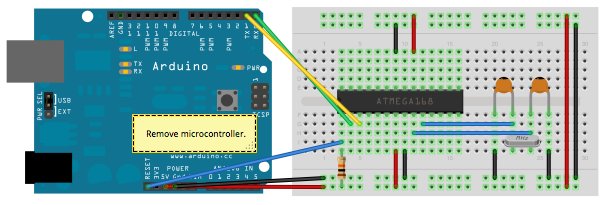
Connect up the atmega chip on the breadboard as shown in the schematic below. The gray component is the 16 MHz crystal. The two orange components are the 22pF capacitors. The striped component is the 10K resistor. Make sure you connect the 10K resistor to the power rail and not to the ground rail. In this image from the arduino website, an arduino board (WITH THE ATMEGA CHIP REMOVED!) is used as the ftdi interface. The ftdi breakout board acts in the same manner. Connect the power and ground from the breakout board to the power and ground rails running along the side of the breadboard. If you are using an arduino without the chip, connect RX and TX as shown in the picture. If you are using the breakout board, connect RX to the third pin (where the yellow wire connects in the picture) and TX to the second pin (where the green wire connects in the picture) of the atmega chip. Connect the DTR pin on the breakout board to an empty column on the breadboard. Then connect that column to the reset pin on the chip ( the same pin the 10k resistor is connected to) with the .47uF capacitor. If using the arduino board, instead connect the reset pin on the arduino board to the reset pin on the chip. No capacitor is necessary here. (note: this wire is not shown in the image below for some reason, but it it very necessary!)
Materials!
These are the materials you will need to make your perfduino:
1. perfboard
2. green LED
3. 100 – 500 ohm resistor
4. Atmega 328 with arduino bootloader preloaded onto the chip
5. 22 gauge solid core wire
6. ftdi serial to usb break out board
7. 16 MHz crystal
8. (2) 22 pF (that’s picofarad not microfarad) capacitors
9. .47 uF capacitor
10. 10k resistor
11. female pin headers
12. male pin headers
13. also, breadboards never hurt
For more detail: Perfduino: Build Your Own Arduino Microcontroller