Summary of PasswordPump Passwords Manager
The PasswordPump is a USB-based credential manager storing up to 254 accounts on two removable EEPROM chips with AES-128 encryption. It requires a master password for access, supports backup to a secondary chip or external file, and features automatic logout and random password generation. The device uses an Arduino Pro Micro, OLED display, rotary encoder, and RGB LED, operating without cloud storage for maximum security.
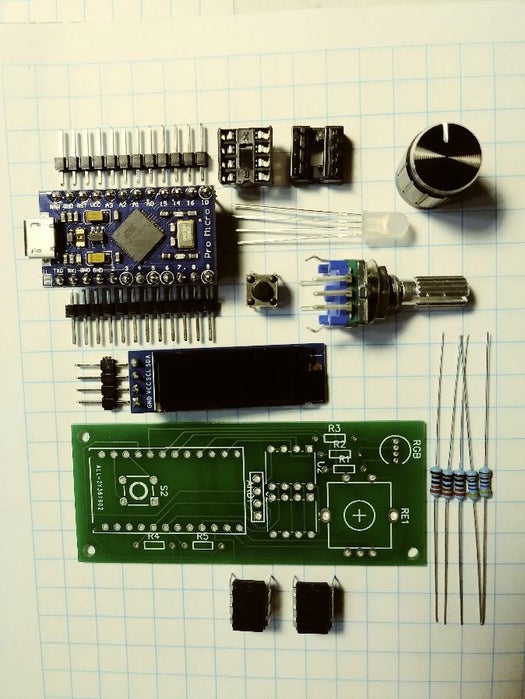
Parts used in the PasswordPump:
- Arduino Pro Micro
- RGB LED
- Resistors (4.7k and 220 ohm)
- Custom PCB
- Rotary Encoder
- Knob
- OLED 128x32 Display
- Momentary Push Button
- 25LC256 External EEPROM Chips
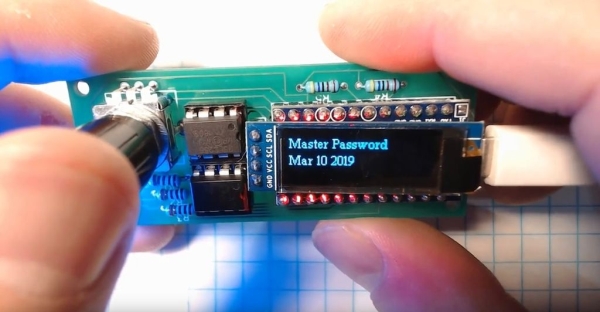
This is v1.0 of the PasswordPump, a USB device that manages credentials for up to 254 accounts. Credentials (account names, usernames and passwords) are stored ONLY on the device itself, on two removable EEprom chips using military grade encryption (AES-128). They are not stored in the cloud or in a file on your computer where they are more exposed to hackers. Credentials are backed up on the device itself; i.e. encrypted credentials are moved from the primary EEprom chip to the backup EEprom on demand. You may remove the EEprom chips from the device (perhaps to keep a third or fourth backup). Credentials are entered either via the rotary encoder (on the left) or via keyboard and serial terminal. The device itself is approximately 1 1/8 x 2 3/4 inches, or 29 x 71 millimeters. Currently it’s not housed inside of a case, but it should be and will be once design of the case is complete. A preliminary case design is available here (bottom) and here (top). Once my 3D printer arrives and I assemble it I’ll be perfecting the case design.
Features
- Store up to 254 sets of credentials on a single 25LC256 EEprom chip.
- Credentials are stored in alphabetical order for easy location. Up to 10 failed attempts to enter the master password are allowed, then an automatic chip wipe and factory reset occurs.
- All credentials are encrypted with AES128, the master password is hashed with SHA256.
- All encrypted accounts and the hashed master password are salted.
- The device is not vulnerable to standard password attacks.
- Backups on external EEprom are encrypted.
- All credentials can be dumped into a text file for an additional backup (e.g. to a thumb drive that’s stored in a safe or safe deposit box, and encrypted).
- Entry of credentials is supported via keyboard and serial terminal or rotary encoder.
- Only one master password, up to 14 characters long, is required to access all of your credentials.
- Automatic logout after 1 hour of inactivity.
- Optional password generation, 31 characters of random letters, symbols and numbers, for extremely strong passwords.
- Configure the display of passwords on the device to be on or off.
Step 1: Understanding Existing Techniques, Projects and Products
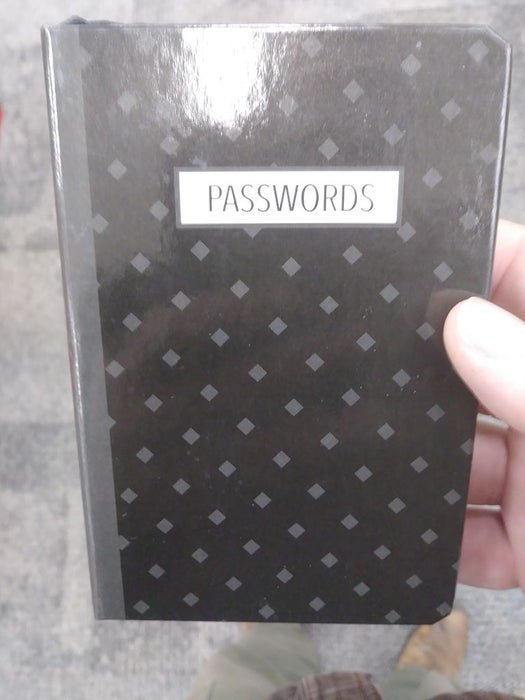
I believe that many people still use the technique depicted above for remembering their passwords, i.e. they store them in a notebook or on a Post-It note. This is dangerous for two reasons. Obviously, if someone steals your notebook full of passwords it’s game over. The PasswordPump encrypts your passwords and requires the entry of a master password to gain access to all of the other passwords; so if somebody steals it, they still can’t get at your passwords. Secondly, people don’t always select passwords that are really difficult to guess or even brute force crack with a dictionary attack. One of the best features of the password pump is that it allows you to generate, and it remembers, 31 character passwords that are a random mix of ASCII characters, numbers and symbols.
I think the commercial product that most closely matches with the feature set of the PasswordPump is the Mooltipass Mini Offline Password Keeper; $79.00 before shipping costs at the time of this writing. Mooltipass is different in some significant ways and seems like a nice, mature, open source product that is also built on the ATMega32u4. I have also just recently become aware of an open source password keeper, Memtype, which claims to be “an elegant solution to have your credentials stored everywhere”. It looks really cool, and one of the coolest things about it is that it’s built on the ATTiny! Finally there is another similar project on this site, The Password Keeper on Arduino Pro Micro, that is an excellent example and even provides a way by which to edit the credentials via a program on your PC. Mooltipass, Memtype or The Password Keeper were not the inspiration for this project, however. The inspiration for this project was the Automated Password Typer. Credentials are hard coded into the Automated Password Typer, however, and there’s no way to add new, remove old, or edit existing credentials (aside from modifying the source code, recompiling and re-flashing); and lock bits are not set to protect the credentials. I set out to expand on the idea presented in that project and, 2,000 lines of code later, landed here with the PasswordPump.
Step 2: Acquire Parts
Quantity Description Cost
– 1 Arduino Pro Micro $2.87
– 1 RGB LED 0.02
– 2 Resistors 4.7k ~0.03
– 3 Resistors 220 ~0.04
– 1 Custom PCB 1.10
– 1 Rotary Encoder 0.42
– 1 Knob 0.15
– 1 OLED 128×32 1.64
– 1 Momentary push button 0.01
– 2 25LC256 External EEprom 1.89
*Total Cost of Parts: $8.17
*Remember that you’ll need a micro USB to USB cable and a breadboard
Step 3: Make Hardware Connections
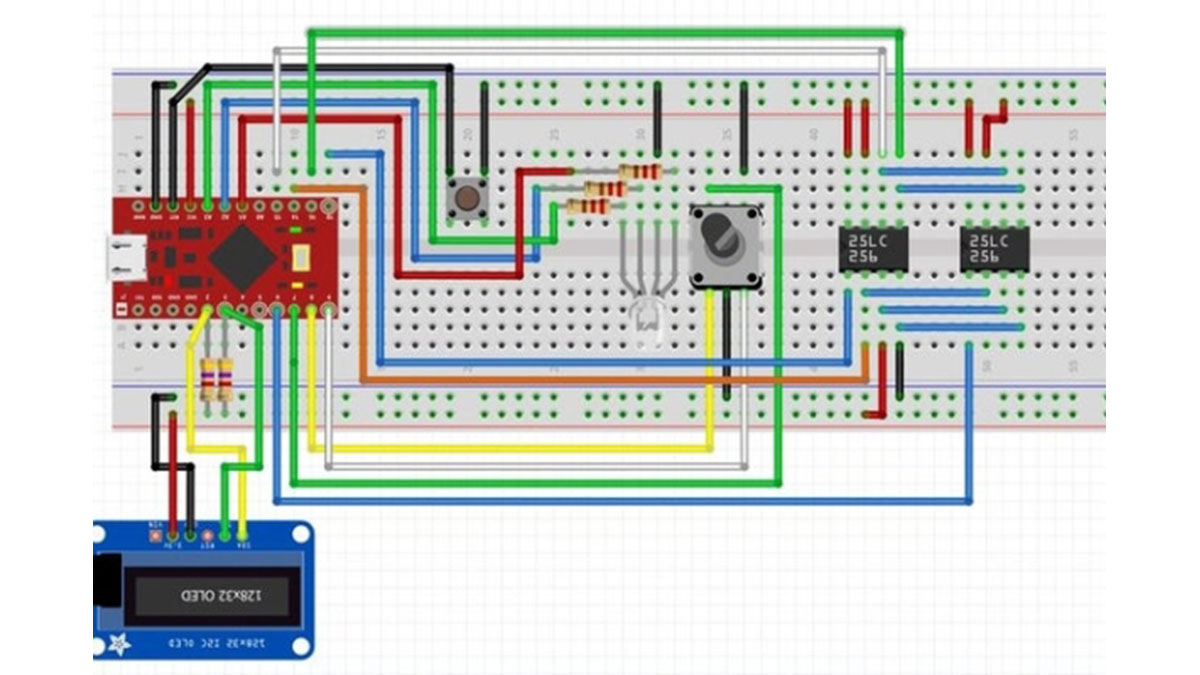
The Fritzing diagram is available here. These tables are also available here, where I was able to better format them, which might be more helpful.
Arduino Pro Micro (w/ ATMega32u4 microcontroller)
Data Sheet
Arduino Pro Micro
Pin Number., Name, Arduino, AVR, – Connect To / Notes
- TX D1 PD3 – unconnected
- RX D0 PD2- unconnected
- GND- unconnected
- GND- unconnected
- SDA D2 PD1 – SSD1306 SDA, 4.7k pullup
- SCL D3 PD0 – SSD1306 SCL, 4.7k pullup
- A6 D4 PD4 – unconnected
- D5 PC6 – unconnected
- A7 D6 PD7 – pin 1 backup chip select for 25LC256
- D7 PE6 – rotary button
- A8 D8 PB4 – rotary pin 2
- A9 D9 PB5 – rotary pin 1
- A10 D10 PB6 – pin 1 primary chip select for 25LC256
- MOSI D16 PB2 – pin 5 primary 25LC256, backup 25LC256
- MISO D14 PB3 – pin 2 primary 25LC256, backup 25LC256
- SCLK D15 PB1 – pin 6 primary 25LC256, backup 25LC256
- A0 D18 PF7- unconnected, must float Used for random # generator
- A1 D19 PF6 – red RGB pin
- A2 D20 PF5 – green RGB pin
- A3 D21 PF4 – blue RGB pin
- Vcc (+3V) – positive rail
- Reset – reset button
- GND – negative ground rail, GND RGB, GND SSD1306, GND encoder button, GND 2 25LC256 chips
- RAW (+5V from USB) – unconnected
25LC256 (External EEprom) Tested Part: MICROCHIP – 25LC256-I/P – 256K SPI™ Bus Serial EEPROM DIP8
Data Sheet
1st 25LC256
Number., Name, ConnectTo, Note
- CS D10 PB6 – pin 13 promicro Chip Select Input
- SO D14 – pin 15 promicro MISO – Serial Data Output
- WP VCC – pin 21 promicro Write Protect
- Vss GND – pin 23 promicro Ground
- SI D16 – pin 14 promicro MOSI – Serial Data Input
- SCK D15 – pin 16 promicro SCLK – Serial Clock Input
- HOLD VCC – pin 21 promicro Hold Input
- Vcc VCC – pin 21 promicro Supply Voltage
2nd 25LC256
Number., Name, ConnectTo, Note
- CS D10 PD7 – pin 06 promicro Chip Select Input
- SO D14 – pin 15 promicro MISO – Serial Data Output
- WP VCC – pin 21 promicro Write Protect
- Vss GND – pin 23 promicro Ground
- SI D16 – pin 14 promicro MOSI – Serial Data Input
- SCK D15 – pin 16 promicro SCLK – Serial Clock Input
- HOLD VCC – pin 21 promicro Hold Input
- Vcc VCC – pin 21 promicro Supply Voltage
Step 4: Source Code
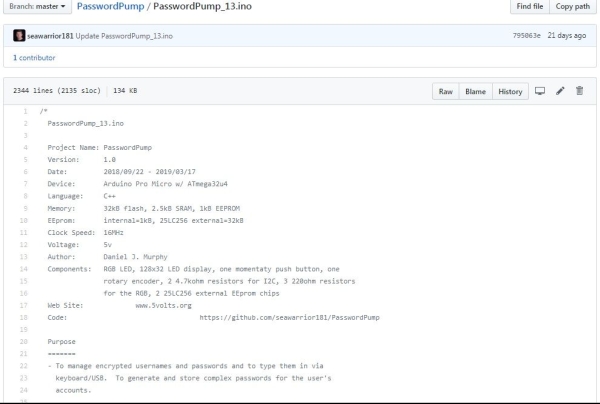
The source code is found here. It’s heavily documented in-line, so I’m not going to go through it line by line here.
I’m certain that there are defects remaining in the program (in fact, all of the defects that I’m aware of are listed in the comments section at the top of the program, along with a list of the defects that I’ve addressed). Therefore use the product at you own risk.
IMPORTANT: I recommend keeping your secondary EEprom up to date by backing up changes made to the primary EEprom when you add, remove or edit credentials. Then use a third EEprom so that you have two backups of your credentials. On top of that, periodically dump the credentials out to a file that you store in an encrypted file on a thumb drive, and secure the thumb drive in a safe or a safe deposit box. Finally, keep your accounts up to date so that if you need to reset a forgotten password you can do so. This product has not been professionally tested for quality purposes and it’s possible that you’ll lose your credentials. You have been provided with the source code so that you may correct any defects you find. That said, I’ve been using the device without incident for a couple of months now, and I am storing all of my credentials on it, with many of them using the generated password feature, so if I lose the device and my backups I’ll need to reset my accounts, because there is absolutely no way for me to know what the passwords are at this point. I am also maintaining backups as per my recommendations above.
IMPORTANT DISCLOSURE: Using a supplied encryption library I’ve endeavored to encrypt all of the credentials that get stored on the external 25LC256 EEprom with AES128 (and hashed the master password, which is stored on internal EEprom with SHA256). I have salted the hashed master password and each set of credentials. This project is the first time I’ve ever used encryption, and there’s been no formal code review, so I could have done it wrong, and the standard disclaimer (buyer beware) applies in this case. I have examined the content of the external EEprom chips (after storing many sets of credentials) using a PC and a CH340 24/25 series EEprom flash BIOS USB programmer and all of the usernames, account names and passwords appear encrypted. However, I am painfully aware that encryption is something that is very easy to do incorrectly, therefore proceed with caution. If you are skilled in this area I would appreciate a code review and some constructive feedback (please contact me directly).
The sketch presently uses 97% of program storage area and 66% of dynamic memory. This makes it extremely difficult to add new features to the product without exchanging them for existing features. There are several new features that I’d like to add but I can’t because of the memory restriction. For example, after 1 hour of total inactivity the device times out and you’re logged out of it. I would like to make that time period configurable (e.g. you could set it to 2 hours if you like), but I simply don’t have the room to add that feature. I think one hour is probably a good compromise, and while at work with the device at my side I periodically turn the rotary encoder a click or two in any direction to push the automatic logout up an hour.
Step 5: Libraries
The following libraries need to be installed in your Arduino IDE if you’re going to compile the source code:
– https://rweather.github.io/arduinolibs/index.html… – AES and SHA library, MIT License.
– https://github.com/LennartHennigs/Button2 – Used for the button on the rotary encoder, Copyright (c) 2017 LennartHennigs , MIT License.
– https://github.com/LennartHennigs/Button2 – Used for the rotary encoder, GNU GPL Version 3.
– https://github.com/LennartHennigs/Button2 – Used to send characters to the keyboard as if typed by the user, GNU Lesser General Public License.
– https://github.com/LennartHennigs/Button2 – Used for internal EEprom
– https://github.com/LennartHennigs/Button2 – for SSD1306 display device, Bill Greiman
Step 6: Compiling
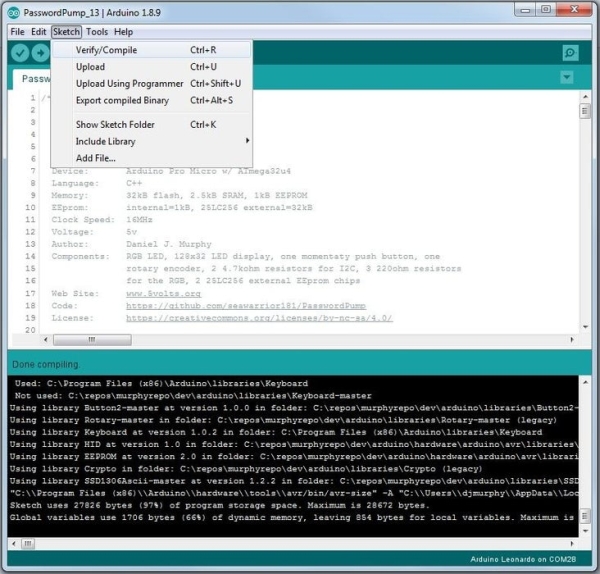
Make sure all of the required libraries are installed. Set the board to “Arduino Leonardo”. Remember that you’ll be uploading via an external programmer, so set that value in Programmer. I use the Pololu USB AVR Programmer.
Step 7: Flashing the Program
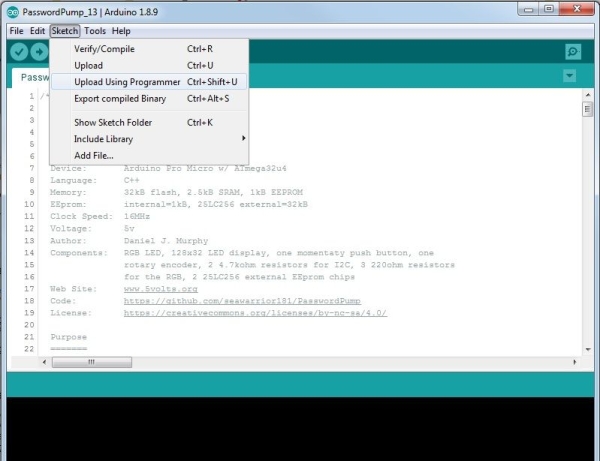
I’m using an external programmer to burn the program onto the device. i.e. from the Arduino IDE I”m selecting Sketch–>Upload Using Programmer to send the program to the Atmel ATMega32u4/Arduino Pro Micro. I’m doing this in part because it overwrites the boot loader, and I want to overwrite the boot loader because by doing so I have more space on the device for the program. I don’t think the program will fit onto the Pro Micro if the boot loader is present, but I haven’t tested this. I also don’t think the device will work correctly with the boot loader present for other reasons. Therefore, I use the Pololu USB AVR Programmer for this. I still have to power the device via the USB cable while programming with the external programmer. If you build the device by sourcing the parts on your own or if you build with the kit, be sure to refrain from snipping the header pins after you have soldered the Arduino Pro Micro to the USB board if you want to be able to load the firmware. If you snip the header pins flush with the PCB board there won’t be a way to re-program the device; you need to connect VDD, GND, RST, MOSI, MISO, and SCK to the Arduino Pro Micro from your external programmer to flash the program. Instructions for doing this are found here. Rest assured that my initial setting of the lock bits will not prevent you from re-flashing the program. If you want to reset the lock bits after re-flashing the program you can do so. For me the easiest way to do that was to use Atmel Studio and my USB AVRISP XPII. But you don’t really need to set the lock bits because the source code is now available to everyone, anyhow. The master password, stored in internal EEprom, is hashed with SHA-256.
Step 8: Operation
To turn the device on you simply plug it into a USB port/receptacle using a micro USB Micro-B plug to USB-A plug cable, the same cable that you’d use to charge an Android phone. The first time you plug it in a driver might need to be installed. The driver is available for download in the source code repository referenced below in the Source Code section.
The first time you power the device on you’ll see :
Master Password
March 11 2019 (or the date of the most recent compile)
At this point you’ll want to enter your master password. Try to select a master password that you’ll be happy with, because if you want to change it you have to Reset the device, and that wipes out all of your credentials. There is only one way to get the credentials back into the device after that, by keying them in via keyboard or rotary encoder. Also try to select a password that can be more quickly entered into the device. It should be a combination of upper and lower case, with numbers and maybe a symbol or two. I like to pick a password that can be typed almost entirely with my left hand, I find they are easier to input via the rotary encoder. You should select a strong password; a combination of letters, upper and lower case, numbers, and special characters, between 7 and 14 characters long. To enter a character turn the rotary encoder until the character appears and then press the rotary encoder down (short click) to select the character. There’s presently no way to back up if you make a mistake so be careful (or enhance the code yourself, if you can squeeze it in!). Once the entire master password has been entered long click the device (click down the rotary encoder for more than 1/2 a second). You’ve just entered the master password and now you’re ready to enter a set of credentials.
You move through the menu items by turning the rotary encoder, clockwise to move down the list and counter clockwise to move up. Account names are stored in alphabetical order. To select an item you click down on the rotary encoder (short click). To backup you hold the rotary encoder down for more than a half second (long click).
Adding Credentials
To add a set of credentials via the keyboard you need to open a serial terminal. The one that works best for me is the Arduino serial terminal. So if you open the Arduino IDE go to Tools->Ports and select the Arduino/Genuino Micro port. Then select Tools->Serial Monitor (or Ctl+Shift+M). Next, on your PasswordPump navigate down to Keyboard OFF and change it to Keyboard ON with a short click. Navigate back up to Add Account and short click. You’ll see:
Account Name
Add Account
Short click, then switch back to the Arduino Serial Terminal and enter the account name, followed by the return key. Then long click on the Password Pump. You should now see:
Edit Username
[the account name you entered]
Short click again, switch back to the Arduino Serial Terminal and enter the username, followed by the return key. Then long click on the Password Pump. You should now see:
Edit Password
[the account name you entered]
Short click again, switch back to the Arduino Serial Terminal and enter the password, followed by the return key. Then long click on the Password Pump. You should now see:
Indicate Style
[the account name you entered]
Short click again and use the rotary encoder to specify either 0 or 1. Specify 0 if, while supplying username and password, the Password Pump should send a carriage return after sending the username and before sending the password. Specify 1 if, while supplying username and password, the Password Pump should send a tab after sending the username and before sending the password. Then long click on the Password Pump. You should now see:
Account Name
[the account name you entered]
Long click again and you’ll see:
Find Account
[the account name you entered]
You’ve finished entering the credentials.
Note that you can also enter credentials using just the rotary encoder. Keyboard can be ON or OFF, it doesn’t matter. Simply enter the credentials using the rotary encoder in a fashion similar to how you entered the master password.
Sending Credentials
Navigate to Find Account and short click. Use the rotary encoder to scroll through the list of credentials you’ve entered. When you’ve found the account name associated with the credentials you want to send to your computer, place the input focus in the username text box in the window prompting you for credentials on your computer. On the Password Pump you should see:
Send User & Pass
[the account name you selected]
Short click to send the username, a carriage return or a tab character (depending on the style setting), and then the password. If you selected the correct style you should now be logged in to your account / application.
If you only want to send the password to the computer, followed by a carriage return, scroll down once using the rotary encoder until you see:
Send Password
[the account name you entered]
And short click to send the password and the carriage return character.
Similarly you can send just the username or just the account name.
Editing Credentials
To edit a set of existing credentials first decide if you’re going to edit the credentials via the keyboard or just the rotary encoder. If you’re going to edit the credentials via the keyboard follow the instructions in Toggling Keyboard Entry. Then use Find Account to navigate to the account you want to edit and short click. Then scroll down to Edit Creds and short click. Then scroll to the attribute you want to edit; Account Name, Edit Username, Edit Password, or Indicate Style. Now short click. Use the keyboard to re-enter the attribute in the fashion described in Adding Credentials, or just use the rotary encoder to re-enter the attribute. Then long click to save the change. If you are generating a new password for the account then follow the instructions in Generating a Password.
Deleting Credentials
Make sure you have a current EEprom backup. Navigate to Find Account and short click. Use the rotary encoder to select the account that you want to delete, and short click. Using the rotary encoder scroll down to Delete Acct and short click. Confirm your desire to delete the account by selecting Y with the rotary encoder and short clicking. The account is gone now and it’s wiped from the primary EEprom chip. It isn’t wiped from the backup EEprom yet, so if you accidentally delete an account, and you have a recent backup, you can restore the backup and the account will reappear. Navigate to Find Account and verify that your account is deleted. If you’re not able to scroll through all of your accounts, a intermittently occurring defect has occurred and the linked list that manages the display of all of the accounts is corrupted. Restore the latest backup from EEprom. If you backup the EEprom immediately after deleting the account it is also wiped from the secondary EEprom.
Generating a Password
Read through all of these instructions before attempting to change your password to a new generated password. The most powerful feature of the PasswordPump is it’s ability to generate random 31 character passwords and remember them. These passwords are extremely difficult to guess and are not as vulnerable to brute force attempts to break into an account. Before performing this operation you should be sure that you have a current backup of all your credentials. To generate a password for an account simply find the account via Find Account and select the credentials by short clicking on the account name. In your application on your computer navigate to the change password feature and place input focus in the Old Password text box. On the PasswordPump navigate to Send Password (NOT Send Password ) and short click. In your application on your computer place input focus in the new password text box by hitting the key. In the PasswordPump scroll down to Edit Creds and short click, then scroll down to Gen Password and short click. This changes the password to a randomly generated series of 31 characters. Now long click once, navigate to Send Password (NOT Send Password ) and short click. If you need to confirm the new password then place input focus on that text box in the application on your computer and short click again. Confirm your password change by hitting the return key or otherwise clicking on the appropriate button. You now have a random 31 character password on the account, and the only place where that password exists is on the encrypted EEprom chip on your PasswordPump. At this point it’s a good idea to Backup to EEprom and Backup to a File, and to be sure that you can somehow recover from a lost password on that account. Warning: If the attempt to change your password fails because the old password is not accepted be aware that you have just overwritten the old password with your new generated password. To restore the old password you’ll need to either Restore a Backup from EEprom and try again, or go to the encrypted backup file on your thumb drive to get the current password for the account, or recover the password from the account using whatever mechanism is available to you via the application or web site. Think ahead and be careful so that you don’t lock yourself out of your account!
Logging Out
When you want to log out of the device navigate to Logout using the rotary encoder and short click. The RGB led changes from green to blue. You’re now logged out and must enter the master password again in order to use the device. If you’re walking away from your computer to get coffee it’s good practice to lock your computer and logout of the PasswordPump.
Toggling Keyboard Entry
Navigate to Keyboard ON/OFF. Short click to toggle the setting. When the keyboard is on you may enter credentials via the keyboard using the process described in Adding Credentials. Keep the keyboard set to OFF when you’re not entering credentials. This setting is not saved when the device powers off and the default is Keyboard OFF.
Showing/Hiding Passwords
Using the rotary encoder navigate to Show Psswrd ON/OFF. Short click to toggle the setting. This setting is saved when you log out and power down the device.
Backing Up to EEprom
On the Password Pump navigate to Backup EEprom using the rotary encoder. Short click, then confirm that you want to backup from the primary EEprom to the secondary EEprom by selecting Y with the rotary encoder and short clicking. The RGB will be yellow while the backup is taking place, and then change back to green.
Back Up to a File
On the PasswordPump navigate to Backup to File using the rotary encoder. On your computer open a text editor (one without an autocomplete feature), notepad.exe works best, and place input focus inside the text editor. Personally I use UltraEdit because it has built in encryption. Then short click on Backup to File. The contents of the primary EEprom chip (all of the credentials stored in the PasswordPump) are dumped into the text editor. The RGB led turns purple, then to green when the operation is complete. It’s best to encrypt this file by zipping it up with a password using WinZip or similar, and storing it on a thumb drive that you can, in turn, store in a safe or safe deposit box. Delete the original file from your computer and empty the trash. Keep this file up to date by periodically executing this operation. I carry the encrypted file with me on a thumb drive that is securely attached to my key ring, and I keep a backup of that file elsewhere.
Restore a Backup from EEprom
If you decide that you want to restore the EEprom backup (or, in other words, have the contents of the secondary, backup EEprom overwrite the contents of the primary EEprom), then navigate to Restore Backup on the PasswordPump. Short click and confirm the operation by selecting Y with the rotary encoder and short clicking. The RGB led will turn yellow until the operation is complete, then it changes back to green.
Performing a Factory Reset
You want to wipe out all of the encrypted credentials on the primary EEprom and factory reset the device. On the PasswordPump navigate all the way down to Reset using the rotary encoder. Short click. Confirm that you want to factory reset the device and clear all of the credentials and the master password by selecting Y with the rotary encoder and short clicking. The RGB will flash blue and red slow and then fast while the device is factory resetting, then change to blue. At this point you can enter a new master password. Note that a Factory Reset doesn’t wipe out the credentials stored on the backup EEprom. If you use the same master password you’ll be able to restore the backup and see the credentials. If you want to wipe out the backup EEprom as well, select Backup EEprom after you’ve entered your new master password, or swap the position of the primary and backup EEprom chips and perform another factory reset.
Source: PasswordPump Passwords Manager
- How many credentials can the PasswordPump store?
The device manages credentials for up to 254 accounts. - What encryption method is used for stored data?
All credentials are encrypted using military grade AES-128 encryption. - Can I generate strong passwords with this device?
Yes, it can generate random passwords consisting of 31 characters including letters, symbols, and numbers. - How do I back up my credentials?
You can backup encrypted credentials from the primary EEPROM to the secondary EEPROM or dump them to a text file on a thumb drive. - What happens after ten failed password attempts?
An automatic chip wipe and factory reset occurs after up to 10 failed attempts to enter the master password. - Does the device require a case to function?
No, the device currently operates without a case, though a preliminary 3D printed design is available. - How long does the device stay logged in before timing out?
The device automatically logs out after 1 hour of inactivity. - Can I edit existing credentials via a computer keyboard?
Yes, you can toggle keyboard entry on and off to add or edit credentials via a serial terminal.