This is Open Source Home Automation Project based on Arduino Uno and Arduino Wiznet based Ethernet shield.
How Does it Work
The main brain for this project is Arduino UNO Board along with Arduino Ethernet Shield to give it a wireless connectivity.Arduino runs a code to control a Relay board according to the input and also serves a web page through which respective output to the relay board can be controlled.Through relay controller board we can control lamps, tubes or any AC power sockets.
You will be able to control all of your AC Appliances wirelessly with the help of any WIFI Enabled device.

STEP 1:
Relay Controller Board Build Tutorial:
Quantity of the components depends upon how many channels you want e.g. if you want to control more than one light then you will have to add that much number of relays on your controller board.
Here is the material list which will be needed to build the board: (Quantity of the components given for making 1 channel relay controller)
| Sr.No | Component Names | Quantity |
| 1 | Relay (I have used GOODSKY RWH-SH-105D Relay) | 1 |
| 2 | Transistor 2N3904 | 1 |
| 3 | 1K Resistor | 2 |
| 4 | 10K Resistor | 1 |
| 5 | 1N4148 Diode | 1 |
| 6 | Red Led 3mm | 1 |
| 7 | 3 Pin PCB Mount Connector | 1 |
| 8 | 1 Pin PCB Mount Connector | 1 |
Above components are for making of single controller board you can multiply number of the components depending on how many relay controller you want.
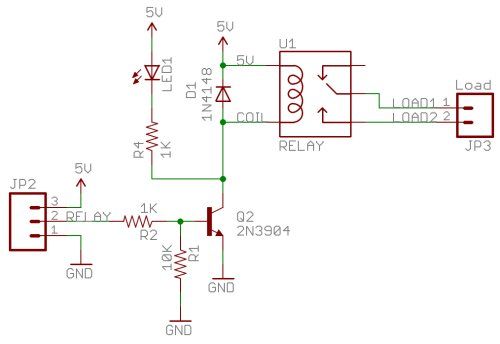
Here in the circuit diagram Pin no.2 will be connected to the arduino control output pin and other two will be connected to +5V and Gnd accordingly.
After soldering all of your components according to the above circuit diagram the board should look like this.
Rear View
This is single relay controller board. You can extend this to as many as you want. I have made 5 channel relay controller board as below.
Note:
All the usual warnings apply: Mains voltage (120VAC or 220VAC) can kill you. This project, if done incorrectly, could certainly burn down your house. Do not work on or solder to any part of a project while it is plugged into the wall socket – just unplug it before modifying anything!
STEP 2:
Getting IP Address Of Arduino Ethernet Shield:
Mount your Arduino Ethernet shield on Arduino Uno as shown:
Now connect your Uno Board to PC with USB cable and open Arduino IDE. After Opening up you will find blank Arduino window. Now go to File–> Example –> Ethernet –> dhcp address printer sketch. Your Ethernet shields MAC address is printed on back of it as follow you will need this in DHCP ADDRESS PRINTER code to get the IP address of your Ethernet shield.
In DHCP address printer sketch put your MAC address as given on back of the Ethernet shield and upload it to the Arduino board.
After finished uploading connect Arduino Ethernet shield to internet with Ethernet cable once connected then open up you serial monitor of Arduino IDE the IP address allotted to your Ethernet shield will be displayed e.g. (xxx.xxx.x.xxx) note it down somewhere because you are going to need this in further codes.
STEP 3:
BuildingMainCircuitConnection :
Now we are ready with our Relay controller board. So, it’s time to move on to the Main Circuit Connections. Here I have given the pin configuration for the whole Autohome Project.
| Arduino Digital Pin No. | Pin Usage |
| 4 | will be used for Infrared Receiver |
| 5 | used as Output Pins to control Relays |
| 6 | used as Output Pins to control Relays |
| 7 | used as Output Pins to control Relays |
| 8 | used as Output Pins to control Relays |
| 9 | used as Output Pins to control Relays |
| 10 | will be used by Arduino Ethernet Shield |
| 11 | will be used by Arduino Ethernet Shield |
| 12 | will be used by Arduino Ethernet Shield |
| 13 | will be used by Arduino Ethernet Shield |
Note: For relays it is recommended to power it from separate source not from Arduino (I have powered it from Arduino only but since here we are working with single board. As board number increases Arduino won’t be able to supply sufficient power to the boards.)
Here is the connection diagram:
In this way you can do necessary soldering work to make following connection.
You can also make your own protoshield which can easily fit on top Arduino like this:
Once you finish soldering stuff, now you are ready for your main code upload.

STEP 4:
Uploading Arduino AutoHome code to the Board:
Here is the Arduino AutoHome code just copy and paste it into your Arduino IDE sketch.
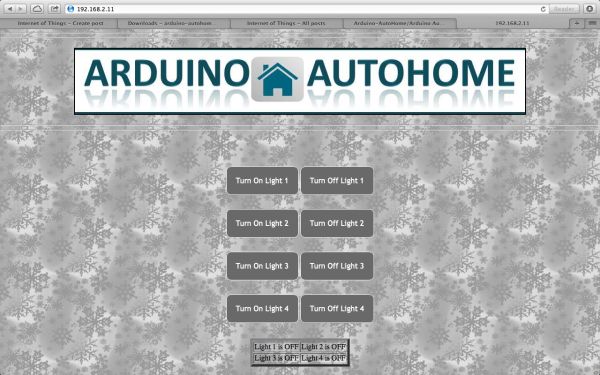
Upload this code to your UNO board. Now you are ready to your your Automation Project, just plug your Ethernet shield to router and and you will be able to find the control page on the IP Address specified by in in the Arduino Code. So directly enter the IP address in the web browser of the the device which is on the same network as that of your Arduino.
So you will have the control page as shown below:


