A home automation system is an automating the bulk of electronic and electrical tasks within a home. It uses a combination of hardware and software to enable control and management over appliances and devices within a home.
Home automation not only refers to reduce human efforts but also energy efficiency and time saving. Here we are performing home automation by using ESP8266 – WiFi SoC and Blynk Playstore App.
Components Required
- ESP8266
- 470Ω Resistor
- LED
- Breadboard
- USB Cable
- Connecting Wires
- Android Phone with Blynk App
Hardware
Circuit Diagram
Home-Automation-using-using-ESP8266-Blynk-App-Circuit-Diagram
Circuit Diagram Explanation
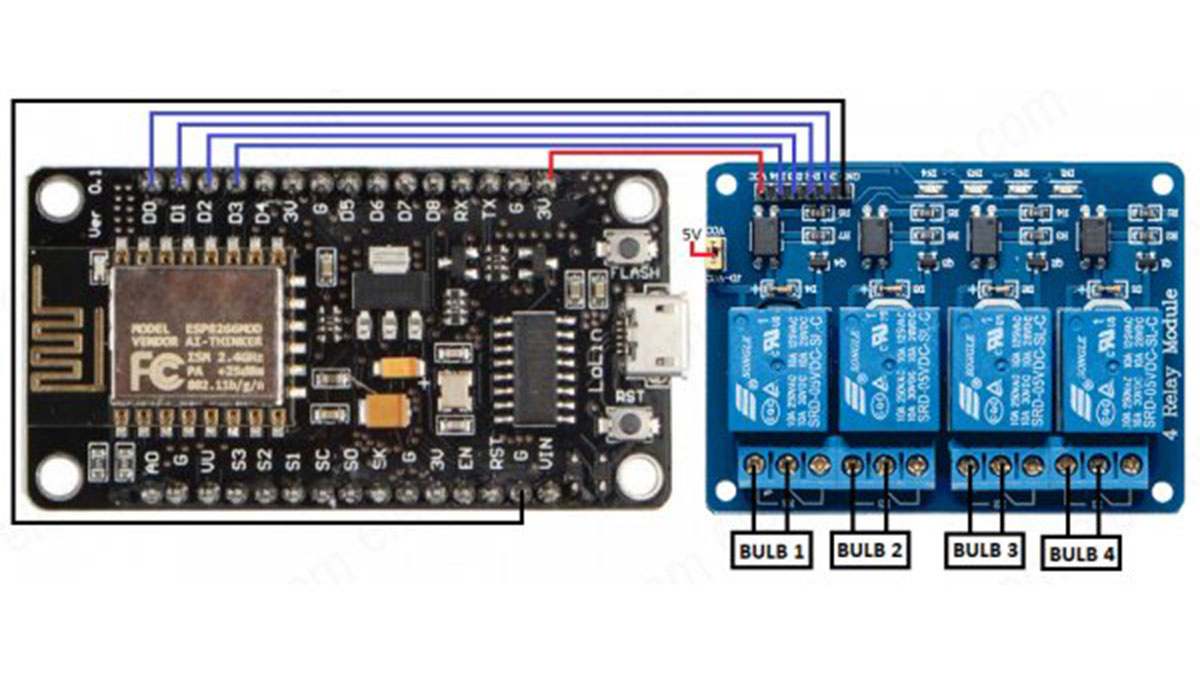
NodeMCU to 4- Channel Relay Board
- Connect D0 pin of NodeMCU to D1 pin of 4- Channel Relay board.
- Connect D1 pin of NodeMCU to D2 pin of 4- Channel Relay board.
- Connect D2 pin of NodeMCU to D3 pin of 4- Channel Relay board.
- Connect D3 pin of NodeMCU to D4 pin of 4- Channel Relay board.
- Connect 3.3V of NodeMCU to Vcc pin of 4- Channel Relay board.
- Connect GND pin of NodeMCU to GNDpin of 4- Channel Relay board.
Software
Blynk Library Installation
- Download the zip file for Blynk Library : Blynk_Release_v0.4.8
- Extract the downloaded zip file in a folder.
- Open up Arduino IDE, go to: File -> Preferences and under the Settings tab, copy the sketchbook location path.
- Now open the file explorer and go to the copied path location. This is the path where all the libraries are installed. So, we have to copy all the newly downloaded Blynk libraries into this folder.
- Copy the files/folders from the Libraries folder of the downloaded Blynk directory, and paste it to the Libraries folder of your Arduino IDE’s directory (The path which we copied in step 3).
- Similarly, copy the files/folder from the Tools folder of the downloaded Blynk directory, and paste it to the Tools folder of your Arduino IDE’s directory.
Installation and Configuration of Blynk App
- Firstly install “Blynk” application from play-store and open it.
- Create an account by using Email account or Facebook account.
- Click on New Project, enter the Project Name (enter the Project Name according to your wish) as “Home Automation“, Choose Device as “NodeMCU“, Connection Type as “Wi-Fi” and then click “Create” icon.
- After the creation of Project, App will send the Auth Token code to registered Email ID.
- Click on the “+” icon which located on top right side of the app to create buttons.
- Enter the button name and select the GPIO pins (exmaple: D0, D1, D2, D3)
Programming ESP8266 – Blynk App
Arduino Code
#define BLYNK_PRINT Serial
#include <ESP8266WiFi.h>
#include <BlynkSimpleEsp8266.h>
char auth[] = “YourAuthToken”;
char ssid[] = “YourNetworkName”;
char pass[] = “YourPassword”;
void setup()
{
Serial.begin(9600);
Blynk.begin(auth, ssid, pass);
}
void loop()
{
Blynk.run();
}
Code Explanation
We are including ESP8266 WiFi library which provides ESP8266 specific WiFi routines and we are calling it to connect to the network. BlynkSimpleEsp8266 library establishes the communication between Blynk App and ESP8266.
#include <ESP8266WiFi.h>
#include <BlynkSimpleEsp8266.h>
Get and enter Auth Token which is received from the Blynk App while creating a Project.
char auth[] = “YourAuthToken”;
Get and enter the “ssid” and “password” i.e., your WiFi name and password.
char ssid[] = “SERVER NAME”;
char pass[] = “SERVER PASSWORD”;
Put your setup or configuration code in the setup function, it will only run once during the startup.
Here in the setup function, it will initialize serial communication for debugging and logging with a baud rate of 115200. This begins the connection for respective Blynk Auth Token, Server Name and Server Password.
void setup()
{
Serial.begin(9600);
Blynk.begin(auth, ssid, pass);
}
Put your main code in void loop() function to run repeatedly. This continuously runs with Blynk App commands.
void loop()
{
Blynk.run();
}
Working
The home automation circuit is built around ESP8266, Blynk Android App, and a 4-channel relay board. The hardware set up should be according to the circuit diagram. AC mains appliances(Bulbs) will be connected to relays which are controlled by the ESP8266.
User has to install and configure the Blynk App as per the above instructions.