In this lesson(Nokia Library For Proteus), I will show you how to build a simple Graphical User Interface with the help of the Nokia 3310 LCD. I will design a Nokia 3310 Menu interface with the used of Arduino.

Nokia Library For Proteus
Nokia 3310 LCD is a Graphical LCD device where we can manage its individual pixels, there is more we can do with simple displaying some text. One thing we can do is shows a picture in the form of bitmap.
Here we are designing a Graphical User Interface to interrelate with Arduino.
So, let us build a simple Nokia 3310 Menu system, which we can manage and interact with Arduino in a more habitual way.
The purpose of this project is to show a simple menu on the Nokia 3310 LCD and passes through the menu.
Nokia 3310 LCD Menu
Graphical User Interface is a way to interrelating with the hardware using a screen on display. GUI makes it simply to interrelate with the hardware as we get a visual response from the hardware. For example, you are designing a remote monitoring system to check out whether the light is ON or OFF. If we design the system in such a way that the status of the light is shows on a screen, then the job becomes very simple.
The purpose of this Arduino Nokia 3310 Menu Interface gives an overview of how it’s simple to build our own GUI system using Arduino and Nokia 3310 LCD. We can interrelate with Arduino through the Nokia 3310 Menu and manage different parameters.
Required Components
Arduino
Nokia 3310
Circuit Diagram
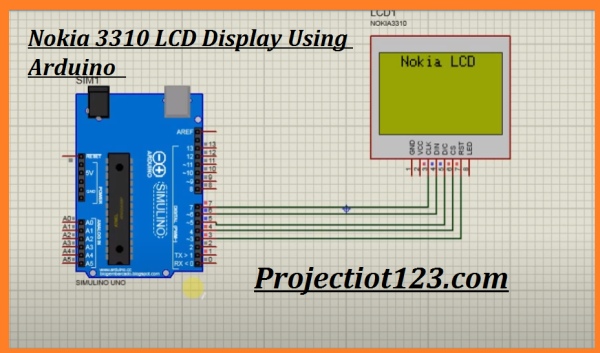
As you see in the diagram the connection of this project is very simple. The RST pin 7 of Nokia 3310 is attached with Arduino pin 3. Next pin of Nokia 3310 CS is connected to Arduino pin 4. The D/O pin of Nokia 3310 is attached with Arduino pin 5. The DIN pin of Nokia 3310 is attached with Arduino pin 6. The CLK pin of Nokia 3310 is attached with Arduino pin 7.
Working
Nokia 3310 LCD carry a maximum logic voltage of 3.5v. So, I have utilized a couple of logic level converter to attach with Arduino and Nokia 3310.
We know that for the communication of Nokia 3310 LCD first we have to install the code in Arduino then after installing the code simulate the program. The LCD first display the name of the module Nokia 3310. It’s up to what you want to display on the LCD. Here I just display the name of the module. You can also set the restore option. This option will restore the default setting and your mobile will be restored.
Conclusion
This project is based on designing a Graphical User Interface with the support of the Arduino based Nokia 3310 Display is executed in this project.
It is simple design but you can enlarge the idea into a full GUI system. Additionally, we can attach more modules which make this project more interesting.
Source: Nokia Library For Proteus
