Over time, we have built several Arduino based weather stations, real-time clocks, dataloggers and a dozen of projects based on Nokia 5110 LCD display. For today’s tutorial, we will merge all that we have learned from each of those tutorials and we will build a datalogger with a display that allows you to select different ways of viewing the data, a line graph or a bar chart, etc.
The idea behind today’s project is to show how real-time data can be plotted and displayed on the Nokia 5110 LCD. The project will also look at the development of a menu through which the user can select the different kind of plots/graphs to view the data.
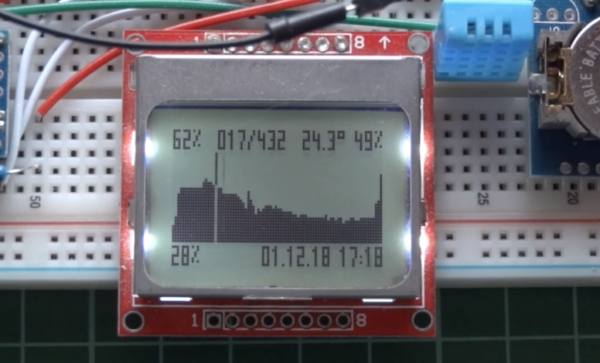
At the center of today’s project is the Nokia 5110 LCD Display. The Nokia 5110 LCD is one of the most popular LCD display among makers. It was originally developed for use as a screen for cell phones and was used in lots of mobile phones during the ’90s. The display uses a low power CMOS LCD controller/driver, the PCD8544, which drives the 84×48px graphics display. In a normal state, the display consumes about 6 to 7mA which makes it quite ideal for low power devices. We have published quite a number of tutorials on this display that might help you understand how to drive it. Today’s use of the display will be to show that it can be used to plot real-time data and how different kind of graphs can be displayed on it.
Asides the Nokia 5110 LCD, we will use a DHT11 temperature and humidity sensor, DS3231 real-time clock, a rotary encoder, and an Arduino pro mini. The DHT11 will serve as the source for the data to be logged as it will measure temperature and humidity data from the environment and push to the display. The DS3231 will be used to generate a timestamp for the data and rotary encoder will be used to navigate through the menu that we will create on the LCD. All of these components will be driven by the cheap and tiny Arduino Pro Mini.
The project is similar to our Arduino Menu with Nokia 5110 tutorial and I will suggest you check it out to better understand of this project.
At the end of this tutorial, you would know; how to interface each of these components mentioned above with the Arduino, create a menu on the Nokia 5110 LCD, and plot graphs on it.
REQUIRED COMPONENT
The following components are required to build this project;
- Arduino Nano or Arduino Pro Mini
- Nokia 5110 84×48 LCD
- DHT11 temperature/humidity sensor
- DS1307 or DS3231 RTC module with built-in AT24C32 EEPROM
- Rotary Encoder
- Breadboard
- Jumper Wires
SCHEMATICS
The schematics for this project takes a bit of effort. Connect the components as shown in the schematics below.
To make the connections easier to follow, a pin map showing how the components are connected is shown in the list below.
Read more: NOKIA 5110 LCD BASED ARDUINO DATALOGGER WITH MENU