Summary of Alastor “Mad-Eye” Moody Moving Eyeball
Summary: A moving eyeball costume prop inspired by Mad-Eye Moody was built using an Arduino-controlled servo to move a ping pong ball eye mounted on a leather dog collar. The servo is controlled by a potentiometer in a pocket-mounted Arduino case, connected via a 3.5 mm cable. A rubber pipe end cap holds the servo and eye, and a brass-colored jar lid with glued screw heads forms the prosthetic ring.
Parts used in the Mad-Eye Moody Moving Eyeball:
- Arduino Uno
- Arduino Case
- 9-volt Battery Clip
- 12g mini servo (ES08MA suggested)
- 3.5mm Stereo Jack Panel Mount Connector
- 1K to 1M Ohm Potentiometer (volume knob)
- 1-1/2 inch flexible pipe end cap (rubber)
- 20 inch leather dog collar
- 3.5 mm headphone cable (extension)
- Ping pong ball (cut in half)
- Velcro (adhesive)
- Blue circle sticker and small black dot sticker (iris and pupil)
- Brass-colored salsa jar top (for brass ring)
- Brass screws (dremeled heads) and superglue
- Screws and nuts for mounting/spacers
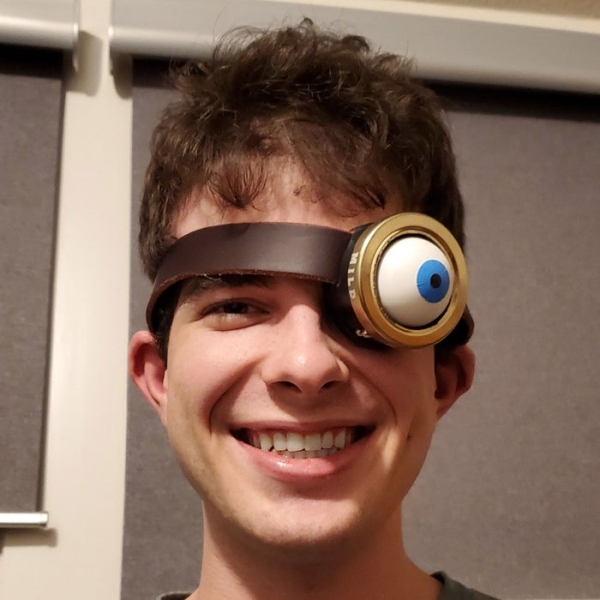
Before COVID hit my son went to a costume party dressed as Professor Alastor “Mad-Eye” Moody from Harry Potter. I made him a moving eyeball using an Arduino, servo and ping pong ball.
Step 1:
Parts list
Arduino Uno https://smile.amazon.com/dp/B008GRTSV6
Arduino Case https://smile.amazon.com/dp/B00HFSWC06
9-volt Battery Clip https://smile.amazon.com/dp/B01AXIEDX8
12g Servo https://smile.amazon.com/s?k=ES08MA (any mini servo will do but I have yet to have one of these little 12g metal gear servos fail in any of my RC projects)
3.5mm Stereo Jack Panel Mount Connector https://smile.amazon.com/dp/B01C3RFHDC
1K to 1M Ohm Potentiometer (Volume Knob) https://smile.amazon.com/dp/B07KCWM71T
1-1/2″ flexible pipe end cap https://smile.amazon.com/dp/B07FP3NMSH (I found mine at the local hardware store but I think this is the same one; The diameter is right but not sure if the depth is standard between brands)
20″ Leather Dog Collar (Found at my local farm/ranch supply store)
Step 2:
The first thing I did was learn how to control a servo with a potentiometer by using an Arduino. This video was the most helpful.
Step 3:
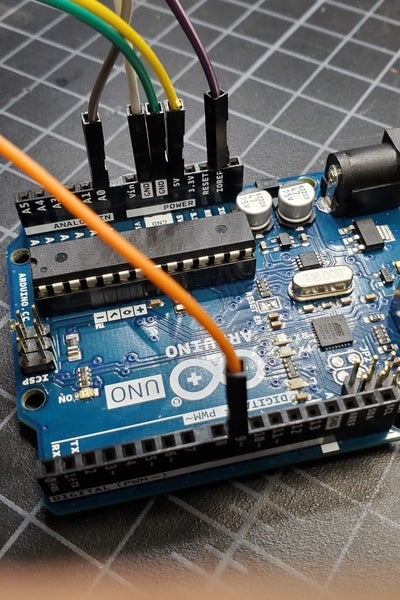
First I made a mock-up using jumper wires.
Step 4:
The code is really simple. Basically there are only two wires to worry about: The Analog or A0 pin for the potentiometer and the signal pin (I used pin 9) for the servo. The other two wires going to each component are just constant positive and negative to power them. The code is attached with a .c extension. Rename it with an .ino extension to open in Arduino or with a .txt extension if you just want to take a look at it.
Step 5:
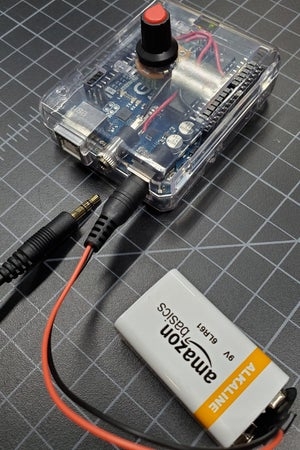
After I was satisfied with the code I extended the three wires from the servo to the Arduino using a regular 3.5 mm headphone cable and installed a panel mount headphone jack on the end of the Arduino case. I mounted the potentiometer on the top of the case so the knob could be easily turned using your fingers while in your pocket. The headphone cable runs from the back of the leather collar down underneath your clothes to the Arduino in your pocket which is powered by the 9-volt battery.
Step 6:
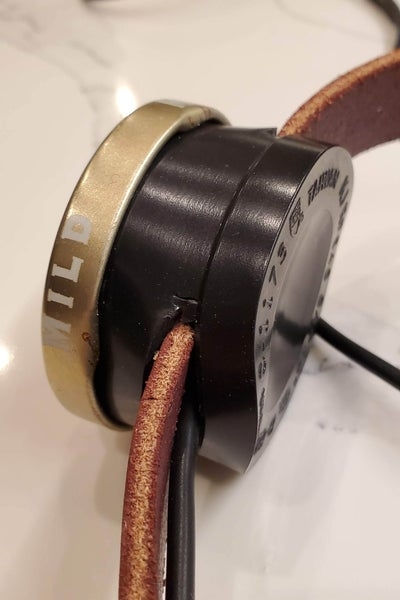
Then I cut a slit in either side of the rubber pipe end cap and pulled the leather dog collar through. I used the rubber end cap so it would be a little more comfortable having it pressed against your eye vs something 3D printed. Then I mounted the servo horn/arm to the side of the end cap and inserted another screw through the last hole of the servo horn and through the end cap as well to make sure the servo turned and not the horn. I used several nuts to act as spacers between the horn and the side of the end cap so the servo was centered in the opening.
Step 7:
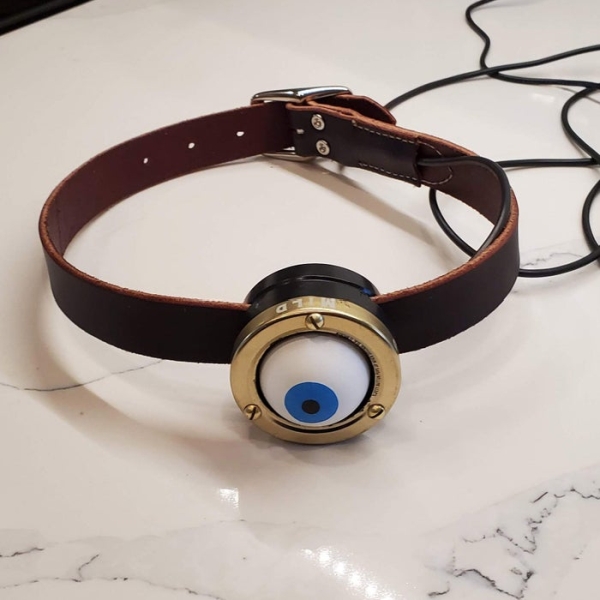
Then I cut a ping pong ball in half and stuck velcro inside and also on the end of the servo. A ping pong ball is a little over-sized compared to a real eyeball but it adds to the comic effect. I stuck a blue circle sticker on the ping pong ball for the iris and stuck an even smaller black dot sticker on top of that for the pupil.
Step 8:
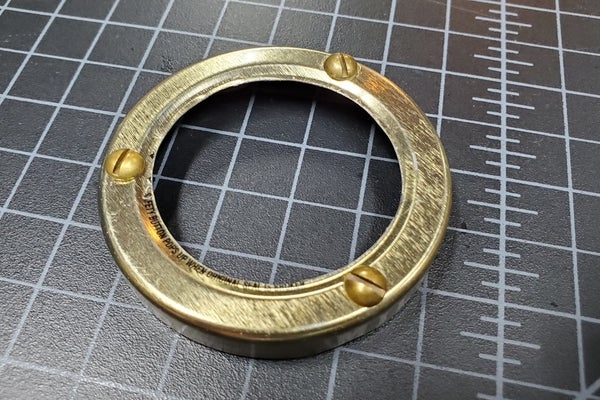
The “real” Mad-Eye Moody has a brass ring around his prosthetic eye so I cut out the inside of a brass-colored salsa jar top and dremeled the heads off some brass screws and superglued them to the jar top. The top fit snugly over the rubber pipe.
Step 9:
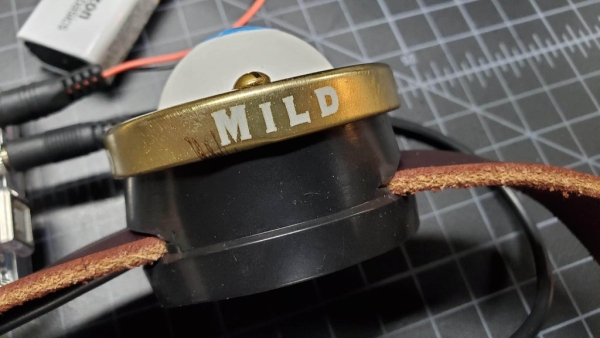
It even still says MILD on the side lol. Anyway, thanks for looking!
Source: Alastor “Mad-Eye” Moody Moving Eyeball
- What components control the servo movement?
The servo is controlled by an Arduino using a potentiometer connected to an analog A0 pin and the servo signal on pin 9. - Can the servo be extended away from the Arduino?
Yes, the servo wires were extended using a regular 3.5 mm headphone cable and a panel mount jack on the Arduino case. - How is the eyeball attached to the servo?
A ping pong ball half is attached with Velcro to the end of the servo horn. - What holds the servo and eye to the collar?
A rubber pipe end cap is slit and the leather collar is pulled through; the servo is mounted to the side of the end cap. - How is the prosthetic brass ring made?
An inside section of a brass-colored salsa jar top is used, with dremeled brass screw heads superglued to it. - Where is the Arduino and battery placed?
The Arduino is enclosed in a case and carried in a pocket, powered by a 9-volt battery connected via a battery clip. - How is the potentiometer made accessible for control?
The potentiometer is mounted on top of the Arduino case so the knob can be turned while in a pocket. - Is the ping pong ball realistic for an eyeball?
The ping pong ball is oversized compared to a real eyeball but chosen for comic effect.