This tutorial walks through the process of combining Arduino sample sketches to make a working project prototype. Developing the code for your project can be the most intimidating part, especially if you haven’t done it a thousand times already.
If you’re a total Arduino newbie, try my free Arduino Class right here on Instructables.
Let’s dive in!
Step 1: Define the Purpose
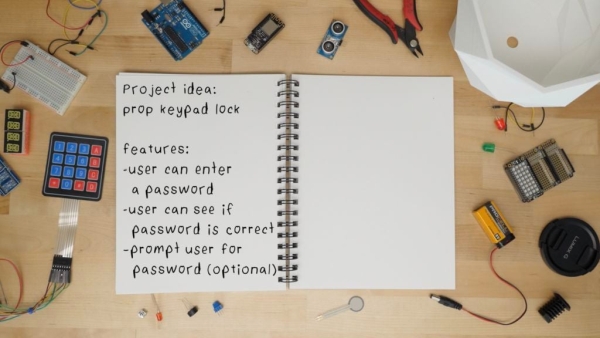
First, and this may seem obvious, but write out the main purpose of the project idea. If it has multiple functions, decide which features are needed versus those that would be nice but aren’t necessary at first. See also my previous tutorial about common Arduino mistakes including biting off more than you can chew. Keep it simple at first; you can always add to it later.
Step 2: Classify Inputs and Outputs

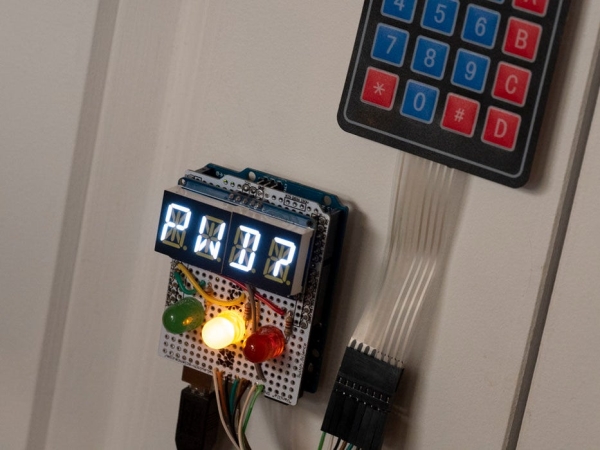
Next, classify the project’s inputs and outputs. A weather monitor might have a temperature and humidity sensor and a display of some kind. Internet projects might have a cloud service as an input, output, or both, like my Internet Valentine project which also has a button input and LED and vibrating motor outputs for each circuit. The project I’m building today is a prop passkey evaluator that uses a membrane keypad input and outputs to an alphanumeric display as well as three indicator LEDs.
Step 3: Write Pseudocode
The next step is to write pseudocode that attempts to walk through the program’s main loop. Pseudocode is just plain words used to explain the program. It shouldn’t be overcomplicated, but should sketch out the basic causes and effects you want to deal with in your program.
Yellow LED starts on
Monitor and store input from membrane keypad
Use special * and # characters to start and stop entering the password
If passcode is correct then
	Turn on green LED
Display “OPEN” on display
if passcode is incorrect then
	Turn on red LED
	Display “NOPE” on display
Step 4: Test Hardware
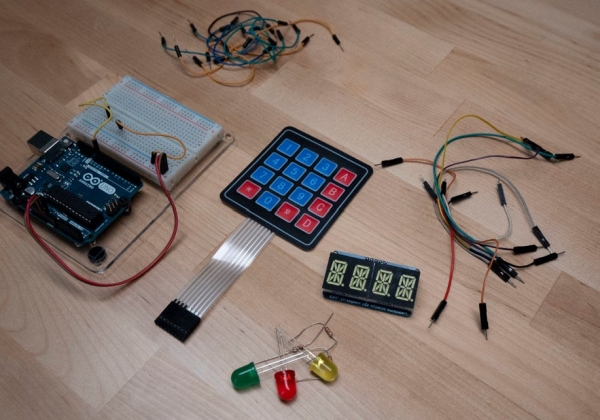
Next step: select and evaluate hardware components that could work for your inputs and outputs. It’s a little more complicated than just making sure you have enough pins available, but I’ll save my hardware selection advice for another tutorial (leave your questions in the comments). Here’s a great guide about microcontroller selection.
Build and run a sample for each component you’re working with. This involves downloading any relevant code libraries, and checking out example code that tests you’ve wired it up correctly. For inputs, you’ll use the serial monitor to get some feedback. In my case that’s a membrane keypad using the keypad library.
And then I added an alphanumeric display with an i2c backpack, and three different colored LEDs each with their own resistor. I uploaded the sample code for the display to verify it’s connected properly, then ran a simple blink sketch to test the LEDs. In both case I found wiring errors I needed to fix.
It’s easier to discover that something is wired incorrectly at this stage, when you’re working with code that’s known to work with the component at hand rather than trying to debug wiring and code at the same time.
Start writing comments in your code that explain what each section does.
Step 5: Create Your New Program
Create a new sketch where you’ll paste in elements of all of your sample sketches to make your program.
In the loop, if you don’t have a good example to follow or want to write it from scratch, paste in your pseudocode as comments to start. Then you’ll start to create the logical overall structure of the program.
It’s possible one of your sample sketches already does most of your core structure, or to be easily able to find something online that does. It’s likely that somebody’s done something similar to your idea before, even if it uses different hardware. So I looked online, and I found a few membrane keypad door lock projects, all using this password library. So I downloaded the library and checked out the examples that come with it, and I got very lucky! There is a membrane keypad passkey evaluator sample that does exactly what I want. All I have to do is include my desired outputs, so code for the display and LEDs.
One really good practice while you’re doing this is to compile your program really often. That way, if there’s an error, you’ll be able to isolate it to just the time you copied over such-and-such.
Here’s where it’s pretty critical that you pay attention to matching curly braces, missing semicolons, and other typos that would make your program hard to debug.
Source: Mash Up Arduino Code Samples