Summary of Low Cost Bioprinter
This project describes converting a Monoprice MP Select Mini V2 into a low-cost bioprinter (~$375) by replacing the filament extruder with interchangeable paste extruders and modifying the printer frame and electronics. It includes 3D printing custom parts, disassembling the control board, installing heat set nuts and mounts, and using common lab supplies and software to print bio-inks like alginate/agarose.
Parts used in the Low Cost Bioprinter:
- Ramps 1.4
- Arduino Mega 2560
- Stepper motor drivers
- Additional stepper motor (optional)
- Maker Beam 2 in X 1 in
- Maker Beam attachment hardware
- M3 screws assorted sizes
- M3 nuts (x2)
- 8 mm threaded rod
- 8 mm nut
- 608 bearing
- Binder clip
- Filament
- Monoprice MP Select Mini 3D Printer V2
- Zip ties
- M3 heat set nuts 2mm width
- 3D printed paste extruder parts (epoxy and non-epoxy versions)
The goal of this project is to develop a low-cost bioprinter to make bioprinting more accessible to research institutions. Currently, low-end bioprinters cost approximately $10,000 while high-end bioprinters cost approximately $170,000. In contrast, our printer can be built for approximately $375.
Supplies:
Parts:
- Ramps 1.4: https://www.amazon.com/HiLetgo-Control-Printer-Su…
- Arduino mega 2560: https://www.amazon.com/Elegoo-EL-CB-003-ATmega2560…
- Stepper motor drivers: https://www.amazon.com/BIQU-Compatible-Stepper-Ste…
- Additional stepper motor (optional) https://www.amazon.com/Stepper-Motor-Bipolar-64oz-…
- Maker beam 2 in X 1 in
- Maker beam attachment hardware
- M3 screws assorted sizes
- M3 nuts x2
- 8 mm threaded rod
- 8 mm nut
- 608 bearing
- Binder clip
- Filament
- Monoprice V2 https://www.monoprice.com/product?p_id=15365&gcli…
- Zip ties
- M3 heat set nuts 2mm width
Tools:
- Drill bits of various sizes
- Hand Drill
- Drill press
- Hacksaw
- Soldering iron + solder
- Wire stripper
- Needle nose pliers
- Hex keys various sizes
Lab supplies:
- Petri dishes ~70mm diameter
- 60 ml syringe with Luer-lock tip
- 10 ml syringe with Luer-lock tip
- Luer-lock fittings
- Tubing for fittings
- T Connector for tubing
- Centrifuge
- Centrifuge tubes 60ml
- Scale
- Weigh boats
- Autoclave
- Beakers
- Graduated cylinder
- 0.1M CaCl2 solution
- Agarose
- Alginate
- Methylcellulose
- Sucrose
Software:
- Fusion 360 or Solidworks
- Arduino IDE
- Repetier Host
- Ultimaker Cura 4
Step 1: Selecting a 3D Printer
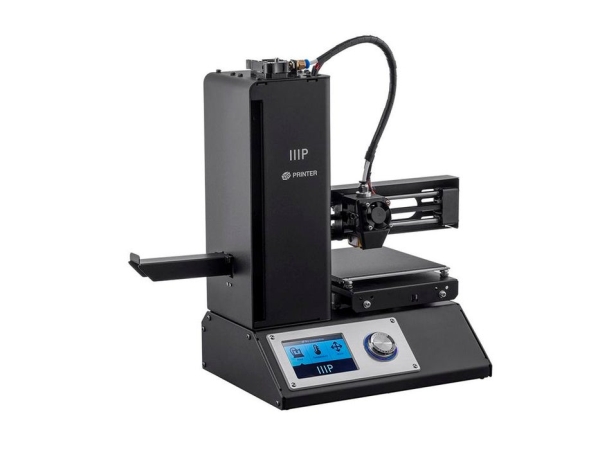
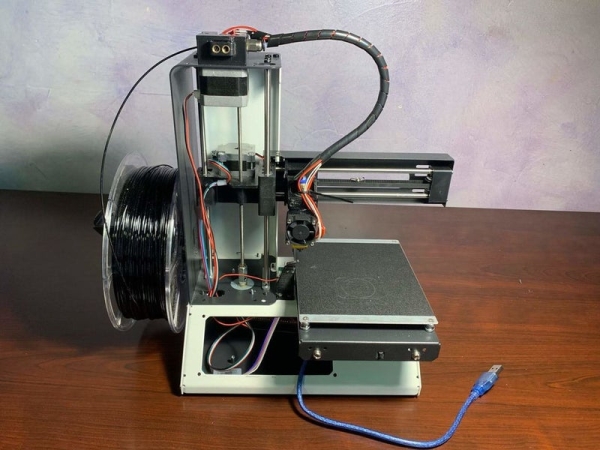
We chose the Monoprice MP Select Mini 3D Printer V2 as the starting 3D printer. This printer was selected because of its low cost and high availability. Additionally, a highly accurate 3D model of the printer was already available which made design easier. This instructable will be tailored for this specific printer but a similar process can be used to convert other common FDM printers and CNC machines.
High accuracy model: https://www.thingiverse.com/thing:2681912
Step 2: 3D Printing
Before disassembly of the Monoprice printer, several parts need to be 3D printed for the modification of the 3D printer. There are versions of the paste extruders, one that requires epoxy and one that doesn’t. The one that requires epoxy is more compact but more difficult to assemble.
Step 3: Prepare Printer for Modification
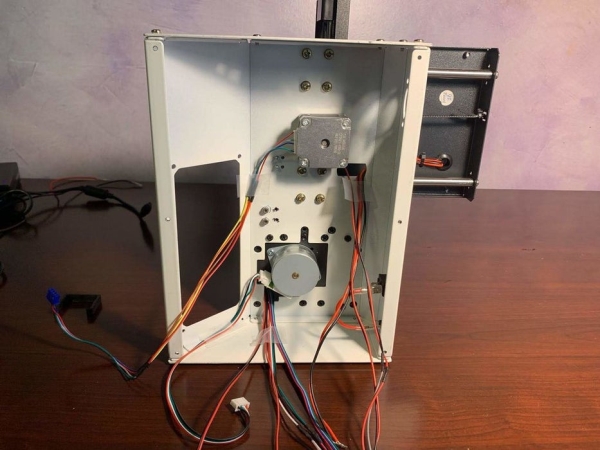
The front tower panel, bottom cover and the control panel should be removed. Once the bottom has been removed, disconnect all electronics from the control board and remove the control board.
Step 4: Interchangeable Mount
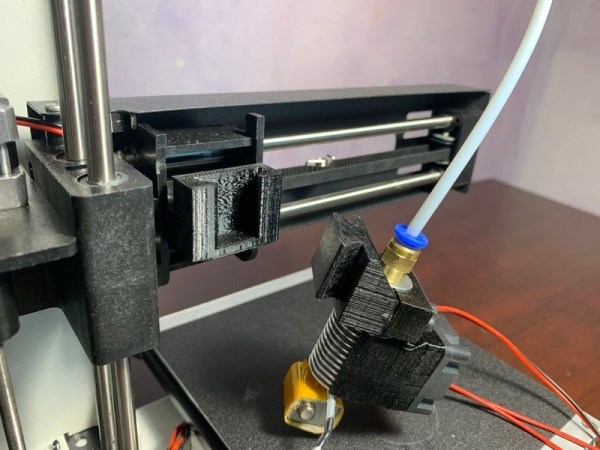
Body 1 and Body 14 each require two heat set nuts. Body 1 is mounted to the printer frame by the two M3 bolts hidden under the belt. The bolts can be revealed by removing the belt tensioner and pulling the belt to one side.
Read more: Low Cost Bioprinter
- What 3D printer was selected as the base for the bioprinter?
The Monoprice MP Select Mini 3D Printer V2 was selected as the starting printer. - Why was the Monoprice MP Select Mini V2 chosen?
It was chosen for its low cost, wide availability, and an available high-accuracy 3D model that eased design. - What electronics board is used in the conversion?
The project uses a Ramps 1.4 with an Arduino Mega 2560 and stepper motor drivers. - Are there different paste extruder versions to print?
Yes, there are two versions: one requiring epoxy and a more compact non-epoxy version. - What must be removed before modifying the printer?
Remove the front tower panel, bottom cover, control panel, disconnect electronics, and remove the control board. - How is Body 1 mounted to the printer frame?
Body 1 is mounted using two M3 bolts hidden under the belt; reveal them by removing the belt tensioner and pulling the belt aside. - Do Body 1 and Body 14 require heat set nuts?
Yes, both Body 1 and Body 14 each require two heat set nuts. - What software is recommended for design and control?
Fusion 360 or SolidWorks for design, Arduino IDE, Repetier Host, and Ultimaker Cura 4 for printer control and slicing. - What lab supplies are listed for bioprinting bio-inks?
Items listed include petri dishes, 60 ml and 10 ml Luer-lock syringes, Luer-lock fittings, tubing, centrifuge and tubes, scale, weigh boats, autoclave, beakers, graduated cylinder, 0.1M CaCl2, agarose, alginate, methylcellulose, and sucrose.