Summary of Arduino RC Robot
A durable, 3D-printed, Arduino Uno–based remote control robot kit (OmniBot) with modular quick-connect motors, up to four DC motor channels, two servos, and several-hundred-meter range. Designed for easy prototyping and education, it uses a sleek 3D-printed case, simple wiring, and an RC transmitter/receiver; minimal soldering and basic Arduino familiarity required. Files and instructions for printing, cleaning, and assembly are provided.
Parts used in the OmniBot:
- Arduino Uno microcontroller (surface mount chip type recommended)
- Arduino Motor Shield V1
- Turnigy Evo Transmitter (mode 2) with compatible receiver (iBus compatible)
- Male and female JST plugs (silicone type recommended)
- 13.5mm x 9mm rocker switch
- M3x6mm countersunk screws (6 required)
- 2S LiPo battery (or 7–12V non-rechargeable battery pack)
- 2S LiPo charger (only if using LiPo)
- PETG 3D printer filament (PLA can be used)
- TT motors and wheels
- Servo motors

Description
A durable, 3D printed, remote controlled Arduino based robot with several hundred meters range. A modular quick-connect motor scheme lets you rapidly prototype different robot designs without any tools. Perfect for robotics education for kids.
Whats it all about?
So you’ve just started learning Arduino, or maybe 3D printing and your ready to build something cool. You want to build something meaningful, and practical, but fun… You’re ready to build the OmniBot. If the Arduino is the Swiss Army Knife of electronics, then the OmniBot is the Swiss Army Knife of robotics! The OmniBot is the result of a several month long project of Bolts and Bytes Maker Academy that aimed to design a versatile and easy to use remote controlled robotics kit. And now its all open source! The OmniBot is battery powered, can drive up to four DC motor channels, two servo motors, and has a remote controlled range of several hundred meters! And it all fits inside a sleek 3D printed case, running on, you guessed it, an Arduino Uno brain.
Okay, but why?
We really wanted to make it super easy for young kids to pick up some cardboard and glue and end up with a working custom robot. With traditional robot kits you might buy online, you’re forced to deal with lots of messy jumper wires, writing your own code, and – oh yeah… you can almost never control them remotely. They just run the same code in a loop. With the OmniBot, you simply plug in a battery, plug in a motor, and tape it or glue it where you want, and – boom. robot. All the code we’ve written auto-magically works with the same controller you might use for a drone or RC plane. It’s the perfect kit for rapid prototyping field ready robots. When you have finished building your OmniBot platform, you have only just begun. In ten short minutes you could go from a mission critical bomb defusing robot, to a Rocket-league style soccer bot, and that’s what makes OmniBot powerful. So let’s get started!
Recommended Skill Levels:
- This projects includes some light soldering, it is fairly manageable for beginners.
- General understanding of Arduino and how to work in the Arduino IDE uploading sketches and adding libraries. No coding is required but advanced users can customize their code if desired.
- Some light hardware work with screwdriver and wire cutters/strippers. Adult supervision recommended for young kids. (The final product is suitable for use with all ages!)
Supplies:
Required Tools:
- Soldering iron and solder
- Allen wrench/key or hex head screwdriver
- Phillips head or flat head screwdriver (depending on the terminal blocks of the motor shield)
- Hot glue gun and hot glue sticks (not required but highly recommended!)
- Wire cutters (flush cutters are recommended as they can be used in other steps)
- Wire strippers
- Needle nose pliers (not required but it makes cleaning the 3D print much easier)
- Access to a 3D printer (if you don’t have one, ask your local maker space, school, lab, or library!)
- A computer with the Arduino IDE software
Bill of Materials:
The following items and links were sourced from Amazon (all or most are Amazon Prime items) but it should be noted that most, if not all of these, can be found for much cheaper on websites like Banggood and AliExpress if your willing to wait a few weeks for shipping. This can actually cut the project cost in half if you look well enough.
- Arduino Uno Microcontroller (the type with the surface mount chip works better for this)
- Arduino Motor Shield V1
- Turnigy Evo Transmitter (mode 2) (this one comes with the receiver but most receivers with iBus communication should work)
- Male and Female JST plugs (I highly recommend the type with silicone because they are more flexible)
- 13.5mm x 9mm Rocker Switch
- M3x6mm countersunk screws (only 6 screws are actually needed)
- 2S Lipo battery (this can be substituted with a non rechargeable battery back between 7 and 12 volts)
- 2S Lipo Charger (only required if using a lipo battery)
- PETG 3D printer filament (PLA can be used but PETG is more durable and heat resistant to hot glue)
- TT motors and wheels
- Servo motors (larger servo motors can be used as well)
If you’ve got all your tools and parts then follow me! We’ve got robots to build…
Step 1: 3D Printing Your Robot Chassis
For this step you will need:
- A 3D printer with a minimum build volume of 4.5″X x 4.5″Y x 1.5″Z
The good news is, I’ve already design it for you! The 3D STL files are all right below. But first, here are some notes.
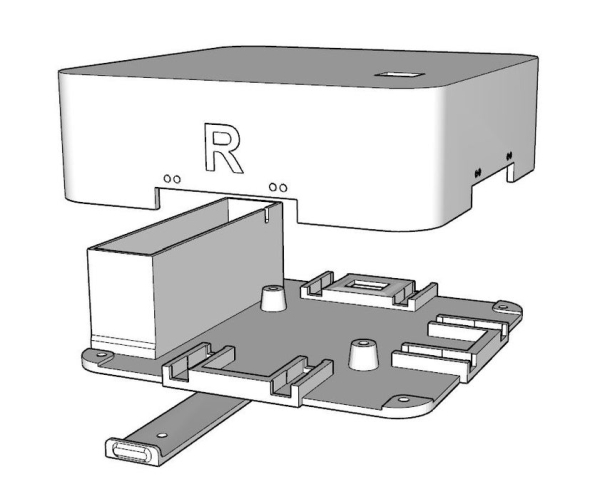
The print is three separate solid models, the Upped Section, the Lower Section, and the Battery Door. The Lower Section does require support materials, but only under the section where the switch will be installed.
The Lower Section and Battery Door can be printed in one shot as a “print in place” model, meaning that you can pull it straight off the printer when its done and the door will work right away without installation. Some lower quality printers might struggle with the tolerances however and melt these two parts together so I’ve also included separate print files for each the Battery Door and Lower Section so you can print them individually and assemble them after.
Step 2: Cleaning the 3D Print
For this step you will need:
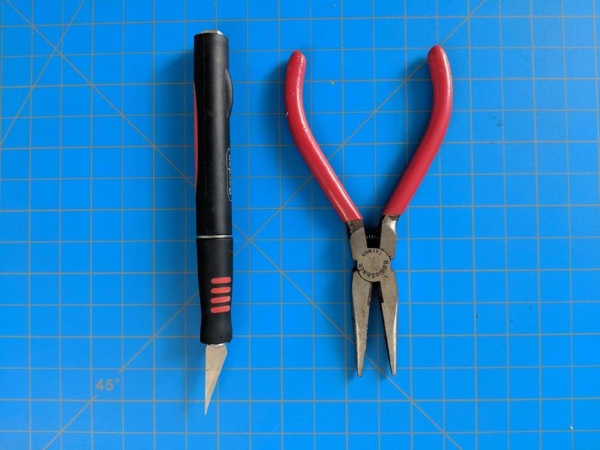
- A pair of needle nose pliers
- A hobby knife
Carefully remove your print from the build plate. If you printed it all in one shot like I did, you may have to brush off some stringing between parts. Using a pair of pliers, pull out the support material by the hole where the switch will go. On some printers the first layer or two of the battery door may be fused with the lower section, if this is the case you can use a hobby knife to slice out the door. If the fusing is too bad, you may need to print the door and lower section separately and snap them together afterwards.
Read more: Arduino RC Robot
- What is the OmniBot?
The OmniBot is a durable 3D printed, remote controlled Arduino based robot kit designed for rapid prototyping and education. - What microcontroller does the OmniBot use?
The project uses an Arduino Uno microcontroller, with the surface mount chip type recommended. - How many motors and servos can OmniBot drive?
OmniBot can drive up to four DC motor channels and two servo motors. - What transmitter and receiver are recommended?
The Turnigy Evo Transmitter (mode 2) with its receiver is recommended, and most receivers with iBus communication should work. - Do I need a 3D printer to build OmniBot?
Yes; access to a 3D printer is required to print the chassis parts, though maker spaces or libraries can be used if you do not own one. - What filament is recommended for printing the OmniBot chassis?
PETG is recommended for durability and heat resistance, though PLA can be used. - Is soldering required for this project?
The project includes some light soldering and is manageable for beginners. - What tools are required to assemble the OmniBot?
Required tools include a soldering iron and solder, hex key or Allen wrench, Phillips or flat screwdriver, hot glue gun (recommended), wire cutters, wire strippers, needle nose pliers, and a computer with the Arduino IDE. - Can I substitute the LiPo battery?
You can substitute the 2S LiPo with a nonrechargeable battery pack between 7 and 12 volts. - Are the 3D print parts printed as multiple pieces?
The chassis is three solid models: Upper Section, Lower Section, and Battery Door; Lower Section and Battery Door can be printed as a print-in-place model or separately if tolerances are problematic.