Summary of Led Slot Machine Costume using Arduino
This article details the creation of a Slot Machine costume featuring addressable LEDs controlled by an Arduino. The process involves transferring a graphic onto a T-shirt, constructing fabric light holders using Heat-N-Bond to secure LED strips, and integrating flashing lights into a hat powered by batteries. The project combines sewing techniques with electronics to create a wearable display.
Parts used in the Slot Machine Costume:
- Plain white T-Shirt
- Old or new white shirt to cut
- 1 meter addressable led strip from Adafruit
- Arduino (Uno SMD)
- Sewing gauge
- 1 pkg Heat-N-Bond ultra hold
- Battery holder for 4 AA's
- 4 AA's rechargeable 1500mah
- Iron on transfer paper
- Hot glue gun
- Hat
- Flashing led kit
- 2 Basic night lights
- 2 Lg washers
- 9V Batt
- Clear tape
This Instructable will walk you through my process of making a Slot Machine costume with addressable leds controlled with an arduino!
Step 2: Lets Get started
Picture set up:
I found my slot picture online that the best graphic that when enlarged would stay nice and clear. Be sure to follow the directions on the iron on transfer paper when printing and transferring. Print the picture to full page 8.5 by 11 HINT: Turn off border less printing or it will cut off part of the pic. I forgot and end cut part off the pic.
Lay out the transfer paper and mark the edges with pins ( see pic 1 ) and check to be sure it is centered. Once you are happy with the lay out you can go ahead and lay the transfer back down and remove the pins.
Start the transfer process following the iron on transfer instructions. Let it cool completely before attempting to remove. If you notice the transfer not bonding as you lift , reheat it until it bonds.
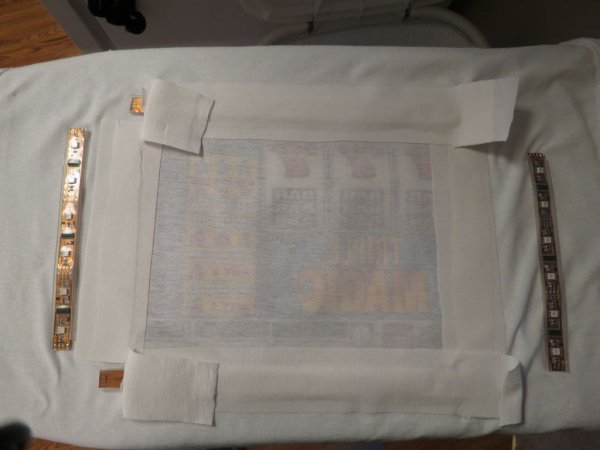
Light holders:
We need a way for the addressable leds to stay in place. I chose to use Heat-N-Bond with some extra fabric.
Cut fabric strips about 2 1/2″ wide and 2″ longer then each side ( you should end up with 4 strips for all sides) (See Pic 2)
Cut the Heat-N-Bond to the size of the strips and attach following the instructions provided with the package. (See Pic 3)
Cut some more fabric strips to 1 1/2″ wide by as long as the other strips you just made. (See Pic 4)
Cut 2″ by 2″ fabric squares and iron them to the ends of the strips. (See Pic 5)
Attach the light holder strips:
Turn the shirt inside out and position the 1 1/2″ (See pic 4a ) strips along the picture outline. Peal the backing off the Heat-N-Bond of the wider strips and lay facing down on top of small strips being sure it is centered. (See pic 4b)
Iron on following the instructions provided in package.
You should now have long pockets along the perimeter of the picture with 2″ ends that can be lifted ( these will later be used for access to solder the lights then bonded down) (See pic 6)
The parts list
Shirt Parts:
Plain white T-Shirt
Old or new white shirt to cut
1 meter addressable led strip from Adafruit
Arduino (I used an uno smd)
Sewing gauge (or other measuring device)
1 pkg Heat-N-Bond ultra hold
Battery holder for 4 AA’s
4 AA’s rechargeable 1500mah
Iron on transfer paper
Hat parts:
Hot glue gun
Hat
Flashing led kit ( I got mine from the shack, but it’s also avil online elsewhere)
2 Basic night lights
2 Lg washers
9V Batt
Clear tape
For more detail: Led Slot Machine Costume using Arduino
- How should I print the slot machine picture?
Print the picture to full page 8.5 by 11 and turn off border less printing to avoid cutting off parts. - Can I remove the transfer paper immediately after ironing?
No, you must let it cool completely before attempting to remove it. - What is the best way to attach the light holders?
Use Heat-N-Bond with extra fabric strips to create pockets along the perimeter of the picture. - How do I access the soldering points for the lights?
The design includes 2 inch ends that can be lifted for access to solder the lights before bonding them down. - Does the project require specific battery types?
Yes, the shirt uses 4 AA's rechargeable 1500mah, and the hat requires a 9V Batt. - What material is used to bond the fabric strips?
Heat-N-Bond ultra hold is used to attach the fabric strips to the shirt. - Can I use any size fabric strips for the light holders?
You should cut strips about 2 1/2 inches wide and 2 inches longer than each side of the picture. - What powers the flashing lights in the hat?
The flashing led kit and basic night lights in the hat are powered by a 9V battery.