So I’ve decided to build a robot using Arduino to control the sensors. Here’s my progress so far – I am hoping that my mistakes here and over the coming posts will guide people in more detail about what to avoid. Also I won’t provide a parts list until I have a working robot…
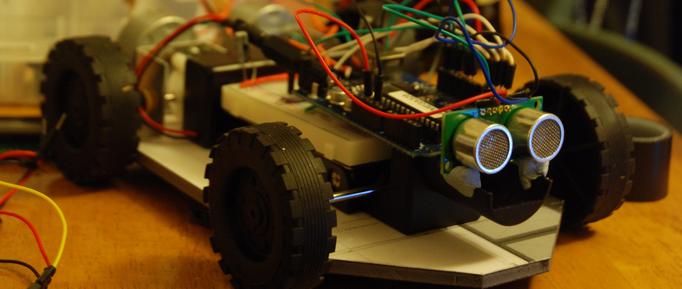
The purpose of my early version of larryBot is to create a basic robot that can be controlled with Arduino and that can be made from minimal materials and costs – I aimed with the Arduino included for this cost to be about £60-70 in total depending on what you can scrounge and providing you have the tools and some parts already. Also I wanted to make a robot from scratch rather than hacking together existing things, like modifying a RC car chassis for example. So far all larryBots aim is to do is to avoid obstacles and move around them.
First off I looked at using the L293D chip to control 2 DC motors and this would operate my steering and I would use the SRF05 ultrasound range finder as a proximity sensor. I had no problem with this circuit when I first started until today.
My first consideration was the chassis, now I figure that most people like me have spent the money on the Arduino board, which is worth every penny, and you probably have a few motors and bits with which to do this. However, like me, you looked at chassis and what to build one from to mount all the electronics. Theres the Tamiya erector set (if you can get it in the UK), Meccano, Lego and of course specific robot chassis’s not to mention designing your own and getting it made.
All very expensive (unless you have it already) and requires effort. I am lazy and karma happened to bless me with finding a stash of 5mm thick foamboard for me to use. If you aren’t aware foamboard is used for modelling and mounting work for display – if you need any then get a design agency to come and quote for work at your company and keep their foamboard
Anyway, the foamboard is excellent for my uses so far as my robots aren’t massive and their weight is minimal. It also allows me to rapidly prototype a chassis and layout without any costs – you can just push screws and bolts through to mount motors and use a glue gun to join parts. Another bonus is that you only need a craft knife to cut it.
To connect everything I just brought a set of various nuts and bolts to use along with a glue gun and thats it.
My circuit throughout has basically remained the same, I use a 6v power supply to power the L293D and the motors, and a 9V DC power supply to power the Arduino, which controls the L293D and reads the Ultrasound sensor. My changes so far have been on the chassis, motors, movement and gearing. The sketch for these versions has also remained the same which you can see detailed below:
larryBot v0.1-05 Arduino Robot Sketch
const int numOfReadings = 10;                   // number of readings to take/ items in the array
int readings[numOfReadings];                    // stores the distance readings in an array
int arrayIndex = 0;                             // arrayIndex of the current item in the array
int total = 0;                                  // stores the cumlative total
int averageDistance = 0;                        // stores the average value

// setup pins and variables for SRF05 sonar device

int echoPin = 12;                               // SRF05 echo pin (digital 2)
int initPin = 13;                               // SRF05 trigger pin (digital 3)
unsigned long pulseTime = 0;                    // stores the pulse in Micro Seconds
unsigned long distance = 0;                     // variable for storing the distance (cm)

int motor1Pin1 = 3;                             // pin 2 on L293D
int motor1Pin2 = 4;                             // pin 7 on L293D
int enable1Pin = 9;                             // pin 1 on L293D
int motor2Pin1 = 5;                             // pin 10 on L293D
int motor2Pin2 = 6;                             // pin  15 on L293D
int enable2Pin = 10;                            // pin 9 on L293D

void setup() {
  // set the motor pins as outputs:
  pinMode(motor1Pin1, OUTPUT);
  pinMode(motor1Pin2, OUTPUT);
  pinMode(enable1Pin, OUTPUT);
  pinMode(motor2Pin1, OUTPUT);
  pinMode(motor2Pin2, OUTPUT);
  pinMode(enable2Pin, OUTPUT);
  // set enablePins high so that motor can turn on:
  digitalWrite(enable1Pin, HIGH);
  digitalWrite(enable2Pin, HIGH);

  pinMode(initPin, OUTPUT);                     // set init pin 3 as output
  pinMode(echoPin, INPUT);                      // set echo pin 2 as input

  // create array loop to iterate over every item in the array

  for (int thisReading = 0; thisReading < numOfReadings; thisReading++) {
    readings[thisReading] = 0;
  }
}

void loop() {
  digitalWrite(initPin, HIGH);                  // send 10 microsecond pulse
  delayMicroseconds(10);                                // wait 10 microseconds before turning off
  digitalWrite(initPin, LOW);                   // stop sending the pulse
  pulseTime = pulseIn(echoPin, HIGH);           // Look for a return pulse, it should be high as the pulse goes low-high-low
  distance = pulseTime/58;                      // Distance = pulse time / 58 to convert to cm.
  total= total - readings[arrayIndex];          // subtract the last distance
  readings[arrayIndex] = distance;              // add distance reading to array
  total= total + readings[arrayIndex];          // add the reading to the total
  arrayIndex = arrayIndex + 1;                  // go to the next item in the array

  // At the end of the array (10 items) then start again
  if (arrayIndex >= numOfReadings)  {
    arrayIndex = 0;
  }

  averageDistance = total / numOfReadings;      // calculate the average distance
  delay(10);

  // check the average distance and move accordingly

  if (averageDistance <= 25){
    // go backwards
    digitalWrite(motor1Pin1, HIGH);
    digitalWrite(motor1Pin2, LOW);
    digitalWrite(motor2Pin1, HIGH);
    digitalWrite(motor2Pin2, LOW);

  }

  if (averageDistance <= 45 && averageDistance > 25) {
    // turn
    digitalWrite(motor1Pin1, HIGH);
    digitalWrite(motor1Pin2, LOW);
    digitalWrite(motor2Pin1, LOW);
    digitalWrite(motor2Pin2, HIGH);
  }
  if (averageDistance > 45)   {
    // go forward
    digitalWrite(motor1Pin1, LOW);
    digitalWrite(motor1Pin2, HIGH);
    digitalWrite(motor2Pin1, LOW);
    digitalWrite(motor2Pin2, HIGH);

  }
}
I’ve gone down the route so far of using differential steering, this means that to turn left 1 motor goes forward while the other goes in reverse. I did look at using a servo to mimic an RC cars steering but this added to complexity which for now I want to avoid.
For more detail: larryBot – Arduino robot versions 0.1 to 0.5 lessons learned