
Summary of Keyboard Injection/Auto Type Your Password With One Click!
This article details a DIY auto-typing machine using an Arduino Pro Micro to automate password entry, eliminating the need to remember or manually type complex passwords. The project involves wiring two pushbuttons with resistors to the microcontroller and enclosing the assembly in a matchbox. Custom code is uploaded to trigger specific passwords upon button presses.
Parts used in the Auto-Typing Machine:
- 2x 10k resistors
- 1x Pro Micro (or any Arduino/Arduino clone with the 32u4 chip)
- 1x Matchbox
- 2x Pushbuttons
- Cables (preferably different colours)
Passwords are hard… and remembering a secure one is even harder! On top of that if you have along, convoluted password it will take time to type.
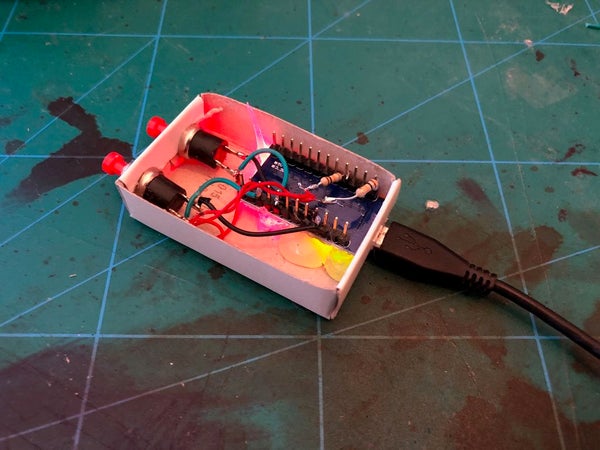
But fear not my friends, I have a solution to this! I Created a little auto-typing machine that will output the passwords into the computer. Now there is no need to remember stuff or being a fast typer.
Step 1: What You Need.
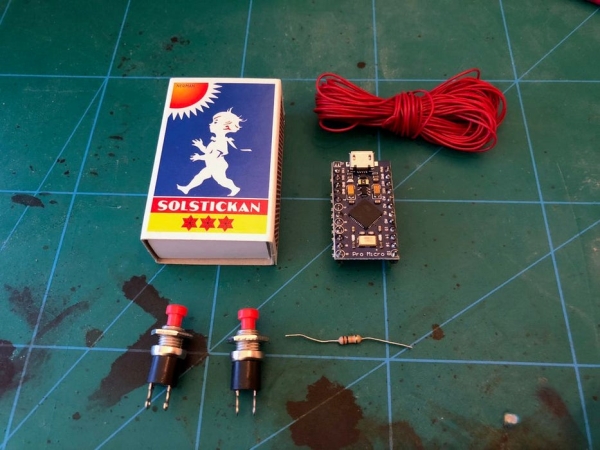
Parts:
2x 10k resistors (never mind the picture where there is only one)
1x Pro Micro (or any Arduino/Arduino clone with the 32u4 chip)
1x Matchbox (Now, don’t get the wrong idea, it is not in a matchbox to be sneaky it is built in one because i think it looks good).
2x Pushbuttons.
Some cables, preferably different colours.
Tools used:
Soldering iron.
Glue gun
Step 2: Putting It Together
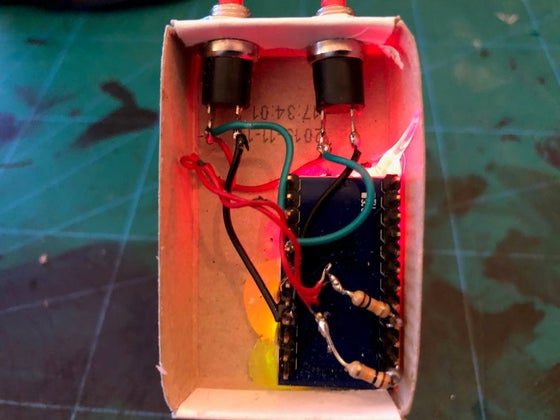
For the wiring you’ll need to connect the VCC and/or RAW on the Pro Micro via a resistor to the button. The cable that goes to the digital pins on the Pro Micro will go to the same pin as the power on the button. Lastly, return to ground (GND).
Or make it easy for yourself and look at the images to see how I connected things. The Fritzing image is to help make it clear where everything will go, I know it is a Leonardo on that image but there were no Pro Micro in Fritzing.
Use the glue gun to secure everything in the matchbox.
Step 3: The Code
include
define buttonPin 7 // Permanently makes buttonPin’s value 7.
define buttonPin2 5 // Permanently makes buttonPin2’s value 5.
void setup() {
pinMode(buttonPin,INPUT); // Set the pins as inputs.
pinMode(buttonPin2,INPUT);
Serial.begin(9600);
Keyboard.begin(); // Start the keayboard funktions
}
void loop() {
int buttonState = digitalRead(buttonPin); //read the state of the button input
int buttonState2 = digitalRead(buttonPin2); //read the state of the button input
if (buttonState == LOW) { //pressing the button will produce a LOW state 0V
Serial.println(buttonState);
Keyboard.print (“m05Ts3cUR3Pa55W0rDewWa”); //Enter your password here
delay (1000);
}
if (buttonState2 == LOW) { //pressing the button will produce a LOW state 0V
Keyboard.print (“5eConDm05Ts3cUR3Pa55W0rDewWa”); //Enter your second password here
delay (1000);
}
}
If you want, you could make it type in your usernam/email then tab to password and enter that as well. Just put this piece of code in instead of just the Keyboard.print().
Source: Keyboard Injection/Auto Type Your Password With One Click!
- What components are required for this project?
You need 2x 10k resistors, 1x Pro Micro or compatible Arduino with a 32u4 chip, 1x matchbox, 2x pushbuttons, and cables. - How do you wire the buttons to the Pro Micro?
Connect VCC or RAW on the Pro Micro via a resistor to the button, connect the digital pin cable to the same power pin on the button, and return to ground. - Which tools are necessary to build this device?
The project requires a soldering iron and a glue gun. - Can I use a Leonardo instead of a Pro Micro?
Yes, the author notes that while the diagram shows a Leonardo, any Arduino or clone with the 32u4 chip works as a substitute. - How does the code detect a button press?
The code reads the button state, where pressing the button produces a LOW state of 0V. - Where should I enter my custom password in the code?
You must replace the example text inside the Keyboard.print function with your desired password string. - Can this device also type usernames and email addresses?
Yes, by modifying the code to include typing the username or email followed by a tab and the password before entering. - What happens after the password is typed?
The code includes a delay of 1000 milliseconds after printing the password.
