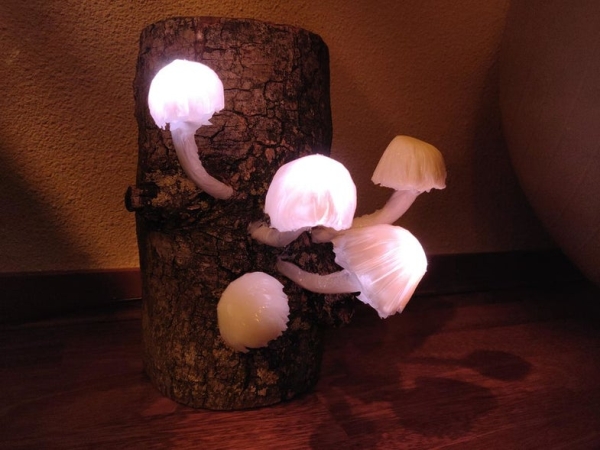
This instructable will show you how to make mushrooms that will glow in the dark. You can turn individual mushrooms off and on again by pressing the top.
I started this project for a school assignment where we had to create something using the Arduino Uno.
I wanted to create something pretty and magical and quickly decided that I wanted to make glowing mushrooms. Initially, I wanted to not only make them glow, but also have them move and play a tune. However, due to the deadline for the project, I had to scrap those ideas.
This project was inspired by DIY perks’ video:
Here you will find the process I went through to create these lights, as well as the instructions on how to do it.
For this project, you will need:
- An Arduino Uno;
- A breadboard;
- A perf board;
- 5 LEDs from a neopixel LEDstrip;
- 5 pressure Sensors;
- A light sensor;
- A 470Ω resistor;
- 6 resistors of any value;
- Stiff wire (non-conductive!);
- Transparent silicone sealer;
- Watercolour paint;
- Cling film
- A tree log;
- A drill;
- A chisel and hammer;
- Wires in several colours;
- Electrical tape;
- Other, strong tape;
- Hot glue;
- Shrink tube;
- A heat gun;
- A soldering station;
- Pliers;
- tissue paper;
- A steady hand and a lot of time and patience;
Step 1: Concept Design
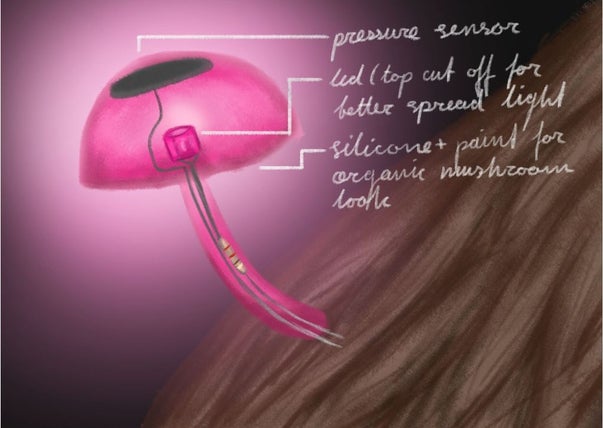
I almost immediately knew what I wanted to make for this project. Since I had been wanting to make glowing mushrooms for a while, I figured this was the perfect opportunity to do so. To get a bit of an idea of the technology behind the mushrooms, I sketched out how I would make them. This was an important step in my process, because this way I could actually visualise the hardware and sort things out in my head. Eventually, the design changed a bit (I placed the LED above the pressure sensor, added stiff wire to press down on the sensor and hold up the top of the mushroom and I removed the movement and sound components).
Before starting this project I had no experience with the Arduino and only knew how to code a little bit in Python, so I did some research. I roughly knew what I would need for my project, so I scavenged the internet and started to experiment with code. I quickly ran into problems with my servo’s (which I wanted to use to make the mushrooms move), so I decided to drop that idea. Later, when I found I needed more time than I initially thought to figure out how to code what I wanted and to hollow out the tree log, I also decided to drop the music idea and just stick with only the mushrooms.
I also realised that it would probably be a good idea to place the pressure sensor underneath the LED, so no light would be blocked by the sensor.
Step 2: Preparing the Log
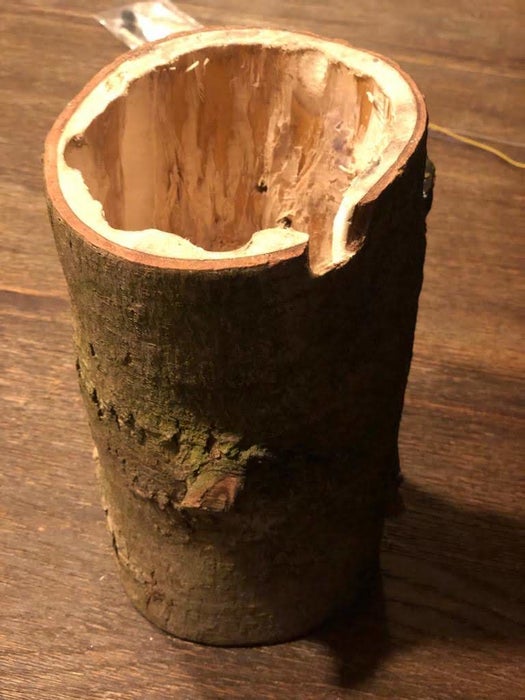
One of the most time-consuming tasks of this project was hollowing out the log. I would suggest either getting one from a soft kind of wood that’s easily workable (unlike me), or buying an already hollowed out log.
If you want to hollow out your own log, you can either burn the hole in or use the method I used. For my method you will need a drill, a chisel, a hammer, and a lot of patience.
Before you start drilling, you should think about how far down you want to hollow the tree out. Note: If you remove more wood, the project will end up being less heavy, but also less strong.
When you roughly know how deep you want to go, you can start drilling holes. Remove the wood in between the drill holes using the chisel and a hammer. Repeat this process until you are satisfied.
Remember that the side of the log with the hole in it will be the bottom!
Now you should plot out where you want your mushrooms, the light sensor and the power cable to go and drill holes from the outside to the inside of the log at those places. I recommend placing the light sensor far away from the mushrooms, because if it is too close the light from the mushrooms will mess with the values of the sensor.
Step 3: Making the Mushroom Caps
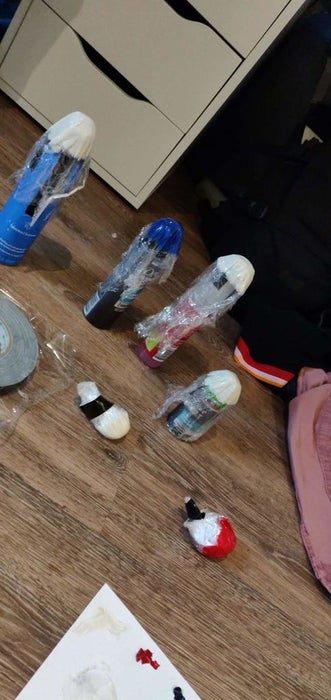
For the mushroom caps you will need transparent silicone sealant, watercolour paints, cling film, something to stir with and round objects (or crumbled up tissue paper).
mix a dollop of silicone with a little bit of watercolour paint. I chose white, so I could still give my mushrooms any colour I wanted using the colour of the LEDs, but if you just want one colour you can make it more intense by making the mushrooms that same colour.
Next, place the silicone on a piece of cling film and fold the cling film over it, so that the silicone is sandwiched in-between. Flatten the silicone using your hands, until it has the preferred thickness. You can hold it up to the light to get an idea of how it will look. Make sure you make the mushroom caps big enough for your LEDs and pressure sensors to fit in!
Place the cling film over a round object and leave it to dry.
When it has fully dried you can take it out of the cling film, remove any access around the edges if needed and your mushroom cap is done.
Source: Interactive Glowing Mushrooms