Summary of How to Make an Arduino Radar
This article details a DIY Arduino radar project that detects object distance and direction using an ultrasonic sensor mounted on a rotating servo. The creator enhanced the original design by 3D printing a sensor bracket, laser-cutting a housing box for aesthetics, and adding a buzzer for audio feedback. The system utilizes Arduino IDE for hardware control and Processing software to visualize data on a screen.
Parts used in the Arduino Radar:
- Servo motor
- Ultrasonic sensor
- Buzzer
- Breadboard
- UNO R3 Arduino
- Wires
- 3D printed ultrasonic sensor bracket
- Laser-cut box
This is a radar, designed to detect the distance and direction an object is from the ultrasonic sensor. With the ultrasonic sensor connected to a servo, it has the ability to rotate 180 degress, similar to a radar utilised to detect the position of planes. As the radar wasn’t my original idea, I have also made improvements and adjustments to the original source of this project. This includes 3D printing an ultrasonic sensor bracket, laser cutting a box to make it look cleaner, and the inclusion of a buzzer. The original inspiration for this project can be viewed here: https://www.youtube.com/watch?v=JvmIutmQd9U as it gave me a good understanding into what the end result was going to look like, but also gave me ideas on improvements I could make to the overall aesthetics of the project.
Step 1: Materials and Programs
The materials required for this build include:
– 1 Servo
– 1 Ultrasonic sensor
– 1 Buzzer
– 1 Bread board
– 1 UNO R3 Arduino
– Heaps of wires
Programs required to make this radar:
– Arduino IDE
– Processing 3.4
To download the above programs onto your computer, follow the links below:
– https://www.arduino.cc/en/main/software
– https://processing.org/download/
Step 2: Arduino Code
This is the arduino code which basically controls the movement and input of the servo and sensor. This was copied from the youtube video https://www.youtube.com/watch?v=JvmIutmQd9U and seemed to work nicely with my arduino board and computer.
// Includes the servo library
#include <Servo.h>.
// Defines Trig and Echo pins of the Ultrasonic Sensor
const int trigPin = 10;
const int echoPin = 11;
#define buzzerPin A0 //Defines the pin A0 as an output to buzzerPin
// Variables for the duration and the distance
long duration;
int distance;
Servo myServo; // Creates a servo object for controlling the servo motor
void setup() {
  pinMode(trigPin, OUTPUT); // Sets the trigPin as an Output
  pinMode(echoPin, INPUT); // Sets the echoPin as an Input
  Serial.begin(9600);
  myServo.attach(12); // Defines on which pin is the servo motor attached
}
void loop() {
  // rotates the servo motor from 15 to 165 degrees
  for(int i=15;i<=165;i++){
  myServo.write(i);
  delay(30);
  distance = calculateDistance();// Calls a function for calculating the distance measured by the Ultrasonic sensor for each degree

  Serial.print(i); // Sends the current degree into the Serial Port
  Serial.print(","); // Sends addition character right next to the previous value needed later in the Processing IDE for indexing
  Serial.print(distance); // Sends the distance value into the Serial Port
  Serial.print("."); // Sends addition character right next to the previous value needed later in the Processing IDE for indexing
  tone(buzzerPin, 10000 / distance);
  }
  // Repeats the previous lines from 165 to 15 degrees
  for(int i=165;i>15;i--){
  myServo.write(i);
  delay(30);
  distance = calculateDistance();
  Serial.print(i);
  Serial.print(",");
  Serial.print(distance);
  Serial.print(".");
  tone(buzzerPin, 10000 / distance); //Produces a different tone according to the distance the object is from the sensor
  }
}
// Function for calculating the distance measured by the Ultrasonic sensor
int calculateDistance(){

  digitalWrite(trigPin, LOW);
  delayMicroseconds(2);
  // Sets the trigPin on HIGH state for 10 micro seconds
  digitalWrite(trigPin, HIGH);
  delayMicroseconds(10);
  digitalWrite(trigPin, LOW);
  duration = pulseIn(echoPin, HIGH); // Reads the echoPin, returns the sound wave travel time in microseconds
  distance= duration*0.034/2;
  return distance;
}
Step 3: Processing Code
Here is the code I used for the processing program to take the information from the ultrasonic sensor, and turn it into the display that it creates. This was a code the I copied from the video https://www.youtube.com/watch?v=JvmIutmQd9U which worked really well, it only needed a few tweaks.
<p>p.p1 {margin: 0.0px 0.0px 0.0px 0.0px; font: 11.0px 'Helvetica Neue'; color: #000000; -webkit-text-stroke: #000000}<br>p.p2 {margin: 0.0px 0.0px 0.0px 0.0px; font: 11.0px 'Helvetica Neue'; color: #000000; -webkit-text-stroke: #000000; min-height: 12.0px}
span.s1 {font-kerning: none}</p><p>import processing.serial.*; // imports library for serial communication</p><p>import java.awt.event.KeyEvent; // imports library for reading the data from the serial port</p><p>import java.io.IOException;</p><p>Serial myPort; // defines Object Serial</p><p>// defubes variables</p><p>String angle="";</p><p>String distance="";</p><p>String data="";</p><p>String noObject;</p><p>float pixsDistance;</p><p>int iAngle, iDistance;</p><p>int index1=0;</p><p>int index2=0;</p><p>PFont orcFont;</p><p>void setup() {</p><p> size (1200, 700); // ***CHANGE THIS TO YOUR SCREEN RESOLUTION***</p><p> smooth();</p><p> myPort = new Serial(this,"/dev/cu.usbmodem143401", 9600); // starts the serial communication</p><p> myPort.bufferUntil('.'); // reads the data from the serial port up to the character '.'. So actually it reads this: angle,distance.</p><p>}</p><p>void draw() {</p><p>  fill(98,245,31);</p><p>  // simulating motion blur and slow fade of the moving line</p><p>  noStroke();</p><p>  fill(0,4); </p><p>  rect(0, 0, width, height-height*0.065); </p><p>  fill(98,245,31); // green color</p><p>  // calls the functions for drawing the radar</p><p>  drawRadar(); </p><p>  drawLine();</p><p>  drawObject();</p><p>  drawText();</p><p>}</p><p>void serialEvent (Serial myPort) { // starts reading data from the Serial Port</p><p>  // reads the data from the Serial Port up to the character '.' and puts it into the String variable "data".</p><p>  data = myPort.readStringUntil('.');</p><p>  data = data.substring(0,data.length()-1);</p><p>  index1 = data.indexOf(","); // find the character ',' and puts it into the variable "index1"</p><p>  angle= data.substring(0, index1); // read the data from position "0" to position of the variable index1 or thats the value of the angle the Arduino Board sent into the Serial Port</p><p>  distance= data.substring(index1+1, data.length()); // read the data from position "index1" to the end of the data pr thats the value of the distance</p><p>  // converts the String variables into Integer</p><p>  iAngle = int(angle);</p><p>  iDistance = int(distance);</p><p>}</p><p>void drawRadar() {</p><p>  pushMatrix();</p><p>  translate(width/2,height-height*0.074); // moves the starting coordinats to new location</p><p>  noFill();</p><p>  strokeWeight(2);</p><p>  stroke(98,245,31);</p><p>  // draws the arc lines</p><p>  arc(0,0,(width-width*0.0625),(width-width*0.0625),PI,TWO_PI);</p><p>  arc(0,0,(width-width*0.27),(width-width*0.27),PI,TWO_PI);</p><p>  arc(0,0,(width-width*0.479),(width-width*0.479),PI,TWO_PI);</p><p>  arc(0,0,(width-width*0.687),(width-width*0.687),PI,TWO_PI);</p><p>  // draws the angle lines</p><p>  line(-width/2,0,width/2,0);</p><p>  line(0,0,(-width/2)*cos(radians(30)),(-width/2)*sin(radians(30)));</p><p>  line(0,0,(-width/2)*cos(radians(60)),(-width/2)*sin(radians(60)));</p><p>  line(0,0,(-width/2)*cos(radians(90)),(-width/2)*sin(radians(90)));</p><p>  line(0,0,(-width/2)*cos(radians(120)),(-width/2)*sin(radians(120)));</p><p>  line(0,0,(-width/2)*cos(radians(150)),(-width/2)*sin(radians(150)));</p><p>  line((-width/2)*cos(radians(30)),0,width/2,0);</p><p>  popMatrix();</p><p>}</p><p>void drawObject() {</p><p>  pushMatrix();</p><p>  translate(width/2,height-height*0.074); // moves the starting coordinats to new location</p><p>  strokeWeight(9);</p><p>  stroke(255,10,10); // red color</p><p>  pixsDistance = iDistance*((height-height*0.1666)*0.025); // covers the distance from the sensor from cm to pixels</p><p>  // limiting the range to 40 cms</p><p>  if(iDistance<40){</p><p>    // draws the object according to the angle and the distance</p><p>  line(pixsDistance*cos(radians(iAngle)),-pixsDistance*sin(radians(iAngle)),(width-width*0.505)*cos(radians(iAngle)),-(width-width*0.505)*sin(radians(iAngle)));</p><p>  }</p><p>  popMatrix();</p><p>}</p><p>void drawLine() {</p><p>  pushMatrix();</p><p>  strokeWeight(9);</p><p>  stroke(30,250,60);</p><p>  translate(width/2,height-height*0.074); // moves the starting coordinats to new location</p><p>  line(0,0,(height-height*0.12)*cos(radians(iAngle)),-(height-height*0.12)*sin(radians(iAngle))); // draws the line according to the angle</p><p>  popMatrix();</p><p>}</p><p>void drawText() { // draws the texts on the screen</p><p>  pushMatrix();</p><p>  if(iDistance>40) {</p><p>  noObject = "Out of Range";</p><p>  }</p><p>  else {</p><p>  noObject = "In Range";</p><p>  }</p><p>  fill(0,0,0);</p><p>  noStroke();</p><p>  rect(0, height-height*0.0648, width, height);</p><p>  fill(98,245,31);</p><p>  textSize(25);</p><p>  text("10cm",width-width*0.3854,height-height*0.0833);</p><p>  text("20cm",width-width*0.281,height-height*0.0833);</p><p>  text("30cm",width-width*0.177,height-height*0.0833);</p><p>  text("40cm",width-width*0.0729,height-height*0.0833);</p><p>  textSize(40);</p><p>  text("Ryan's Radar", width-width*0.875, height-height*0.0277);</p><p>  text("Angle: " + iAngle +" °", width-width*0.48, height-height*0.0277);</p><p>  text("Distance: ", width-width*0.26, height-height*0.0277);</p><p>  if(iDistance<40) {</p><p>  text("        " + iDistance +" cm", width-width*0.225, height-height*0.0277);</p><p>  }</p><p>  textSize(25);</p><p>  fill(98,245,60);</p><p>  translate((width-width*0.4994)+width/2*cos(radians(30)),(height-height*0.0907)-width/2*sin(radians(30)));</p><p>  rotate(-radians(-60));</p><p>  text("30°",0,0);</p><p>  resetMatrix();</p><p>  translate((width-width*0.503)+width/2*cos(radians(60)),(height-height*0.0888)-width/2*sin(radians(60)));</p><p>  rotate(-radians(-30));</p><p>  text("60°",0,0);</p><p>  resetMatrix();</p><p>  translate((width-width*0.507)+width/2*cos(radians(90)),(height-height*0.0833)-width/2*sin(radians(90)));</p><p>  rotate(radians(0));</p><p>  text("90°",0,0);</p><p>  resetMatrix();</p><p>  translate(width-width*0.513+width/2*cos(radians(120)),(height-height*0.07129)-width/2*sin(radians(120)));</p><p>  rotate(radians(-30));</p><p>  text("120°",0,0);</p><p>  resetMatrix();</p><p>  translate((width-width*0.5104)+width/2*cos(radians(150)),(height-height*0.0574)-width/2*sin(radians(150)));</p><p>  rotate(radians(-60));</p><p>  text("150°",0,0);</p><p>  popMatrix(); </p><p>}</p>
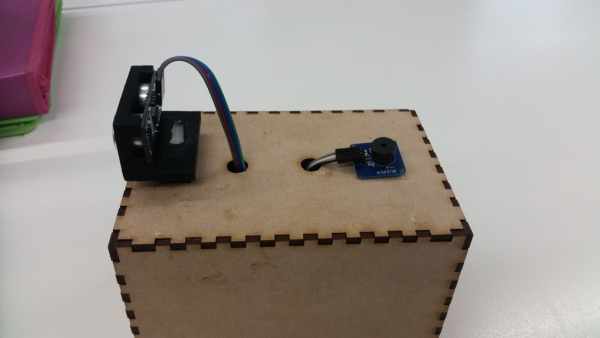
Step 4: Ultrasonic Sensor Bracket
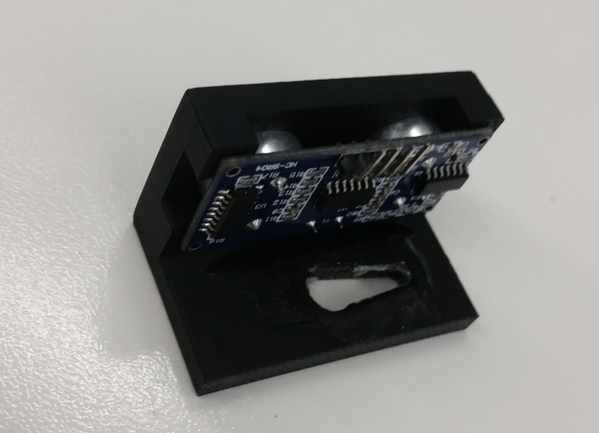
As my inspiration for this project hadn’t included any sort of bracket to hold the ultrasonic sensor in place, I decided that it would be a good idea to 3D print this bracket to give the finished design a cleaner look, and make everything easier to put together. The section which holds the ultrasonic sensor ended up fitting relatively tightly around the ultrasonic sensor, doing a good job at keeping it in place. However, the hole cut out underneath for the servo arm to go in is slightly too big, so I needed to add a lot of glue to keep it in place. But overall, it works quite nicely and gives the design a good look.
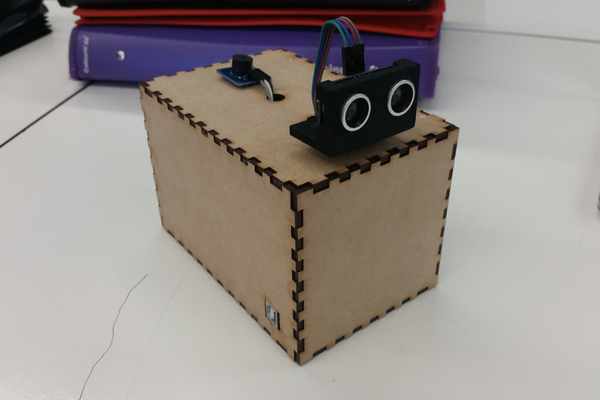
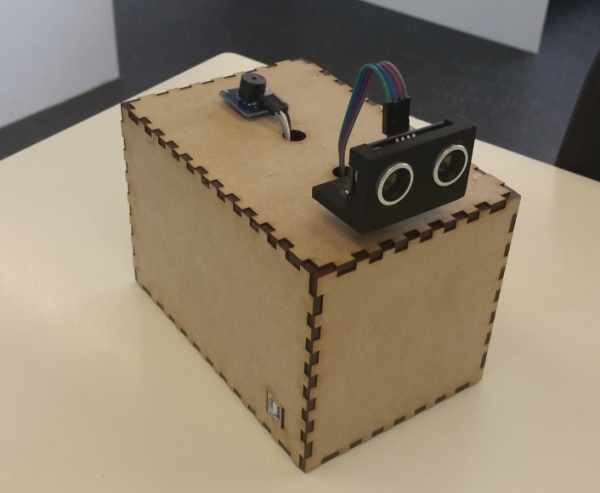
Step 5: Laser-Cut Box Design
This box was implemented to give the project a clean and professional look. It does a good job at concealing all of the wires and the arduino board itself. To create the actual box design, I used the website http://www.makercase.com/ to get the finger edges to join each side of the box together. This was a very useful website as it saves me heaps of time and is very easy to use. As you can see from the finished product of the radar, I cut out measured holes in the side and top of the design to allow for the parts of the project which needed to be on the outside. This included holes for the servo, which I stuck to the box from underneath, wires to the ultrasonic sensor, the buzzer, and to the arduino board itself from the computer. It is quite big (there is a lot of room in the box) but at least it gives you a lot of room to work with and nothing is ever cramped. If you were to make a box design yourself, you could definitely make ti smaller and everything would still fit.
Source: How to Make an Arduino Radar
- How does the radar detect objects?
The ultrasonic sensor connected to a servo rotates 180 degrees to detect the distance and direction of an object. - What improvements were made to the original project?
The creator added a 3D printed sensor bracket, a laser-cut box for a cleaner look, and included a buzzer. - Which programs are required to build this radar?
You need Arduino IDE and Processing 3.4 to control the hardware and display the visual output. - Can the radar detect objects beyond 40 centimeters?
No, the code limits the range to 40 cm; if the distance is greater, it displays Out of Range. - How is the sound generated in this project?
A tone is produced by the buzzer at a frequency calculated as 10000 divided by the measured distance. - What website was used to design the laser-cut box?
The maker case website was used to generate finger edges for joining the sides of the box together. - How does the Processing code handle serial data?
It reads data from the serial port up to the character dot to separate the angle and distance values. - Why was glue added to the 3D printed bracket?
Glue was necessary because the hole cut for the servo arm was slightly too big to hold the sensor tightly.