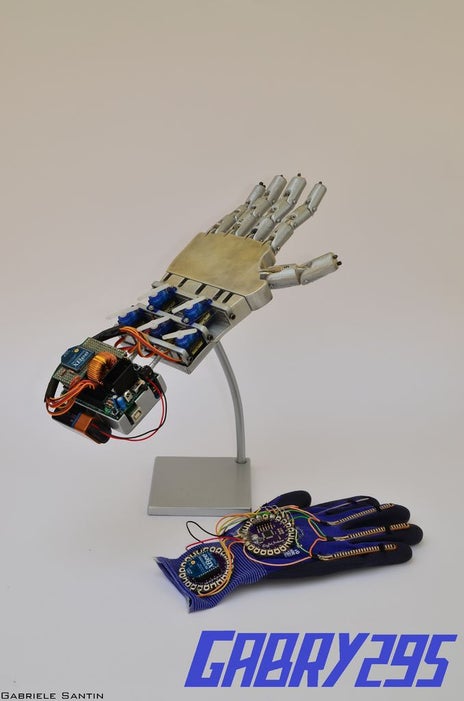
This is my school project for the 5th year of high school (I’m Italian, we have 5 years of high school).
It consists in an artificial hand controlled by a glove with flex sensors. The artificial hand reproduces the movements of the hand with the control glove, wirelessly. The hand and the glove works both with Arduino.
I just wanted to share my work for everyone interested 🙂
This guide is still in development, sorry if some parts are not clear, I’ll put some 3D images in future.
I’m sharing something about my project on my facebook page: https://www.facebook.com/Gabry295
Step 1: Materials Needed
I bought almost everything from https://www.sparkfun.com/, they have fair prices (I don’t mean to advertise!)
Total cost: ABOUT 160$
Materials for the control glove:
• an elastic glove;
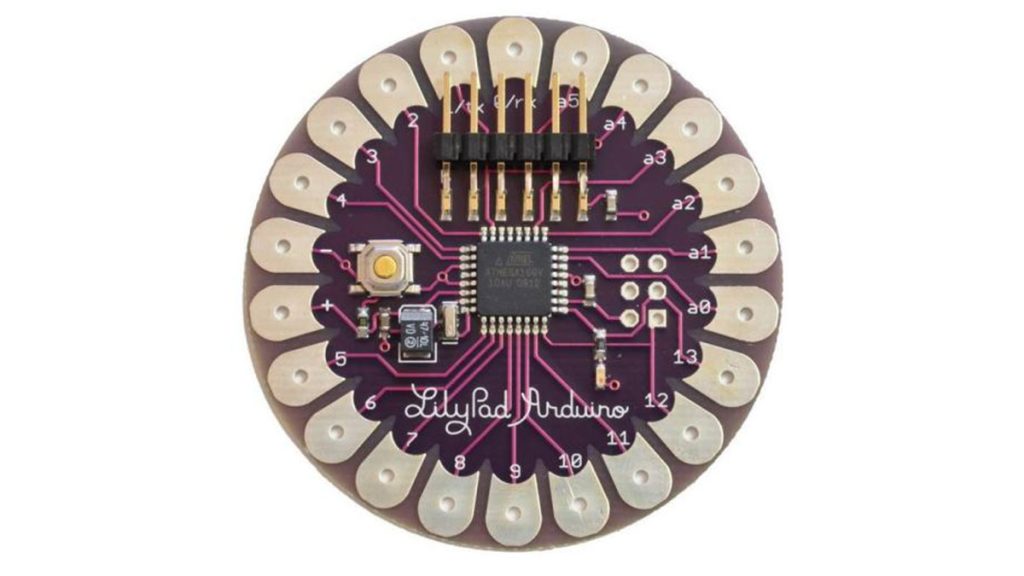
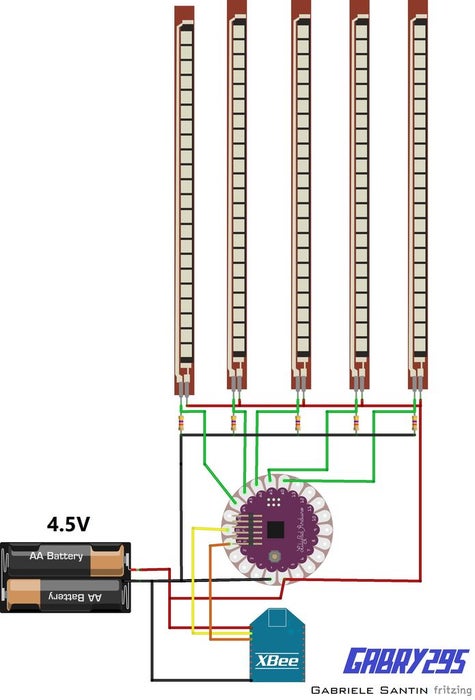
• LilyPad Arduino board (there are different versions, which usually only have 4 analog inputs, so pay attention and buy the one in the image): it works exactly like the classic Arduino UNO, so you can use even an Arduino Nano, but pay attention to the voltage needed;
• XBee module: for the radio communication;
• Shield to connect the Xbee module;
• 5 Flex sensors;
• 5 resistors: 47 KΩ;
• battery pack with 3×1.5 V batteries (Lilypad can be powered from 2.7 to 5.5 V, so 4.5 V it’s ok);
• LilyPad FTDI adapter:
to connect the LilyPad board to the PC and load programs with the
Arduino IDE (quite optional, because you can use also the Arduino UNO
board removing the ATmega chip, but it’s tricky to make this kind of
connection every time).
–
Materials for the robotic hand:
• a steel structure for the palm of the hand and wood for the fingers;
• Arduino UNO board;
• XBee module;
• 5 servomotors 5V powered (I used TowerPro SG90);
• a servomotor shield for Arduino UNO: to connect the servomotors I used the Robot_Shield from FuturaElettronica, which has also a switching regulator to power the entire circuit, but you can use any shield made for controlling servomotors. Link: https://store.open-electronics.org/index.php?_rou… ;
• Shield to connect the XBee module (I made an horrible one, but it’s economic and I needed to make one small because of the size of the Robot_Shield);
• fishing wires;
• (optional) fihing sinkers, to secure the fishing wire, can be done also simply making a knot;
• 9 V Battery.
–
Tools needed:
• angle grinder (mainly to cut wood and steel);
• axial grinder;
• welding machine (with electrodes);
• drill;
• soldering station and solder;
• electrician’s scissors;
• pliers;
• heat shrink tubing.
Step 2: Making the Glove
To make the control glove I suggest first to choose the right position of the different components, then connect everything with the proper length of wire.
To make an analog read with Arduino LilyPad you need to make a voltage divider, since that flex sensors don’t work like potentiometers (they have only 2 contacts).
So following the scheme, first solder the 5 resistor on the LilyPad board, one side to the 5 different Analog pins, the other in common to the ground. Then solder the flex sensors, one side to the 5 different Analog pins and the other in common to the positive.
Then connect the XBee Shield: two wires for the power, the oter two for the signal. Solder the Tx pin to the Rx and vice versa.
Now you need the battery pack, and the glove it’s done.
BE CAREFUL: don’t power the Arduino LilyPad over 5.5 V and don’t power it conversely (even if sometimes I did it by mistake… And it still works!)
Read more: How to Make a Remote Controlled Robotic Hand With Arduino