Summary of How to Make a Basic Computer Mouse Using the Joystick Module and Arduino Uno
This instructable shows how to build a joystick-controlled PC mouse using an Arduino Uno, a joystick module, jumper wires, Arduino sketch (reads analog X/Y and button), and a Python script that reads serial data and moves/clicks the system mouse.
Parts used in the Joystick Controlled Mouse:
- Arduino Uno
- Joystick module
- 5 jumper wires
- Computer with Arduino IDE
- Python (and mouse Python package)
This instructable will show you how to make a joystick controlled mouse using Arduino Uno and the joystick module.
Supplies
You will need-
- One Arduino Uno
- 5 jumper wires
- One Joystick
- Arduino IDE
- Python
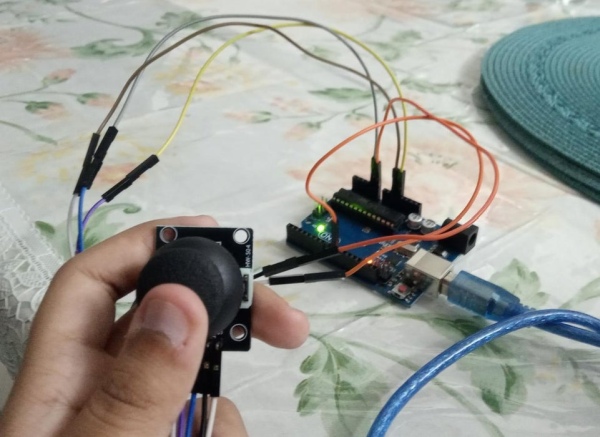
Step 2: Make the Circuit
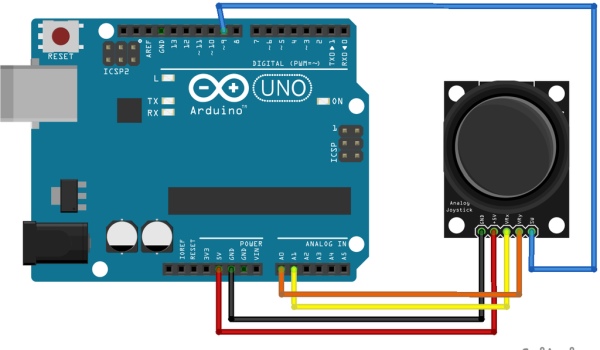
Make this circuit shown using your Arduino and Joystick.
Step 3: Uploading the Arduino Sketch
//The program that you can copy onto the Arduino IDE is-

void setup()
{
  Serial.begin(9600);
  pinMode(9,INPUT);
  digitalWrite(9,HIGH);

}
int prev_state=0;
void loop() {
  int z=0,xpos=0,ypos=0;
  int x=analogRead(A0);
  int y=analogRead(A1);
  int sensitivity=10;
  if(x>=550)
  xpos=map(x,550,1023,0,sensitivity);
  if(x<=450)
  xpos=map(x,450,0,0,-sensitivity);
  if(y>=550)
  ypos=map(y,550,1023,0,sensitivity);
  if(y<=450)
  ypos=map(y,450,0,0,-sensitivity);
  int curr_state=digitalRead(9);
  if(curr_state==1 && prev_state==0)
Step 4: Changing the Com Port in the Python Program
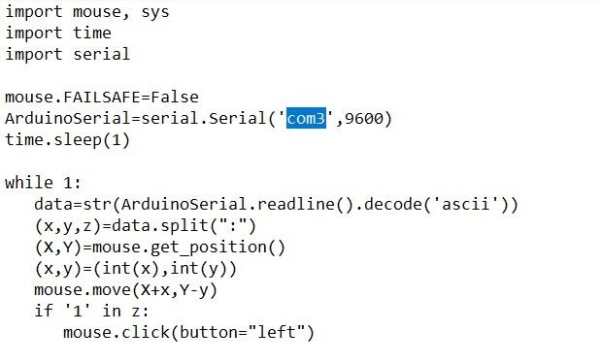
Paste this program in a Notepad –
import mouse, sys
import time
import serial

mouse.FAILSAFE=False
ArduinoSerial=serial.Serial('com3',9600)
time.sleep(1)

while 1:
  data=str(ArduinoSerial.readline().decode('ascii'))
  (x,y,z)=data.split(":")
  (X,Y)=mouse.get_position()
  (x,y)=(int(x),int(y))
  mouse.move(X+x,Y-y)
  if '1' in z:
   mouse.click(button="left")
Change the com3 part of the program to the specific port which is applicable to you. Save this file as Python.py in Notepad.
Step 5: Open the Python File
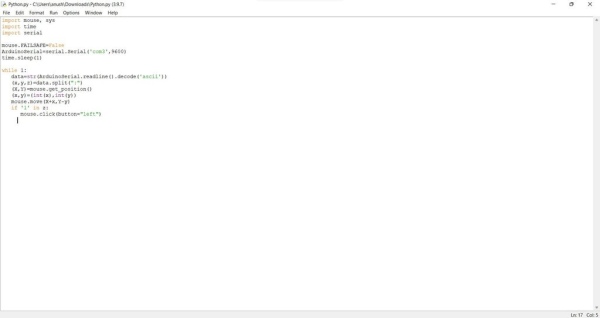
Open the python file in the Python software you just saved i.e. Python.py
Step 6: Upload the Program
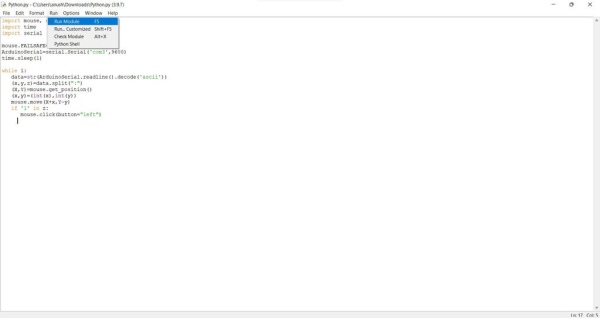
Click on the Run tab and click on Run Module to run the program on the Arduino Board
Step 7: Your Program Is Ready to Go!
Once you finish all this steps you can use the joystick to move around the mouse pointer and if you click hard then it also has a clicking function.
Step 8: Understand How the Joystick Works and Understanding X and Y Axis
If you want to learn more about x and y axis’s you can visit – https://www.math.net/x-and-y-axis.
How the Joystick works –
A joystick plainly consists of two potentiometers aligned in the x and y direction which I have given an explanation link for. The Arduino Uno reads Analog (we fixed the x and y pins in analog pin 0 and 1) values from the Joystick in the range of 0 to 1023. Thus, when the joystick is in its default position e.i. the center, the Analog value also becomes close to 510 – 511 (between 0 and 1023).
Source: How to Make a Basic Computer Mouse Using the Joystick Module and Arduino Uno
- What components are needed to build the joystick controlled mouse?
Arduino Uno, joystick module, 5 jumper wires, Arduino IDE, and Python (with the mouse package). - How do you connect the joystick to the Arduino?
Connect the joystick analog X to A0, analog Y to A1, and the button to digital pin 9, using jumper wires as shown in the circuit. - How does the Arduino sketch send data to the computer?
The sketch reads analog X and Y and the button state, maps values to a sensitivity range, and sends data over Serial at 9600 baud. - How do you run the Python program to control the mouse?
Save the provided Python script, change the serial port to your Arduino COM port, open it in Python, and run the module. - Can the joystick perform clicks as well as movement?
Yes, the button on the joystick is read on pin 9 and triggers a left mouse click in the Python script when pressed. - What serial port setting should the Python script use?
The Python script uses 9600 baud and you must change the com3 value to the specific COM port for your Arduino. - What sensitivity setting is used in the Arduino code?
The Arduino sketch defines an int sensitivity = 10 used to map analog values to movement increments. - What are the analog value ranges for the joystick center position?
The center analog values are approximately 510–511 within the 0–1023 range.