Summary of How to Make a Infrared (IR) Remote Controlled Car With a TV Remote for University Project, Science Fair and Robotics Competition
Summary (under 100 words): This article explains how to build an infrared (IR) remote-controlled car using an Arduino and a TV remote. It includes a video demo, circuit diagram, Arduino code for two driving modes (Precision and Racing), troubleshooting tips for common errors, and safety advice. The kit is available via an indicated eBay listing or can be assembled from the component list there. Rechargeable AA batteries are recommended.
Parts used in the IR Remote Controlled Car:
- DIY infrared (IR) remote car kit (from the linked eBay page, select Arduino and breadboard kit option)
- Arduino UNO (included in kit or required)
- TV remote (for control)
- 6x AA rechargeable batteries
- Battery holder for 6x AA
- L293D motor driver IC
- DC motors (for chassis)
- Chassis and wheels (assembly parts)
- Capacitor (as shown in circuit diagram)
- Breadboard and jumper wires
- Cross-head screwdriver
- USB cable (for Arduino programming)
- IR receiver sensor
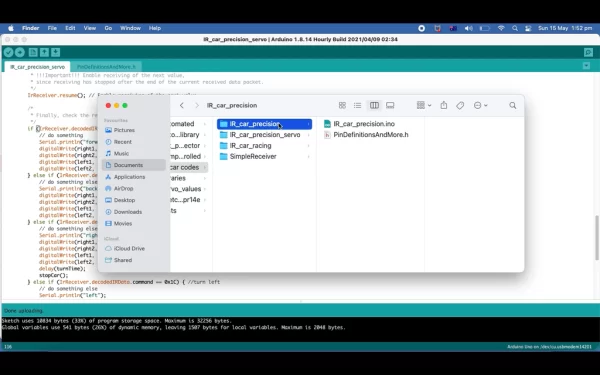
- PinDefinitionsAndMore.h file (software include)
- IR_car_precision.ino and IR_car_racing.ino (Arduino sketches)
Follow the instructions below to build the remote control car. This project is ideal for science fair, robotics competition and university projects. The design is highly adaptable, you can modify it easily and add your own components.
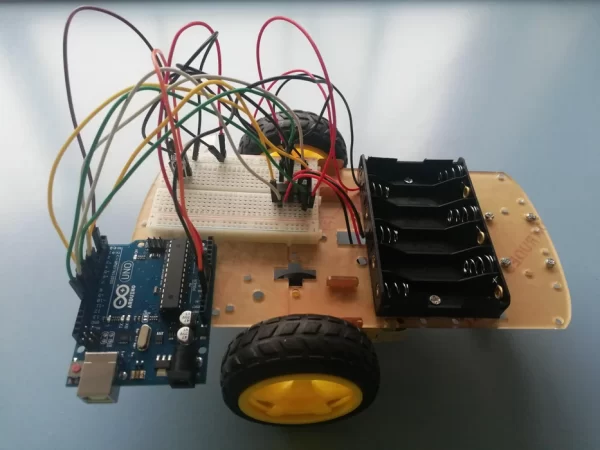
Table of contents
Step 1: video demo
Step 2: circuit diagram
Step 3: Arduino code (software)
Step 4: Fixing common error, if your car does not work
Step 5: Notes for modifying this design
Safety instructions:
- Take the batteries out of car when not in use. If you cannot see/supervise the car, take the batteries out.
- Do NOT short the circuit. A common symptom of this is the circuit overheats.
- If you are using your own power supply, use less than 12 volts, unless you know what you are doing.
Supplies
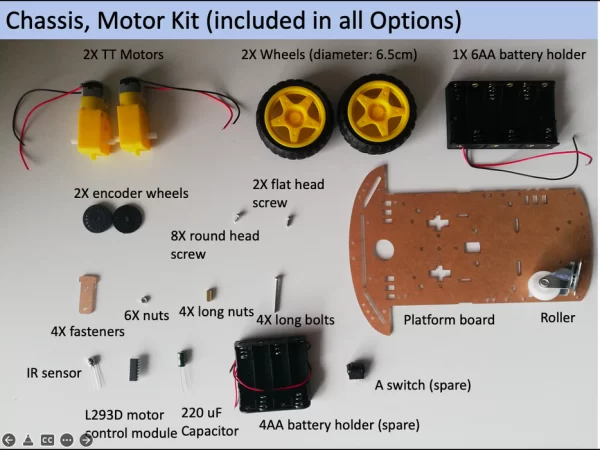
- DIY infrared (IR) remote car kit (from https://www.ebay.com.au/itm/224993090875 , only ships within Australia, and select the option “Arduino and breadboard kit” for electronics on eBay page)
- TV remote (ensure its batteries have charge)
- 6X AA rechargeable* batteries
- A cross-head screw driver
To build the car without the kit, go to the eBay page linked above to see the list of components in the kit.
*rechargeable ones are recommended, since DIY car typically have poor power efficiency and drains batteries quickly
Step 1: Watch the Video
Timestamp in the video:
0:17 assembling the chassis and motors
4:30 electronics
5:48 circuit diagram
5:54 software (Arduino code)
7:50 demo of the driving (with precision mode code)
8:20 demo of the driving (with racing mode code)
Step 2: Circuit Diagram
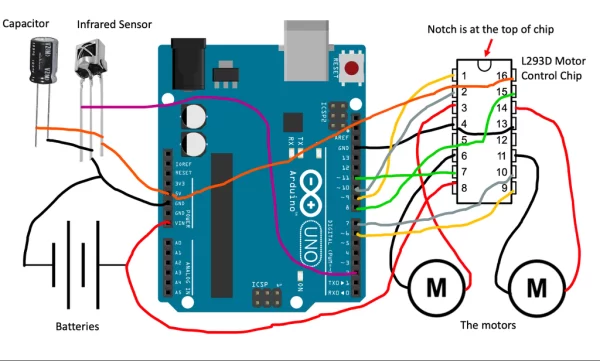
Wire it up according the diagram above.
Step 3: Arduino Code
There are two modes on offer:
Precision Mode: when it turns left/right, it spin on a fixed axis (see Step 1 video at timestamp 7:49)
- Download ‘IR_car_precision.ino’ AND ‘PinDefinitionsAndMore.h’, which are attached below
- Then save them into a folder called ‘IR_car_precision’
- To change the speed of car, find the variable “carSpeed” and change it
- To change how fast the car turns left/right, change the variable “turnTime”
Racing Mode: it turns left/right, while going forward, like a real-life road car. (see Step 1 video at timestamp 8:19)
- Download ‘IR_car_racing.ino’ AND ‘PinDefinitionsAndMore.h’, which are attached below
- Then save them into a folder called ‘IR_car_racing’
- To change the speed of car, find the variable “upperSpeed” and “lowerSpeed”
- To change how fast the car turns left/right, change “upperSpeed” and “lowerSpeed”, so the difference between them is bigger/smaller
If you have never used an Arduino before, check out https://www.arduino.cc/en/Guide/ArduinoUno

Step 4: Fixing Common Errors
If you do not have any errors, skip this step (and congratulations!).
Arduino does not respond to infrared signals.
- Go into serial monitor of the Arduino, which would provide you with information
- Check the TV remote’s battery has power
- Have you change ‘command’ number, which is shown in Step 1’s video at timestamp 7:15?
- Have you inserted the capacitor into the circuit?
- Move the car closer to the TV remote
- Do the check mentioned under ‘Arduino is not powered on‘section below, voltage under 7 volts leads to instability and inaccurate reading by the infrared sensor
Arduino is not powered on
- Use a multimeter or voltmeter to measure the voltage between the black and red wire of battery holder. Then measure voltage between pin 8 and 4 of L293D chip, when it is connected to the battery. If any of the two voltage measurements is less than 7 volts, replace with fully charged batteries.
Motor does not move, or very weakly.
- Check if the Arduino is powered on
- Ensure pin 16 of L293D is connected to 5V on Arduino.
- Both wires of each motor are plugged in properly
Car does not drive straight.
- A bit of deviation from straight path is expected, and there is little can be done.
- Ensure the wheels are mounted properly and are parallel to each other
- Ensure pin 16 of L293D is connected to 5V on Arduino.
- Try all the commands: drive forward, backward, left, right and stop. You might have mixed up the keys.
For all issues.
- Ensure everything is connected as shown in Step 2’s diagram
- Read the error message in the black window at the bottom of Arduino IDE. Copy the error message into Google.
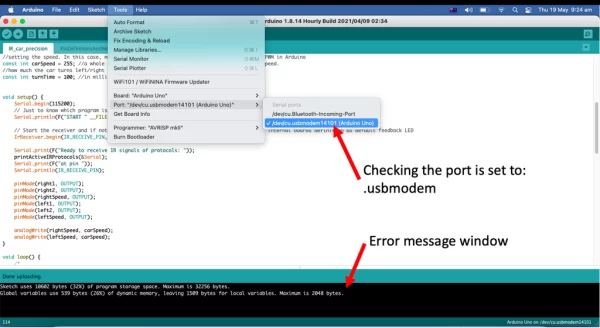
- Go to Tools in Arduino, ensure the Board is “Arduino UNO”. And port is usb something, not BlueTooth.
- What modes of driving code are provided?
Precision Mode and Racing Mode are provided. - How do I change the car speed in Precision Mode?
Change the variable carSpeed in IR_car_precision.ino. - How do I change turning behavior in Racing Mode?
Adjust upperSpeed and lowerSpeed in IR_car_racing.ino so their difference changes turning sharpness. - What should I do if Arduino does not respond to infrared signals?
Check serial monitor, ensure TV remote batteries have charge, confirm command number, ensure capacitor is inserted, move car closer, and check Arduino power voltage. - How do I check if Arduino is powered correctly?
Measure voltage between battery holder red and black, and between pin 8 and 4 of L293D; replace batteries if either is below 7 volts. - Why might the motor not move or be weak?
Ensure Arduino is powered, pin 16 of L293D is connected to Arduino 5V, and motor wires are plugged in properly. - What causes the car not to drive straight?
A small deviation is expected; check wheel mounting and parallelism, verify pin 16 of L293D is on 5V, and test all commands in case of mixed keys. - Where can I get the parts list if not using the kit?
See the linked eBay page for the kit to view the list of components. - What safety precautions are recommended?
Remove batteries when not supervising the car, do not short the circuit, and if using your own supply use less than 12 volts unless you know what you are doing. - What should I check if I get Arduino IDE errors uploading code?
Read the error message, search it online, and ensure Board is Arduino UNO and port is the correct USB port in Tools.