Summary of How to Build an Air Guitar With Arduino, Aka the AIRduino Guitar
The AIRduino Guitar is a wearable virtual instrument built during a two-week Physical Computing project at Chalmers University. It simulates playing a real guitar using a glove for pitch control and a stick for strumming. The system detects hand gestures via an accelerometer and ultrasonic sensor to create musical tones, offering an immersive air guitar experience without strings.
Parts used in the AIRduino Guitar:
- Wires
- Accelerometer (three-axis or one-axis)
- Ultrasonic sensor (Parallax #28015)
- Conductive fabric
- Stretch fabric
- Arduino Diecimila
- Potentiometers (1KOhm-1MOhm)
- Hot melt glue
- 3.5 mm female jack
- Resistors (10k)
- Capacitor (10uF)
- LEDs
- 9V battery
The idea here is to build a wearable virtual guitar that is to be controlled with two hands much like playing Air Guitar. It has been created and prototyped during a two weeks project at ChalmersUniversity (Sweden) for a Physical Computing class.
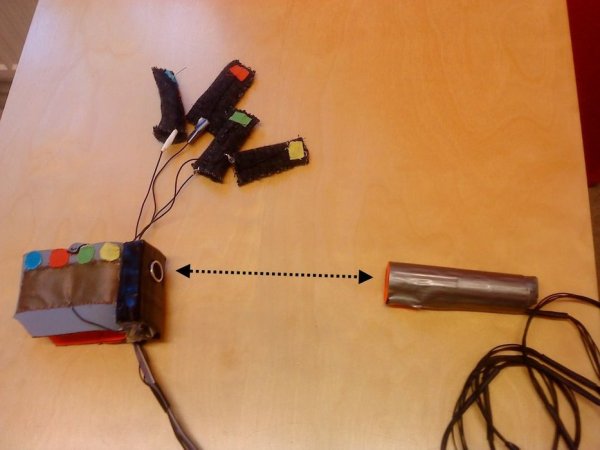
The aim is to get the feeling of playing a real guitar. The AIRduino Guitar is made of one glove and one stick. The glove is used to set the tone and the stick to trigger the sound.
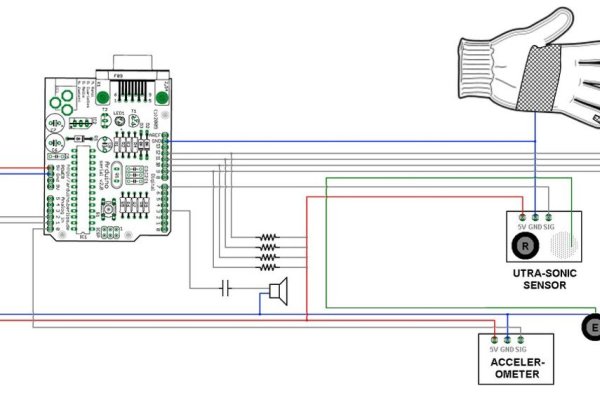
To perform such trick, we used an accelerometer and an ultra-sonic sensor (see Step 1 for concept description).
Take a look at the video demo to get a more precise idea of how it works, and get to work to build your own!
The AIRduino Team:
David Fournier, Jean-Louis Giordano, Monireh Sanaei, Maziar Shelbaf and Gustav Sohtell.
Step 1: Concept Description
The Air Guitar is supposed to work as a right-handed guitar.
The guitar controller is divided in two parts, left-hand controller and right-hand controller.
By left-hand controller the player can bend his fingers and press the glove to change the pitch of the tone.
The right-hand controller is represented by a stick which has to be shaken to trigger the sound of the air-guitar.
Player can also change the distance between right hand and left hand in order to pitch the tones, simulating the different frets on the guitar neck.
To perform such tricks, the main components are an accelerometer to “feel” the stick shake, an hacked ultra-sonic sensor to measure the distance between the right hand and the stick, and conductive fabric to build the glove.
All in all, it is an fairly easy to build toy. The only tricky part would be the ultra-sonic sensor hack which requires some dexterity. You will need some basic electronic skills to understand the instructions, and also to find out what you did wrong when you messed something up and the guitar doesn’t work in the end. We have been there. 🙂
Step 2: Shopping List
Here is a list of what you need to build your own AIRduino Guitar:
1. Wires: unfortunately a lot for this prototype version. They have been used to connect the two gloves and the Arduino parts together. Feel free to improve this part of the design by making it wireless!
2. Accelerometer: used in the stick in your right hand to detect the shaking. We used a three-axis accellerometer, but a one-axis is enough
3. Ultrasonic sensor: used to measure the distance between both hands of the player, we used Parallax #28015
4. Conductive and Stretch fabric: to build the glove,
5. Arduino: the core of the Guitar that handles everything. An Arduino Diecimila works fine.
6. Potentiometers: to adjust some settings, A potentiometer with a max of anything from 1KOhm-1MOhm is ok.
7. Hot melt glue: a convenient way to hold things together,
8. 3.5 mm female jack: used for the audio output,
9. Classic electronic stuff: Resistors (10k), capacitor(10uF), LEDs and some kind of power supply for the arduino. (A 9V battery is just fine).
Read more: How to Build an Air Guitar With Arduino, Aka the AIRduino Guitar
- How does the left-hand controller work?
The player bends fingers and presses the glove to change the pitch of the tone. - How is sound triggered?
The right-hand stick must be shaken to trigger the sound using an accelerometer. - How are different frets simulated?
Players change the distance between their right and left hands to pitch the tones. - What sensor measures the distance between hands?
A hacked ultra-sonic sensor is used to measure the distance between both hands. - Which Arduino model is recommended?
An Arduino Diecimila works fine as the core component that handles everything. - Can I use a one-axis accelerometer?
Yes, while a three-axis was used, a one-axis accelerometer is sufficient. - What power supply is suitable for the Arduino?
A 9V battery is just fine for powering the Arduino. - Is wireless design possible for this project?
Yes, users are encouraged to improve the design by making it wireless instead of using many wires.