Summary of Homemade arduino printer
This article guides readers in building a DIY dot-matrix printer using an Arduino and salvaged parts from two dead CD/DVD drives. The device accepts text input via a terminal, printing characters as dots by moving a pen across paper. The project emphasizes repurposing components like motors, switches, and trays to create a functional, low-cost printing mechanism with a custom acrylic or wooden structure.
Parts used in the Homemade Arduino Printer:
- 1 x Arduino (Duemilanove)
- 2 x H-Bridge (SN754410)
- 3 x small dc motors from cd/dvd drive
- 3 x switches from cd/dvd drive
- A pen or marker
- Wire
- Rubber string
- Sheave
- Stick with round rubber (rollers)
- Acrylic, wood, or Lego for structure
- 5v and 9v power supply
If you want to make your own high resolution printer (maybe not so high res), you are at the right place. This Instructable will show you how to do with two dead cd/dvd drive and a pen (pilot, whiteboard marker, whatever you have) at the best lego-printer style.
Here is how our printer will work: we type any message in terminal then the message will be printed (as dot matrix) and after the message is printed the program will wait for another message.

For this magnificent printer you will need:
1) 1 x Arduino (I’ve used the Duemilanove)
2) 2 x H-Bridge (SN754410)
3) 3 x small dc motors from any cd/dvd drive
4) 3 x switches from the same cd/dvd drive
5) A pen or marker
6) Wire
7) Rubber string
8) Sheave
9) Stick with round rubber like the rollers in a real printer, the wheels from a toy car should work.
10) Acrylic, wood or whatever you have to build the structure.
11) 5v and 9v power supply
If you have an old printer you can use its structure and save some time to build one.
Once you have all that is time to build the structure.
Step 1: Build the structure
Now you have to build the structure with any materials you want (even with lego), I choose acrylic because it’s cheap and easy to work.
All you have to do is to mount a “U” Structure and add two tubes where our printer’s head will move, also add the supports for rollers and the sheave.
As said before, if you have and old printer you can use it and skip this step.
Step 2: Finish the structure
Now it´s time to finish the structure, this is the most painful step because you have to measure, cut, drill, solder, etc…
You will need 2 x motors with gears from drive’s tray and 1 x motor from drive’s head.
You can also use the whole tray, or like I did, cut a circuit board at the same shape of the tray to save some weight. Also add some supports to the head, here I soldered 3 screw nuts to the back of the head.
Also note that the head have 3 switches taken from the cd/dvd drive. These switches tell us if the head reach the left/right of the structure and if the head motor is down (this means that the pen/marker is touching the paper). One leg of the switch goes to ground and the other goes to one analog pin, no need for external resistors because we will use the internal pull-up resistors.
Now attach the motors, the head, the roller and the pen/marker to the head. To finish this step attach the rubber string to the motor, to the head and to the sheave.
Note that all parts will not fit perfectly, so you have to use your skills to make this work, but, probably, some hot glue is the answer for most of our problems.
Step 3: Connect everything together
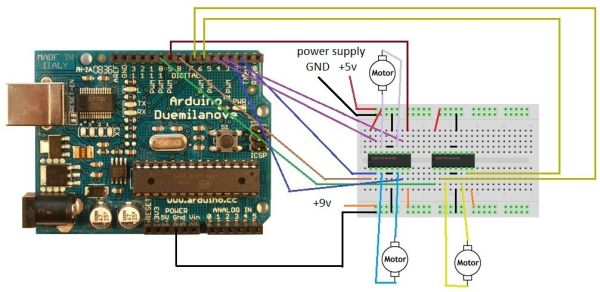
Let’s connect everything to the Arduino. First of all, connect the switches as shown in the previous step.
Then connect the motors to the H-Bridge and the H-Bridge to Arduino. The schematic bellow is a little messy but, thats the way it is, you can also take a look at this simple tutorial (http://itp.nyu.edu/physcomp/Labs/DCMotorControl ).
H-Bridge
small dc motors from any cd/dvd drive
switches from the same cd/dvd drive
Rubber string
- How does the printer work?
The user types a message in the terminal, which is printed as dot matrix text, after which the program waits for the next message. - Can I use an old printer for the structure?
Yes, you can use the structure of an old printer to save time building one from scratch. - What material did the author choose for the structure?
The author chose acrylic because it is cheap and easy to work with. - Which motors are required for the build?
You need two motors with gears from the drive's tray and one motor from the drive's head. - How do the switches function in this project?
The three switches detect if the head reaches the left or right limits and if the pen is touching the paper. - Do the switches require external resistors?
No, you should use the internal pull-up resistors on the analog pins instead of adding external ones. - What is suggested for fixing parts that do not fit perfectly?
Hot glue is suggested as the answer for most problems when parts do not fit perfectly. - How are the motors connected to the control board?
The motors are connected to the H-Bridge, which is then connected to the Arduino.