Summary of Home Automation Using Arduino & Autohotkey
Summary: The author built a PC-controlled home automation system using Arduino, Autohotkey (later NodeJS), relays and an L293D motor driver to switch fan and light from their workstation. The Arduino stores states in EEPROM, uses relays in series with appliances, and initially required an external power adapter. The system evolved to monitor temperature and presence, and now runs from a custom Arduino and relay board with a mobile/tablet app.
Parts used in the Home Automation Using Arduino & Autohotkey:
- Arduino board (custom or standard)
- L293D motor driver IC/board
- Relays (5V relays mentioned)
- External power adapter (example: 5V, 900mA mobile charger)
- BC547 transistors (as alternative switches; BC574 in text appears to be a typo)
- Wiring and basic prototyping hardware
- Workstation PC running Autohotkey (later NodeJS) software
- Mobile/tablet for app (example: Blackberry Playbook shown)
Its been awhile since i last posted something here. Was kinda busy with my university exams & all!
Idea for this project was in my mind for very long & i don’t think anyone would’ve done this project with Autohotkey!
Anyway, this is a necessity for me, honestly i’m a super lazy person & i don’t like getting up to switch on fan/light even though the switches are just 3 footsteps away! From that laziness came this idea! Controlling the fan/light from my workstation. This can be done in many different ways. I wanted the implementation to simple, reliable & perfectly operational. Also, i didn’t wanted to buy new stuff for this project.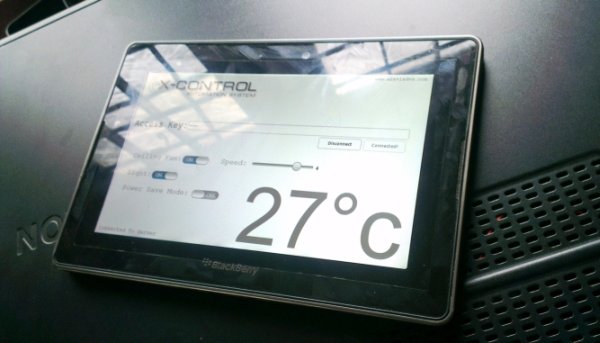
I choose Autohotkey because I didn’t wanted to write thousands of lines of code for a front end with just 2 buttons! Autohotkey makes the implementation simple & straight forward. I made this almost a year ago & it still works like a charm. I’ve used 12v relays & a motor driving IC, L293D for driving the relays. The problem with them was that, they require a 12v adapter. Later, I’ve replaced them with 5v relays but they still need an external power source; replaced the 12v one with an old mobile charger rated at 5v, 900mA.
Logic/Control Flow
Working of the system is quite simple. The relays are connected in series with the fan & light so that they work as switches.When i click the button to switch on, the software sends a value corresponding to “ON” to Arduino. On receiving the “ON” message, the Arduino turns on the relay via the L293D & the relay switches on the corresponding appliance. Same applies when the user clicks “OFF”. The arduino code makes use of the EEPROM on Arduino so, even if the power is disrupted, the system will hold its last state when the power comes back up.
This is the basic schematic diagram of the circuit. Nothing fancy! Just the basic diagram for L293D.
My Implementation
This was my prototype.
My Software
How TO?
Be warned that playing with electricity can really hurt you! Opening up switch boards can burn your house if you don’t know what you’re doing! Let me put this thing straight! I’m not responsible for anything!
You can implement the same with very little modifications. Hardware requirements are:
1) Arduino Board
2) L293D Motor driver board
3) Relays
If you need to control more devices, be my guest & modify the code & find new IC’s to connect more relays. I know that this can be done using BC574 transistors as switches & currently my implementation uses it. Used L293D for the sake of simplicity.
Final Thoughts
The problem with this implementation is that, your computer must be kept running if you want to control anything but is ideal if you want to control only when you’re on your PC, like my situation. Obviously not an ideal thing to do otherwise. I’ve a file server at my home running 24×7. My whole room can now be controlled using an app/software. Everything is written in NodeJS now & works perfectly. Current system also monitors room temperature & is intelligent enough to turn off appliances & put my workstation in sleep mode when no one is around for more than a fixed amount of time. Also the system was built using a custom made Arduino & dedicated relay board. Complete implementation details later!
Here is a photograph of my new app for the automation system running on my Blackberry Playbook i developed:
For more detail: Home Automation Using Arduino & Autohotkey
- What software was used to control the Arduino from the PC?
Autohotkey was used originally and later the system was rewritten in NodeJS. - How are the fan and light switched in this project?
Relays are connected in series with the fan and light and are driven by the Arduino through the L293D. - Does the system retain appliance state after power loss?
Yes, the Arduino code uses EEPROM to hold the last state across power disruptions. - What power supply is required for the relays in the project?
The relays required an external power source; the author used an old mobile charger rated 5V, 900mA. - Can more devices be controlled with this setup?
Yes, the author states you can modify the code and use additional ICs to connect more relays for more devices. - Why was L293D used in this implementation?
L293D was used for simplicity to drive the relay coils. - Can transistors be used instead of L293D?
Yes, the author notes BC547 transistors can be used as switches and current implementation uses them. - Does the system require the PC to be always on?
Yes, in this implementation the computer must be running to control appliances, though the author runs a 24x7 file server.