Hephaestus, my own 3D printer
I finally did it, I designed and built my own 3D printer. This is in no way “the best 3D printer”. Instead, this was an epic and nightmare project that exercised my ability to engineer and build my own CNC machine. Along the way, I figured out what I did well and what I did badly, mistakes were made and sometimes fixed, even ignored.
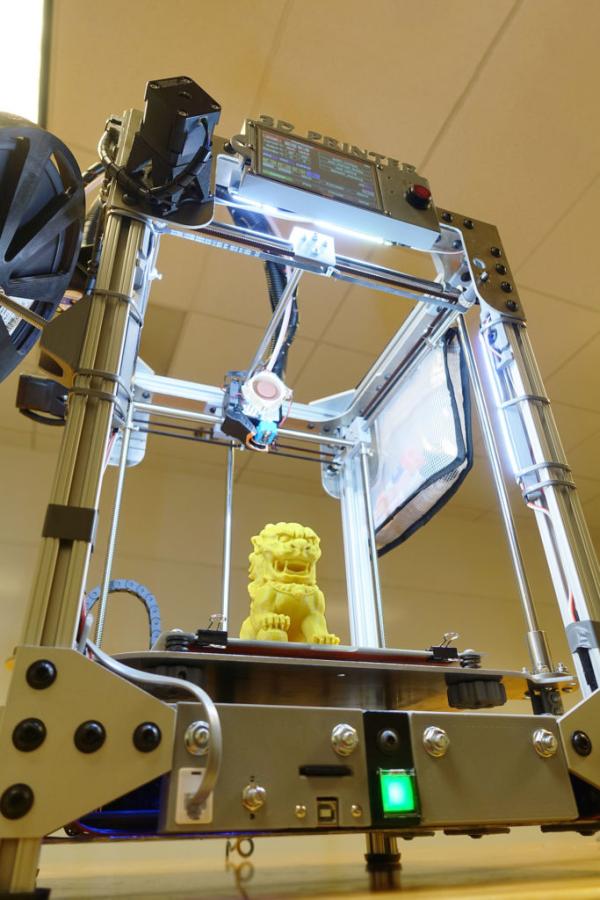
This 3D printer is named Haphaestus. This wasn’t some kit that I purchased and put together, this wasn’t some tutorial I downloaded and followed. I designed almost everything about this printer and built it with tools I own and a waterjet cutting service. The only application specific parts I didn’t design are the Duet controller circuit and the E3D Titan parts.
NOTE: This is not an open source project where I will let you download a few files so you can build one yourself, trust me… you don’t want to. It’ll be a logistical nightmare to just organize the files and BOM to the point where it is useful to anybody else.
This page will be dedicated to recording my experiences and analysis of the first 3D printer I have ever designed and built all by myself.
More pictures of prints near the bottom of this page!
Features and Performance
- Print size: about 190mm x 170mm, borosilicate glass. Build height: 288 mm
- 24V electrical system, 200W silicone heated bed, 65W hotend heater
- Custom extruder that is flexible shaft driven and worm gear reduced. Uses Bondtech geared hobbed wheels
- All metal hotend, E3D heatsink (aluminum) + heatbreak (steel) + heatblock (copper). 3D Solex nozzles (Matchless Race). PT100 sensor
- Duet WiFi control circuit running a flavor of RepRapFirmware. 32 bit microcontroller and Trinamic stepper motor drivers. PanelDue 5i used for control panel with easily accessible USB port and SD card slot
- Printhead moves in Cartesian X-Y by belts (Gates® PowerGrip™ brand, two belts per axis). Bed moves up and down in Z axis with two leadscrews
- 3 point bed leveling without sensors, ultra stiff springs for stability and large knobs for easy adjustments
- Adjustable constant voltage (flicker-free) LED lighting system
- All silicone insulated power wiring
- Custom MOSFET heater circuit rated for 200A bursts, opto-isolated from main control circuit, protected by an army of flyback, TVS, and Zener diodes
- Uses shielded cabling with unused signals for future add-on accessories
Theoretical Print Resolution
- X and Y is 80 steps per mm, that’s 0.0125mm resolution
- 20 teeth pulley, 2mm pitch belt, 200 steps per rev stepper motor, 16x microstepping
- Z axis is 0.04mm resolution
- TR8X8 leadscrew, 200 steps per rev stepper motor, 1x microstepping
I don’t have measurement tools that I can use to make real tolerance claims. I’m using mostly the same pulley and motors as all other printers. I am using higher quality components, a more rigid frame, and cutting edge electronics, so it should be as good or better than my Ultimaker 2 in terms of print capability. Please see the pictures of the test prints for qualitative results.
Read more: HEPHAESTUS – A FULLY DIY 3D PRINTER