
If you’ve ever watched the Harry Potter series, then you would have seen Neville receive a gift from his Gran which was a Remembrall. For those Muggles who haven’t watched it yet or don’t remember the scene, a Remembrall is a large marble sized glass ball that contains smoke which turns red when its owner has forgotten something. It turns clear once whatever was forgotten is remembered. Now that’s very useful for someone like me who forgets stuff pretty often, but it doesn’t let you know what you’ve forgotten!
I planned to binge watch the entire Harry Potter series again a few days ago and when I was done with the first movie, I thought why not make a real Remembrall. Naturally, I searched the web to see if anyone had made it already and to my surprise two people actually made it! Inspired by this great instructable I decided to build it using a NodeMCU and make it even more useful.
In this Instructable, you will learn how to make your very own Remembrall on which by pressing a button it lets you know what you’ve forgotten!!!
Step 1: Gather All the Stuff You Need
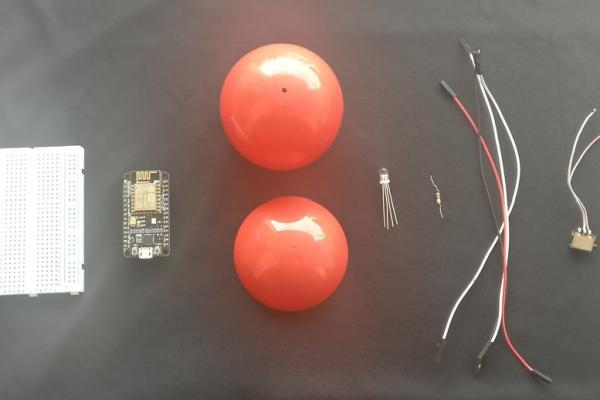
Here’s a list of things you need to make a Remembrall:
Components:
- NodeMCU
- LED of your choice(red is the default color)
- Resistors(2)
- Breadboard
- Jumper wires: Male to Male for prototyping and Female to Female if you don’t want to solder in the end
- Push Button; preferably this kind because it’ll make yours look way better than mine
- Protoboard
- Li-Po Battery(make sure it’s supply is no more than 5V)
Materials:
- A plastic ball or a Christmas ornament which is atleast 6-7cm in diameter
- Hot Glue Gun and sticks
- Scissors
- Soldering station
- Drill Press and bits(for the button, it’ll vary according to the button of your choice)
Software and online Services:
- Arduino IDE
- Todoist API
- PushBullet API
- ThingHTTP
- PushingBox
Don’t worry if you’ve never heard about the online services mentioned above, you’ll learn how to use them in the next few steps.
Note:
If you want it to look good then do have a look here. She has made it look amazing!
We will be programming the NodeMCU using the Arduino IDE, not MicroPython or Lua.
Step 2: Overview: How Does It Work?
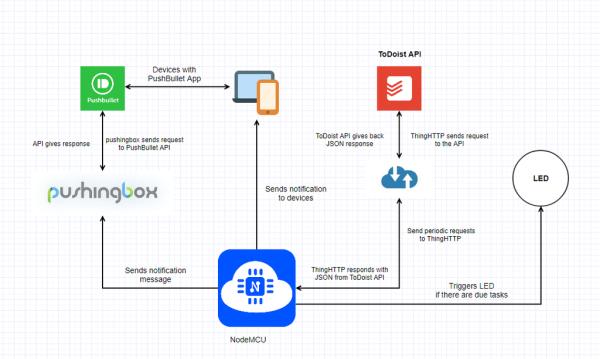
In case you’re not interested in knowing how it works or you’re in a hurry to just build a Remembrall, then have a look at the flowchart and go on the next step.
In this section, you will get to know how the Remembrall works and the bits and pieces that make up the entire project. While this can be called an IoT project, it doesn’t really take sensor data into account if you ignore the push button which is the only thing in the entire project that can be possibly be considered as a sensor.
If you haven’t worked with an ESP8266 module or NodeMCU before or haven’t yet set it up then click here.
Online Services
Todoist:
Todoist is a task manager app where you can create and manage tasks productively. Create an account on Todoist, this where you list things that you don’t want to forget. It’s very easy to use because you can just naturally type the time and date that you need to complete a particular task by and also set priorities and so on. The API provided by Todoist is very simple to use, documented well and the JSON response is very easy to PARSE 😉
ThingHTTP:
It’s not always easy to get responses from API’s over HTTPS when using modules such as the ESP8266, but I have heard that the ESP32 makes that simple. So, in order to use them we take the help of ThingHTTP which is a product of ThingSpeak that simplifies communication between devices such as the NodeMCU and API’s and allows us to perform HTTP requests. In simple words: ThingHTTP provides you with a new URL to use an API that is supported by NodeMCU.
PushBullet:
It’s an app that allows you to share media across your devices with ease. If you want to open a website that you’re currently viewing on your phone but want to view it on your laptop then just share it via PushBullet and it automatically opens the link for you! It can also be used to send tiny notes, which is what we will be using to notify when you’ve forgotten something. If you’re not using it already then click here to create an account. They too have a neat API that lets you send notifications from devices such as the NodeMCU.
PushingBox:
The API provided by PushBullet also communicates over HTTPS, but I’ve not been able to figure out how to send custom messages via ThingHTTP to the PushBullet API which is why I decided to go ahead with PushingBox which is similar to ThingHTTP but allows you to send custom messages in a rather simple fashion. Put simply it does the same thing as ThingHTTP that I mentioned earlier.
Now that you have a brief idea of the services that are used, read the next few lines to know, how all of these are connected. Here’s how it works:
You enter your tasks on Todoist, preferably with due dates and times. Connect the Todoist API with ThingHTTP and get a new URL. Periodically send requests to this new URL that you have obtained and check if there are any due tasks by parsing the JSON response. If there is any task that you have forgotten to do even after say 10 mins (later you can redefine this buffer in the code) then the LED is triggered letting you know that you’ve forgotten something or haven’t ticked off your list yet. Now if you want to know what you’ve forgotten then simply press the button and you’ll receive a notification from the PushBullet app that will show you the details. How does it send this notification? Similar to ThingHTTP you get a new URL from PushingBox and then simply send the list of tasks to that URL and they will send it to PushBullet. During the periodic checks the Remembrall performs, the LED turns off if there are no tasks that are due, meaning you’re safe!
And that’s how it works!
Step 3: Todoist and Their API
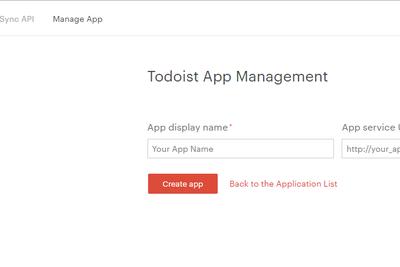
If you don’t have a Todoist account then make one here. I’ve briefly described it’s awesomeness in the previous step so once you have an account then sign in and go to their API documentation and click the Tab that says Manage App and click on the Create a new app button.
In the new window You will have 2 text fields:
- App display name: Remembrall(your choice)
- App service URL: leave it blank
If you scroll down you will find a section that says Test Token and a Create test token button. Click that button and you will get your access token. Save this somewhere.
Just below you will find a Webhooks section. Here there’s a text-box that reads Webhooks callback URL. In that box enter this: https://todoist.com/API/v7/sync/ . Next there’s a drop-down list where you can select a version, choose 7. Below that there will be a grid of check-boxes, check the box that says item:uncompleted, and click the Save webhooks configuration button.
Once you’ve done all that don’t forget to save your access token in a notepad file or a sticky note. In the next step, we’ll connect ThingHTTP with this API.
Step 4: Connect Todoist With ThingHTTP
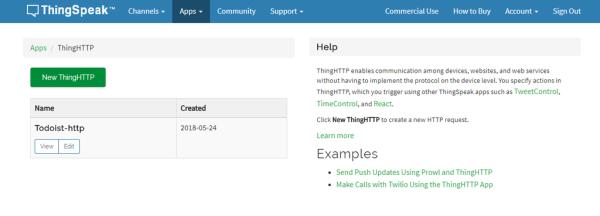
ThingSpeak is an IoT platform with many apps and services made by MathWorks that you can program using MATLAB. Once you’ve signed in, in the top nav-bar under Apps click ThingHTTP. Click the New ThingHTTP button. You’ll get a form in which only fill these 2 fields:
- Name: again, your choice
- URL: https://todoist.com/API/v7/sync/?token=your_access_token_here&sync_token=%27*%27&resource_types=[%22items%22]
Replace your_access_token_here with the token you saved in the previous step. Below the Name field there’s an API Key field, save the key provided.
Then save and proceed to the next step.
Step 5: PushBullet and Their API
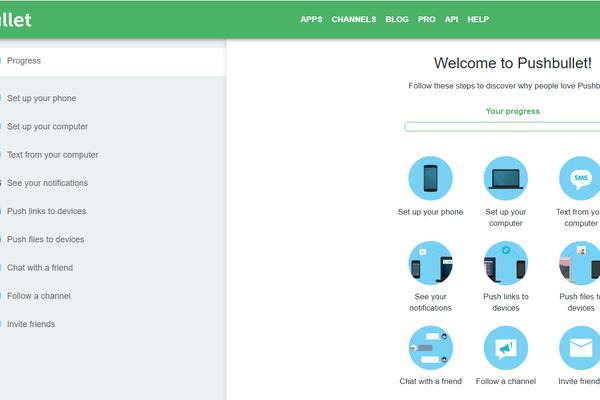
Sign into PushBullet and complete the basic setup steps given. Also install the PushBullet app on your smartphone from your respective stores and sign in to them too. Click the Settings button and then in the Access Tokens section click the Create Access Token Button. Save this access token and go to the next step.
Source: A Useful Remembrall