Summary of Hacking my RC Car using Arduino and Android Smart Phone
Summary (under 100 words): I modified a cheap RC toy car to be controlled by an Android phone using an Arduino Uno, a 1Sheeld Bluetooth interface, and an H-bridge motor driver. I disassembled the car, extended and resoldered motor wires, wired the motors and battery to the H-bridge, mounted the 1Sheeld onto the Arduino, and connected the H-bridge inputs to specific Arduino pins so the phone (via 1Sheeld) controls motor directions. The builder chose the phone gravity sensor over the gyroscope for steering.
Parts used in the RC Car Hack:
- Android smartphone or tablet
- Arduino Uno
- 1Sheeld
- Cheap RC car (toy)
- Male and female connectors (jumper wires)
- H-bridge motor driver
- Mediabridge USB cable
- Male DC power plug
Have an old toy car? I hacked mine using Arduino and an H bridge circuit to control the motors, used my Sony Z1 Android phone to control it with the recent 1Sheeld I got from Kickstarter.
I thought to use the Gyroscope sensor in to drive it but after experimenting, I used the gravity sensor instead, will explain in details why later in step 5.

Step 1: Required stuff
Required components:
1- Android smartphone / tablet ( x1)
2- Arduino uno ( x1) $26
3- 1Sheeld ( x1) $60
4-Cheap RC car ( x1) (you can get it from a toy store)
5- Connectors male female (x4) $5.45 per 40 set
6- H bridge ( x1) $9.51
7– Mediabridge USB cable (x1) $7.99
8- Male Dc Plug (x1) $2
Required tools:
1- Screwdriver
2- Wire cutter
Step 2: Prepare RC car
Here, you can find the steps for dis-assembly of the RC car:
1- Remove the bottom base screw of the RC car.
2- Remove the upper part.
3- Cut the wires from the original car PCB.
4- Remove the motor casing.
5- Cut the motor wires (as they are too short in my case).
6- Solder new ones (cut the jumper from the female side to prepare the wire for soldering).
Step 3: Connect H bridge
1- Connect the H bridge board with the motors.
Connect the motors terminal in H bridge where every motor take two exit
Front motor
Ch 1 to yellow cable.
Ch 2 to orange cable.
Rear motor
Ch 3 to Purple cable.
Ch 4 to blue cable.
2- Connect the battery
Connect the positive pole of the car battery to the H bridge where indicated on board “red cable”.
Connect the negative pole of the car battery to H bridge where indicated on board “black cable”.
3- Connect the male power plugs
Red with red and black with black.
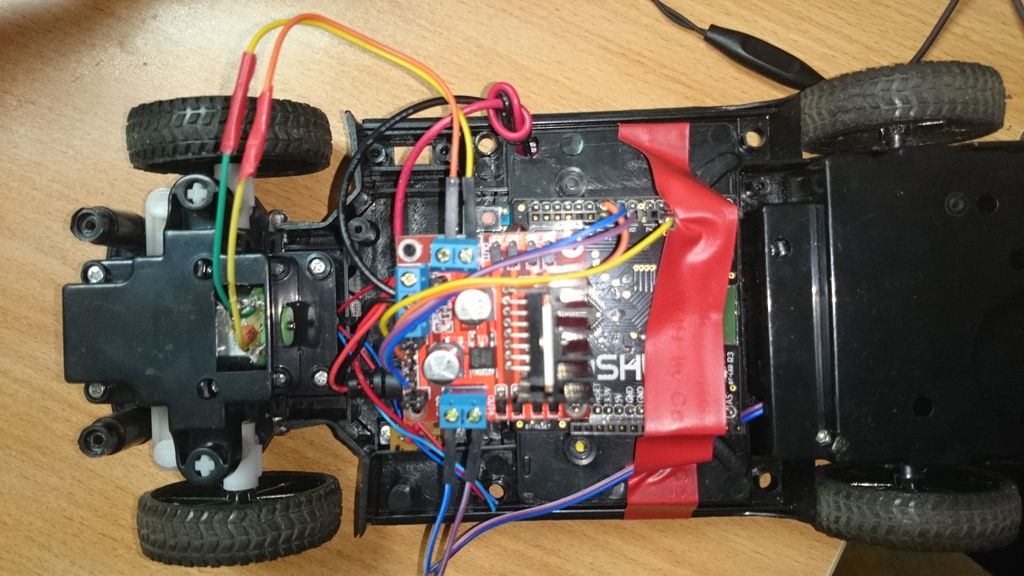
Step 4: Arduino,1Sheeld and H bridge
1-Connect 1Sheeld on top of your Arduino board.
2-Connect the H bridge with 1Sheeld
Connect IN 1 in h bridge “yellow cable in picture ” to pin 6 in 1Sheeld.
Connect IN 2 in h bridge “orange cable in picture” to pin 11 in 1Sheeld.
Connect IN 3 in h bridge “Purple cable in picture “to pin 9 in 1Sheeld.
Connect IN 4 in h bridge “blue cable in picture” to pin 10 in 1Sheeld.
For more detail: Hacking my RC Car using Arduino and Android Smart Phone
- What hardware do I need to hack the RC car?
An Android smartphone, Arduino Uno, 1Sheeld, cheap RC car, male/female connectors, H-bridge, Mediabridge USB cable, and a male DC plug. - How do I prepare the RC car for modification?
Remove the bottom screw and upper part, cut wires from the original PCB, remove the motor casing, cut short motor wires, and solder new extended wires. - How are the motors connected to the H-bridge?
Each motor uses two H-bridge outputs: front motor to Ch1 (yellow) and Ch2 (orange); rear motor to Ch3 (purple) and Ch4 (blue). - How is the car battery connected to the H-bridge?
Connect the positive battery pole to the H-bridge red power input and the negative pole to the H-bridge black power input. - How do I connect the H-bridge to the Arduino/1Sheeld?
Mount 1Sheeld on the Arduino, then wire H-bridge IN1 (yellow) to pin 6, IN2 (orange) to pin 11, IN3 (purple) to pin 9, and IN4 (blue) to pin 10 on the 1Sheeld. - Can I use the phone sensors to control the car?
Yes; the project used the phone sensors via 1Sheeld, and the gravity sensor was chosen over the gyroscope after testing. - What tools are required for the hack?
A screwdriver and wire cutter are required. - Should I replace motor wires when hacking the toy?
Yes, the original motor wires were too short, so they were cut and new longer wires soldered.