Summary of Getting Started With the Particle Photon (Internet Controlled LEDs)
This article guides users on creating an internet-controlled LED project using the Particle Photon. It details hardware setup, connecting the device via smartphone or CLI, and uploading custom code to toggle LEDs remotely through a web browser. The guide emphasizes the Photon's ease of use, Arduino-like coding style, and cloud connectivity features for IoT beginners.
Parts used in Internet Controlled LEDs:
- Particle Photon
- Breadboard
- LEDs
- 220ohm Resistor
- Micro USB Cable
In the previous instructable I showed you how to get started with IoT using the nodeMCU, in this instructable I will be featuring the Particle Photon which is an easy to use IoT device to get started with designing IoT projects. The particle photon is smaller than the nodeMCU and features STM32 ARM Cortex M3 microcontroller on board, with a clock frequency of 120MHz, 1MB flash and 128KB RAM. It is really easy to program this as the code is uploaded to the board over WiFi, the style of coding is similar to that of an arduino.
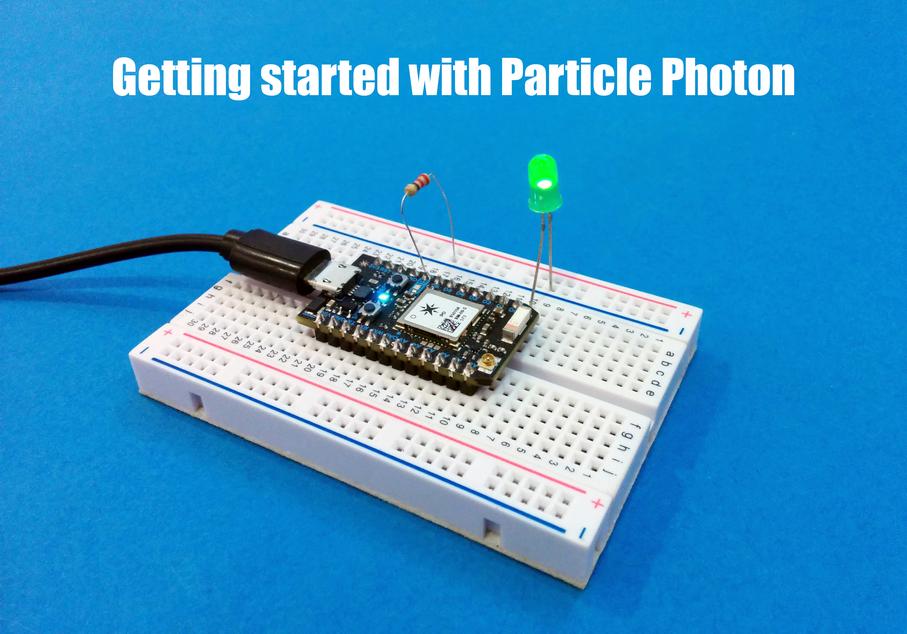
In this instructable I will be showing you how to get started with IoT using the particle photon, by building an internet controlled LED which you can control via a web browser.
Step 1: Tools and Components
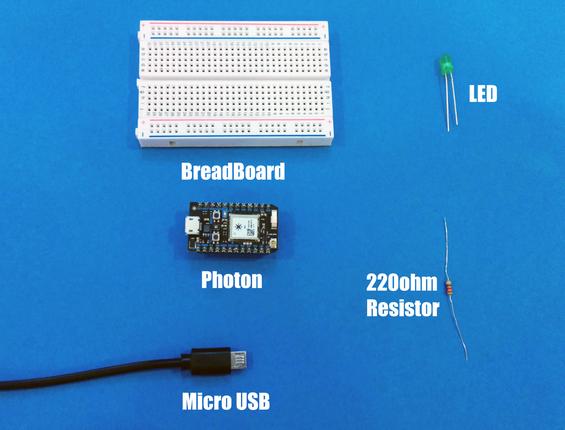
To build this project you will need,
- Particle Photon
- Breadboard
- LEDs
- 220ohm Resistor
- Micro USB Cable
Optionally you can purchase the Photon development kit which includes all these components.
Step 2: Getting the Photon Connected

First before we start to program a board you need to open up the web based ide for the particle photon. You can do this by creating an account at Particle website. After registering for an account next we need to claim the photon to your account. This can be done by two ways one uses an android phone to claim the photon and next uses particle CLI (Terminal Application) to claim your core. I will be showing you how to do it both the ways.
First I will show you how to claim your photon using a smart phone either android or Iphone. Start by going to the play store or apple store and downloading the Particle.io application.
Next login in to the application and click on the add new photon icon. Plug in the core and you should see it blinking blue, connect your phone to the WiFi network though which your photon connects to the internet. And you should see your photon on the app. Next enter your WiFi details and your photon will blink green indicating it is trying to connect to the WiFi network and then it will fade cyan (indicating successful connection). Now you are ready to upload your code to the photon.
Step 3: Getting Photon Connected Via CLI
Another way to get your photon connected to the particle cloud is via CLI (Terminal). For this you will need to install nodeJs, you can download it from here and install it. This method does not need an smart phone to get the photon setup.
Then enter the below command to install particle CLI, make user to run it in administrative or root privileges.
npm install particle-cli
After installing the particle cli, connect your core to the computer (via micro USB) and run the below command.
particle setup
Follow the on screen instructions and you should have you photon breathing cyan and you are now ready to upload the code.
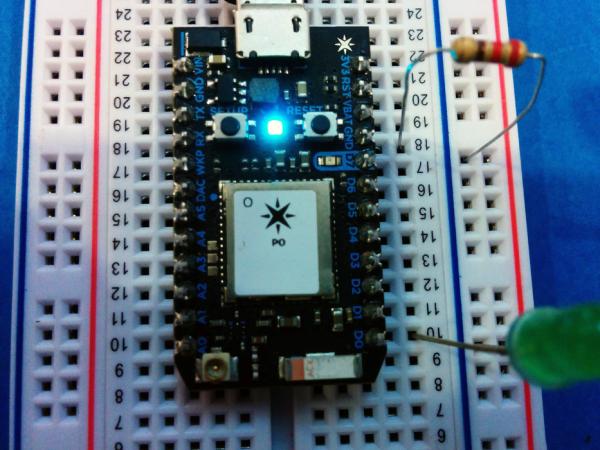
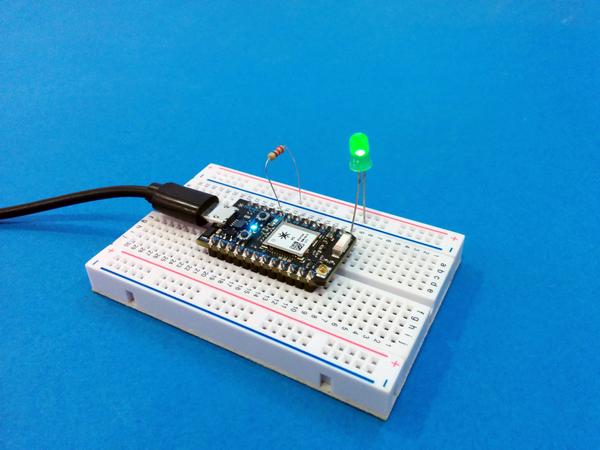
Step 4: Hardware
Before we upload the code to the photon lets, add an led to the photon. The anode of the LED connects to the D0 pin of the photon and the cathode pin connects to the Gnd pin of the photon via a 220ohm resistor.
You can test out the connections by using the particle app to control the led by changing the state of the D0 pin to digital write and then set it to high and you should see the led glow and turn it off by setting the state of the pin to low.
If you got the led to glow, next lets upload the code to the arduino and control it over the internet.
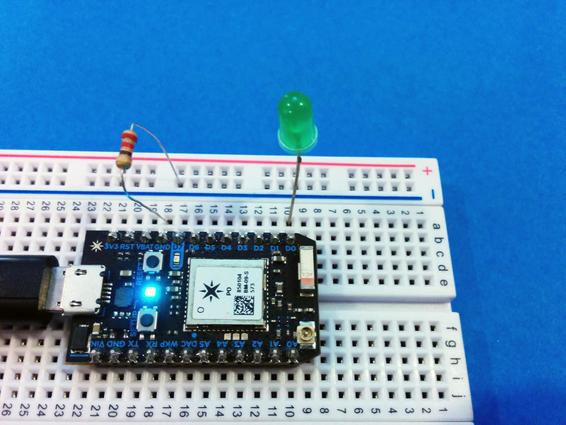
Step 5: Code Upload
Now to upload the code you will need to visit particles web based IDE and paste in the below code and then select the photon from the list of devices on the left of your screen. And then give the new program a name and hit flash. You should see your photon blink pink indicating that the code is uploading on to the board. After uploading the reset and connect to the internet.
Next download the html file from the attachments and open it up with a text editor and fill in the photons id and the access token both can be found in the left menu of the web based IDE.
Now you can open up the html file on a web browser and control the LED over the internet.
// -----------------------------------
// Controlling LEDs over the Internet
// -----------------------------------/* First, let's create our "shorthand" for the pins
Same as in the Blink an LED example:
led1 is D0, led2 is D7 */int led1 = D0;
int led2 = D7;// Last time, we only needed to declare pins in the setup function.
// This time, we are also going to register our Particle functionvoid setup()
{   // Here's the pin configuration, same as last time
   pinMode(led1, OUTPUT);
   pinMode(led2, OUTPUT);   // We are also going to declare a Particle.function so that we can turn the LED on and off from the cloud.
   Particle.function("led",ledToggle);
   // This is saying that when we ask the cloud for the function "led", it will employ the function ledToggle() from this app.   // For good measure, let's also make sure both LEDs are off when we start:
   digitalWrite(led1, LOW);
   digitalWrite(led2, LOW);}/* Last time, we wanted to continously blink the LED on and off
Since we're waiting for input through the cloud this time,
we don't actually need to put anything in the loop */void loop()
{
   // Nothing to do here
}// We're going to have a super cool function now that gets called when a matching API request is sent
// This is the ledToggle function we registered to the "led" Particle.function earlier.int ledToggle(String command) {
    /* Particle.functions always take a string as an argument and return an integer.
    Since we can pass a string, it means that we can give the program commands on how the function should be used.
    In this case, telling the function "on" will turn the LED on and telling it "off" will turn the LED off.
    Then, the function returns a value to us to let us know what happened.
    In this case, it will return 1 for the LEDs turning on, 0 for the LEDs turning off,
    and -1 if we received a totally bogus command that didn't do anything to the LEDs.
    */    if (command=="on") {
        digitalWrite(led1,HIGH);
        digitalWrite(led2,HIGH);
        return 1;
    }
    else if (command=="off") {
        digitalWrite(led1,LOW);
        digitalWrite(led2,LOW);
        return 0;
    }
    else {
        return -1;
    }
}
Source: Getting Started With the Particle Photon (Internet Controlled LEDs)
- What is the Particle Photon?
The Particle Photon is a small IoT device featuring an STM32 ARM Cortex M3 microcontroller with 120MHz clock speed, 1MB flash, and 128KB RAM. - How can I claim my Photon using a smartphone?
Download the Particle.io app, add a new photon, plug it in until it blinks blue, connect your phone to the correct WiFi network, and enter WiFi details. - Can I set up the Photon without a smartphone?
Yes, you can use the Particle CLI by installing NodeJs and running the particle setup command in a terminal application. - How do I connect the LED to the Photon?
Connect the LED anode to the D0 pin and the cathode to the Gnd pin via a 220ohm resistor. - What does a pink blink indicate during upload?
A pink blink indicates that code is currently being uploaded onto the board. - Where can I find the Photon ID and access token?
You can find the Photon ID and access token in the left menu of the web based IDE. - Does the loop function need code for this project?
No, since the system waits for input through the cloud, nothing needs to be placed inside the loop function. - What values does the ledToggle function return?
The function returns 1 if turning LEDs on, 0 if turning them off, and -1 for invalid commands.