Summary of Auto Fish Feeder using Arduino
This article details a DIY automatic fish feeder project using an Arduino RedBoard to solve the issue of feeding fish while away. The creator repurposed junk items like a hard disk enclosure, a floppy drive stepper motor, and a CCTV stand to build a reliable system that dispenses food pellets on a schedule. The design includes a switch to detect lid closure and a timer plug for stability, ensuring consistent feeding without manual intervention.
Parts used in the Auto Fish Feeder:
- Arduino UNO or compatible board
- 9V or 12V adaptor
- 5V stepper motor from an old floppy drive
- Tool box partition
- Phone hang up switch
- Unused harddisk enclosure
- Broken plastic ruler or smooth surface
- CCTV camera stand
- 10K resistor
- Timer AC plug
How often do you ever forget to feed your fish?
Well, for me I don’t forget that much. I just couldn’t go out town for a couple of days and also be ridiculous if I should bring my tank along.
When I won a Sparkfun RedBoard from Sparkfun Analogy Contest, this was the first project that crossed my mind.
Here we go …
Step 1: Bill of Materials
* Arduino UNO or compatible.
* 9V or 12V adaptor.
* 5V stepper motor from an old floppy drive.
* Tool box partition, I need a smooth one to put on top of the moving lid.
* A phone hang up switch to indicate the lid is properly closed.
* Unused harddisk enclosure as the food container.
* Broken plastic ruler or any smooth surface.
* A CCTV camera stand.
* One 10K resistor.
* Timer AC plug.
Step 2: Construction
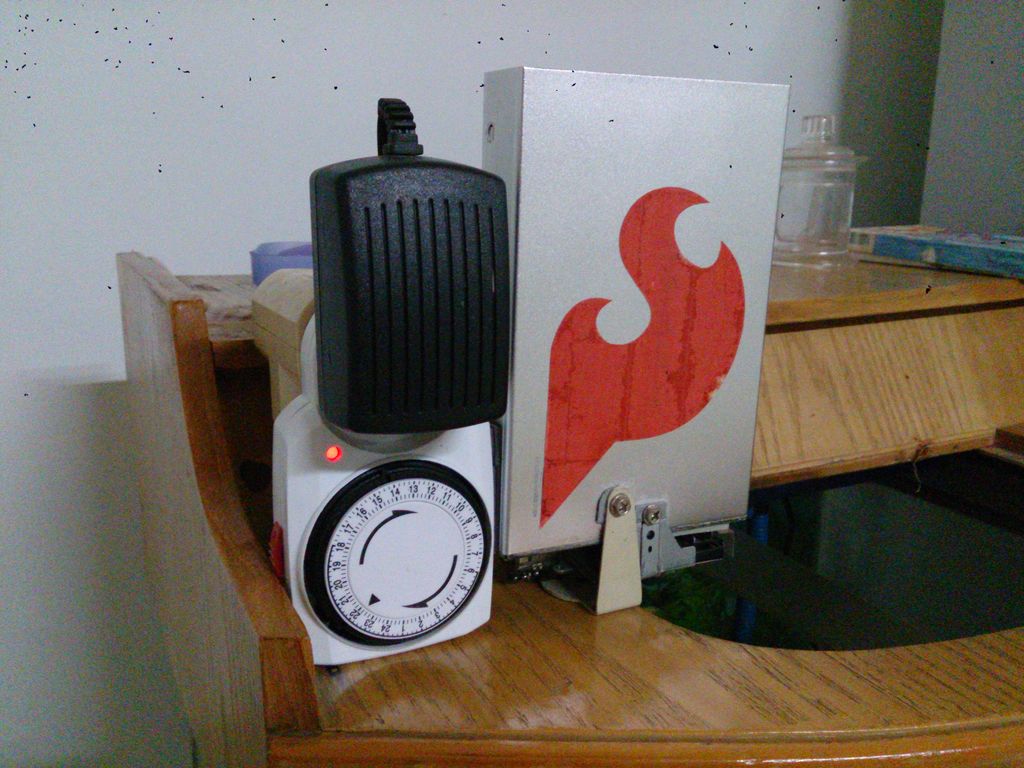
Well the construction is all made out of junk stuffs so the main idea is on picture number 1. I cut out a hole at one end of my harddisk enclosure. Maybe it is easier for you to use mineral water bottle, but you need a post to hold the bottle upside down.
I have this CCTV camera stand and I only need to drill a hole on my enclosure and it has a perfect height for my stepper motor to fit under the enclosure (picture number 2 and 3).
Now for the moving lid I use a 5V floppy drive stepper motor with worm rail along with its moving part (the part used to carry floppy lens; picture number 3 and 4). I put a small smooth plastic from tool box partitioner on top of the lens carrier, below the enclosure’s hole where the food is supposed to come out from (picture number 2). You can use broken ruler as well. Leave about half or one millimeter from the bottom of the enclosure as long as the pellets can’t get through when the lid is closed.
Step 3: Enclosure Tweak
After a few days running, I found a flaw on the enclosure. No food coming out while I still have a lot remained in the container.
Then I realized that the pellets didn’t flow as they should be. That was why I need a broken ruler or any smooth surface that can be fit in the container and forming a “V” shape. Now all the pellets will flow to the hole.
Step 4: Electonic parts
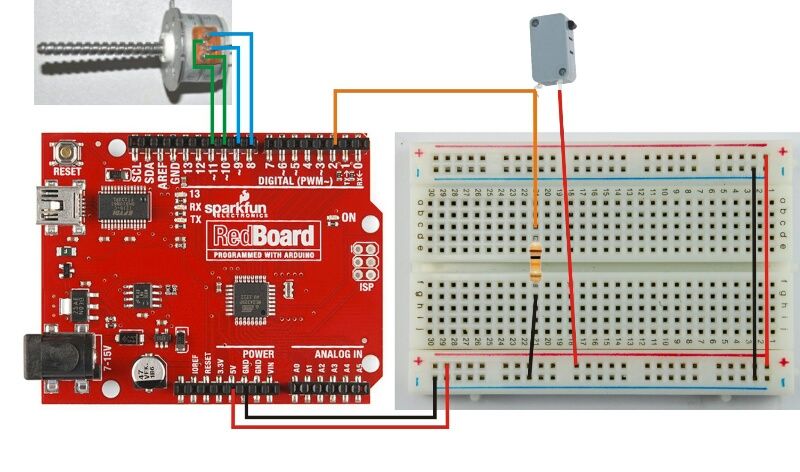
Hook your stepper motor, switch, 10K resistor as picture number 1. Breadboard is for testing and easier to understand the hook up, later on you can save your breadboard for another project (see picture number 5 without breadboard).
Four pins of Stepper motor to digital pin 8, 9, 10, 11.
One leg of switch pin to 5V.
The other leg to Ground through a 10K resistor and also connect to digital pin 2.
Put the switch in front of the moving lid, and bend a metal part as a stopper(orange and red cables on picture number 3). When the switch move forward and pushed on the stopper, arduino reads HIGH on the switch pin and stop the motor.
I taped my RedBoard (arduino UNO) at the back of my enclosure and the timer plug at its side. The timer plug is used to balance the enclosure so that it can stand properly.
For more detail: Auto Fish Feeder using Arduino
- What is the main purpose of this project?
The project automates fish feeding so the owner can go out of town for a couple of days without forgetting. - How do you ensure food flows correctly to the hole?
A broken ruler or smooth surface is fitted inside the container to form a V shape that guides pellets to the exit. - Which pins on the Arduino connect to the stepper motor?
Four pins of the stepper motor connect to digital pins 8, 9, 10, and 11. - How does the system know when the lid is closed?
A phone hang up switch detects the movement; when pushed by a stopper, it reads HIGH and stops the motor. - What component is used to balance the enclosure?
A timer AC plug is taped to the side of the enclosure to help it stand properly. - Can you use a breadboard for the final build?
A breadboard is recommended for testing and easier understanding but can be removed for the final setup. - What material is suggested for the moving lid surface?
A small smooth plastic piece from a tool box partitioner or a broken plastic ruler works well. - Why was a hard disk enclosure chosen over a water bottle?
The enclosure fits perfectly with the CCTV stand height, whereas a water bottle requires a post to hold it upside down.