
Summary of Game Controllers using Arduino
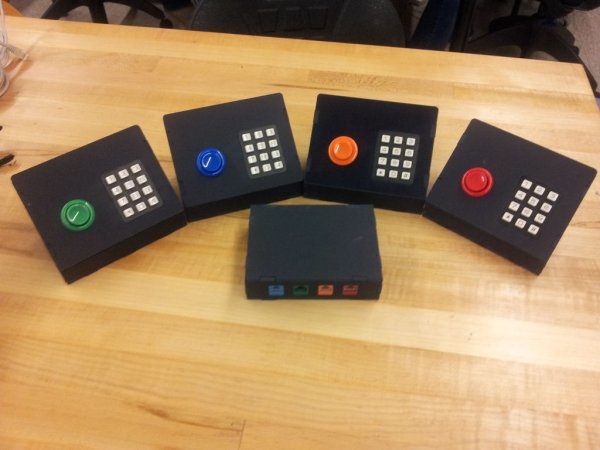
This instructable guides users in building four homemade game controllers that communicate with a central Arduino hub. Designed for educational games like "Fraction Smash," the system uses Ethernet cables and keystones for wiring, allowing students to input data via keypads and buttons to interact with on-screen characters.
Parts used in the Fraction Smash Game Controllers:
- Keypad
- Buttons
- Ethernet Keystones
- Arduino
- Breadboard
- Wire
- Ethernet cables
- Super Glue
This system uses 4 controllers which send signals to a central hub which holds an Arduino.
It was designed for use with a game called Fraction Smash that my group was developing for a class. Students would enter a fraction using the keypad to re-size their character and then hit the smash button to break through the door if they are the right size.
More info here:
http://pdi-studio5.wp.rpi.edu/fraction-smash/
Step 1: Cut out pieces
The .DXF files are attached for automated processes.
All of the CAD files and assemblies can be found here:
http://pdi-studio5.wp.rpi.edu/files/2011/12/Fraction-Smash-CAD.zip
 Controller.DXF57 KBHub.DXF58 KB
Step 2: Add wires to ethernet keystones
This system uses Ethernet cables for the controllers to communicate with the hub. I used three wires on the Ethernet cable, power, ground, and data, although there is space for up to 8 wires if you need more room.
Keystones are easy to use. Simply place one wire in each slot and then push the plastic cap down on top. It may be too hard to do by hand so I used a pair of pliers to push it down. It is not necessary to strip the wire as the keystone will cut through the insulation for you to make a connection.
Keypad (3.95)
http://www.sparkfun.com/products/8653
Buttons (1.49)
http://compare.ebay.com/like/120554574811?var=lv
Ethernet Keystones (1.24)
http://www.monoprice.com/products/product.asp?c_id=105&cp_id=10513&cs_id=1051308&p_id=5371&seq=1&format=2
Arduino (29.99)
http://arduino.cc/en/Main/Buy
Breadboard (5.95)
http://www.sparkfun.com/products/137
Wire
Ethernet cables
Super Glue
For more detail: Game Controllers using Arduino
- What is the primary purpose of this project?
The system constructs homemade game controllers for personal games, education aids, or specific projects like Fraction Smash. - How many controllers send signals to the central hub?
This system uses 4 controllers which send signals to a central hub holding an Arduino. - Can I cut the parts without a CNC waterjet or laser cutter?
Yes, you can cut the parts out of wood by hand if you do not have access to automated cutting machines. - Do I need to strip the wire before using the Ethernet keystone?
No, it is not necessary to strip the wire as the keystone will cut through the insulation for you to make a connection. - What three wires are used on the Ethernet cable?
The system uses power, ground, and data wires on the Ethernet cable for communication. - What tool was recommended to push down the plastic cap on the keystone?
A pair of pliers was used to push down the plastic cap because it may be too hard to do by hand. - How does the student interact with the game character?
Students enter a fraction using the keypad to resize their character and hit the smash button to break through a door. - Where can I find the CAD files and assemblies for this project?
All CAD files and assemblies can be found at the provided link for Fraction-Smash-CAD.zip.