Demonstrates the use of the analogWrite() function in fading an LED off and on. AnalogWrite uses pulse width modulation (PWM), turning a digital pin on and off very quickly, to create a fading effect.
Circuit

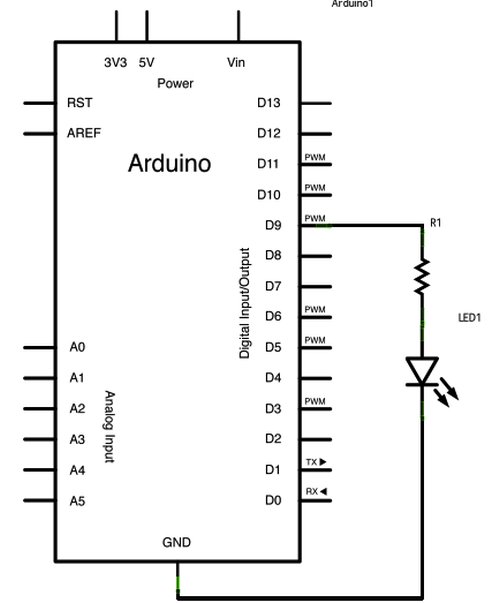
Connect the anode (the longer, positive leg) of your LED to digital output pin 9 on your Arduino through a 220-ohm resistor. Connect the cathode (the shorter, negative leg) directly to ground.
image developed using Fritzing. For more circuit examples, see the Fritzing project page
Schematic
Code
After declaring pin 9 to be your ledPin, there is nothing to do in the setup() function of your code.
The analogWrite() function that you will be using in the main loop of your code requires two arguments: One telling the function which pin to write to, and one indicating what PWM value to write.
In order to fade your LED off and on, gradually increase your PWM value from 0 (all the way off) to 255 (all the way on), and then back to 0 once again to complete the cycle. In the sketch below, the PWM value is set using a variable calledbrightness. Each time through the loop, it increases by the value of the variable fadeAmount.
If brightness is at either extreme of its value (either 0 or 255), then fadeAmount is changed to its negative. In other words, if fadeAmount is 5, then it is set to -5. If it’s 55, then it’s set to 5. The next time through the loop, this change causesbrightness to change direction as well.
analogWrite() can change the PWM value very fast, so the delay at the end of the sketch controls the speed of the fade. Try changing the value of the delay and see how it changes the program.
Fade
This example shows how to fade an LED on pin 9
using the analogWrite() function.
This example code is in the public domain.
*/
Hardware Required
- Arduino board
- Breadboard
- a LED
- a 220 ohm resistor