
Summary of ESP8266 WiFi touch screen thermostat
This article details building a WiFi-controlled thermostat using an Arduino Mega 2560, ESP8266 module, and a 3.2" touch TFT display. The device features six modes, weekly scheduling, weather forecasting, air pressure monitoring, and multi-room temperature tracking. Built for approximately 40EUR, it integrates sensors like DHT22 and BMP180 with a real-time clock to provide comprehensive environmental control and data visualization via a touchscreen interface.
Parts used in the WiFi Controlled Thermostat:
- Arduino Mega 2560
- ESP8266 WiFi module
- BMP180 Digital Barometric Pressure Sensor
- DHT22 Digital Temperature And Humidity Sensor
- 1 Channel Isolated 5V Relay Module
- RTC DS1302 Real Time Clock Module
- 3.2" TFT LCD Module Touch Panel
- TFT 3.2" LCD Shield Expansion Board For Arduino
In this project we will show how to build WiFi controlled thermostat with ESP8266, Arduino and touch screen display. Thermostat will also show other info, like weather forecast and temperature outside. Total cost for thermostat is about 40EUR, which is price for basic commercial thermostat in shop.
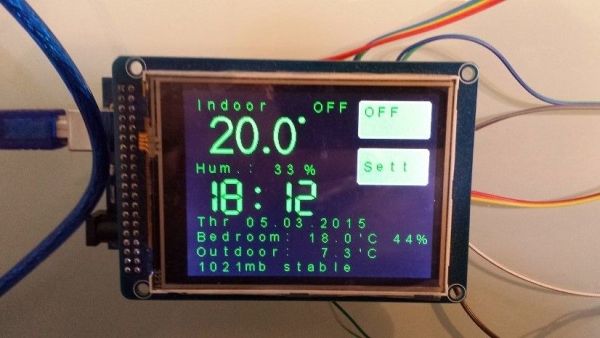
Basic features:
- 6 modes – Auto, Off, LOLO, LO, HI, HIHI
- Touch screen
- WiFi connected
- Four set temperatures (LOLO, LO, HI, HIHI) and weekly schedule
- Time display
- Additional data display – temperature in other room, air pressure and weather forecast
Step 1: Materials
- Arduino Mega 2560
- ESP8266 WiFi module
- BMP180 Digital Barometric Pressure Sensor
- DHT22 Digital Temperature And Humidity Sensor
- 1 Channel Isolated 5V Relay Module
- RTC DS1302 Real Time Clock Module
- 3.2″ TFT LCD Module Touch Panel+ TFT 3.2″ LCD Shield Expansion Board For Arduino
Step 2: Connections
Connect Arduino and TFT shields together. Then add ESP8266 module. Then add ESP8266 to Arduino. See Connenct 5V Arduino and ESP8266 tutorial for details.
DHT22 connections
Arduino DHT22
VCC->1 VCC
GND->4 GND
8->2 DATA
BMP180 connections
Arduino BMP180 module
VCC->VCC
GND->GND
20->SDA
21->SLC
RTC DS1302 connectios
Arduino DS1302
VCC VCC
GND->GND
11->CE
10->IO
9->CLK
For more Detail : ESP8266 WiFi touch screen thermostat
- What are the basic features of this thermostat?
The device supports six modes including Auto and Off, four set temperatures, weekly scheduling, time display, and shows additional data like weather forecasts and air pressure. - How much does it cost to build this project?
The total cost is about 40EUR, which matches the price of a basic commercial thermostat found in shops. - Can this thermostat display weather information?
Yes, the screen displays weather forecasts along with other data such as temperature in other rooms and air pressure. - Does the system include a real-time clock?
Yes, the project uses an RTC DS1302 Real Time Clock Module to manage time display and scheduling. - Which sensors are used to measure temperature and humidity?
A DHT22 Digital Temperature And Humidity Sensor is connected to the Arduino for these measurements. - How is air pressure monitored in this setup?
The system uses a BMP180 Digital Barometric Pressure Sensor connected to the Arduino to track air pressure. - Is the thermostat controllable via WiFi?
Yes, the device is WiFi connected using an ESP8266 WiFi module to allow remote control. - What type of input method does the thermostat use?
The user interacts with the device through a 3.2" TFT LCD Module Touch Panel.
