Summary of ESP8266 ESP-12E Arduino Clock W/ Outside Temp & LEGOS & NeoPixel Ring
This project creates a LEGO-styled clock using an ESP8266 (NodeMCU) that fetches local time via NTP and local temperature from Weather Underground, driving a MAX7219 8-digit 7-seg LCD and a NeoPixel RGB ring. It runs from a USB port, uses common Arduino libraries, and is wired with simple jumper connections. The author provides wiring, library links, and tips for changing WiFi creds, time zone, ZIP code for temperature, and NeoPixel colors for customization.
Parts used in the ESP8266 Arduino Clock W/ Outside Temp & LEGOS & NeoPixel Ring:
- ESP8266 ESP-12E NodeMCU 0.9
- NeoPixel RGB Ring
- 7 segment 8 Digit LCD Display (MAX7219)
- Legos
- MicroUSB Cable
- Jumper wires
- Mini Breadboard
- USB power source (TV USB port suggested)
We went all ‘cord-cutter’ and ditched our Cable box and realized something was now missing in our family room…the oh so familiar LCD clock that was always present. I decided to get to work on a replacement and had some fun with it. If you’re like me you’ve ordered an Arduino kit here and there when the price was right and have parts hiding all over your abode. And…odds are you have leftover Legos from all of those theme kits you’ve bought for your kids over the years. Who needs a 3D printer…HAVE SOME FUN…IT’S GEEKOUT LEGO TIME!
This project grabs your local time from an NTP server and your local temp from Wunderground. Mine is powered by one of our TV’s USB ports.
Read on get CREATIVE and have fun!
Step 1: Hard Resources Needed – Parts List
ESP8266 ESP-12E NodeMCU 0.9
NeoPixel RGB Ring
7 segment 8 Digit LCD Display (MAX7219)
Legos
MicroUSB Cable
Jumpers
Mini Breadboard
Imagination (It’s in your skull which is HARD…so this is a Hard Resource…HAAAA)
Step 2: Soft Resources Needed – Libraries and ‘Stuff’
Assumptions:
- ESP8266 Boards Manager is configured. If not…https://github.com/esp8266/Arduino
- Your WiFi Credentials available.
- Comfortable with installing Arduino libraries.
Arduino IDE
Wundergound API: https://www.wunderground.com/weather/api/d/pricing…
NTP Library: https://github.com/SensorsIot/NTPtimeESP
Step 3: Wire It Up How It Suits You Best…
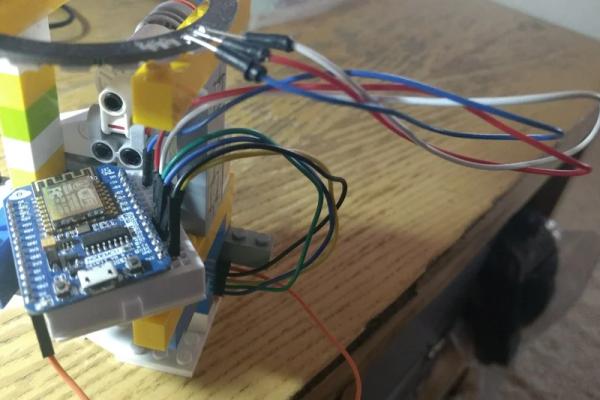
I’ll map out the pins here just based on what I have put together. Refer to the attached pix as needed.
ESP12————->LCD——————–>NeoPixel
5v ———————5v
3v————————————————-3v
Grd——————-Grd———————–Grd
D1————————————————-In (Blue)
D6——————–LOAD/CS (Orange)
D7——————–CLK (Blue)
D8——————–DIN (Yellow)
Step 4: Arduino Source Tips… and Other Stuff
A few things to note….
The NTPtimeESP library’s header file makes the calls to the WiFi libraries so you DO NOT need to add them again to your main source.
Change the WiFi creds in the main source to match your WiFi creds .
Change the time zone information as needed following Andreas’s YouTube video.
Change the ZIP code in the source so you pull the temp for your location.
You can rearrange the order of the LCD writes to flipflop the time and temp.
Change the NeoPixel code string(s) to your liking for other color schemas.
Source: ESP8266 ESP-12E Arduino Clock W/ Outside Temp & LEGOS & NeoPixel Ring
- What does this project display?
It displays local time (from NTP) and local temperature (from Wunderground). - Which microcontroller is used?
An ESP8266 ESP-12E NodeMCU 0.9 is used. - How is the temperature obtained?
The project pulls local temperature from the Wunderground API. - Which display hardware is used for the clock?
A 7 segment 8 Digit LCD Display driven by a MAX7219 is used. - How are colors displayed or customized?
A NeoPixel RGB ring is used and its color strings can be changed in the code. - Where does the project get time information?
Time is obtained from an NTP server using the NTPtimeESP library. - How is the project powered?
The example is powered from a TV USB port via a MicroUSB cable. - What software is required?
Arduino IDE plus the ESP8266 boards setup and required libraries (NTPtimeESP and others) are required. - Do I need to change code for my location?
Yes — update WiFi credentials, time zone settings, and ZIP code in the source as instructed. - Can I change the order or behavior of displayed info?
Yes — you can rearrange LCD writes to change how time and temperature alternate.