Summary of ESP8266/ESP-12 Arduino Powered SmartThings DS18B20 Temp. Sensor
This article guides users in building a SmartThings-connected temperature monitoring system using an ESP8266 NodeMCU and a DS18B20 sensor. It details the necessary hardware components, software tools like Arduino IDE and SmartThings IDE, and step-by-step instructions for wiring the device to a NodeMCU base and configuring it via code modifications. The project enables remote temperature tracking across multiple locations through the Samsung SmartThings ecosystem.
Parts used in the SmartThings Connected DS18B20 Temp Sensor:
- ESP8266 ESP12 NodeMCU SOC
- DS18B20 Temperature Sensor
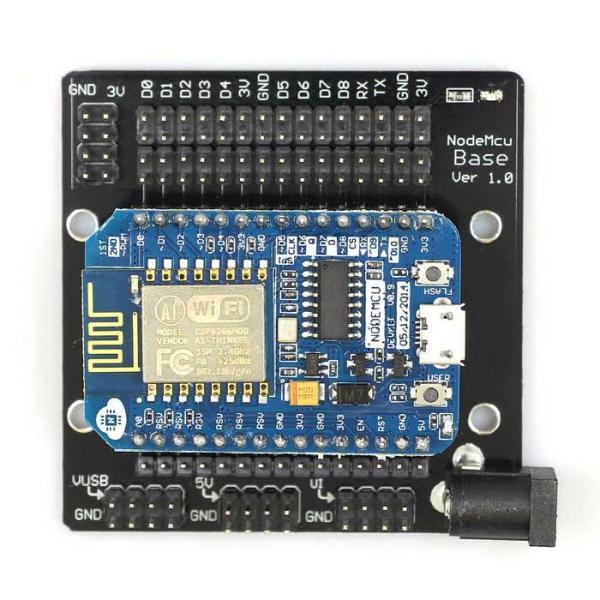
- NodeMCU Base
- Samsung SmartThings 2.0 Hub
- USB Micro Cable
We all like to know what the current room temperature is, and sometimes what the temperature is in another room, or maybe even in your vacation house on the other side of the world. Maybe you want to monitor the temperature in your pet Lizard’s house? You’ve come to the right place to learn how to build your very own SmartThings connected DS18B20 Temp. Sensor with an ESP8266 and Arduino. Check out this Vid and read on.
Step 1: Hardware – What You’ll Need
I DO NOT endorse, represent, or receive anything at all for the examples below. Caveat Emptor.
Substitute as needed for your individual requirements/parameters. Links to products are only for examples and not promotion. I did not use a resistor for the DS18B20. Please use your own judgement.
3. NodeMCU Base
4. Samsung SmartThings 2.0 Hub
USB Micro Cable
Step 2: Software – What You’ll Need

ASSUMPTIONS: Comfortable working with Arduino IDE, Libraries, SmartThings IDE and GITHub.
Arduino IDE
Samsung SmartThings IDE
SmartThings Android App
GITHub
Step 3: Hardware Setup
For this section, the steps explained are based on my setup. Adjust as needed.
- Install NodeMCU board onto Node Base. (confirm the correct orientation by antenna locations matching on each or pin numbers matching if listed on base)
- Install female terminator connections on DS18B20. (I snipped, stripped, soldered and wrapped jumpers to the DS1820B’s lines)
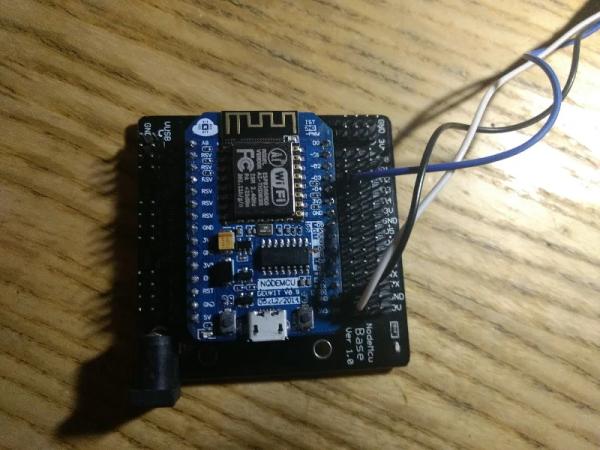
- Attach DS18B20 power to 3.3v rail on Node Base. See Pic.
- Attach DS18B20 ground to ground rail on Node Base. See Pic.
- Attach DS18B20 Data to pin D3 rail on Node Base. See Pic.
NOTE: You may need to disconnect Data connection when loading sketch and reconnect after load has completed.
Step 4: Software Setup
ASSUMPTIONS: Comfortable working with Arduino IDE, Libraries, SmartThings IDE and GITHub.
- Login to your respective SmartThings IDE and GITHub accounts.
- Follow ALL steps shown here by Daniel Ogorchock. AKA Ogiewon.
I know there is a lot of initial information and configuration if this is your first time setting up the ST_Anything configurations, but it is worth it. PLEASE feel free to ask any questions you may have along the way. In addition, the SmartThings Forum for this project is a GREAT place for tips and advice.
- Modify the attached Arduino sketch, adding your WiFi/SmartThings environment specifics. The sketch calls out where to make the changes, as do the steps on the GITHub Page.
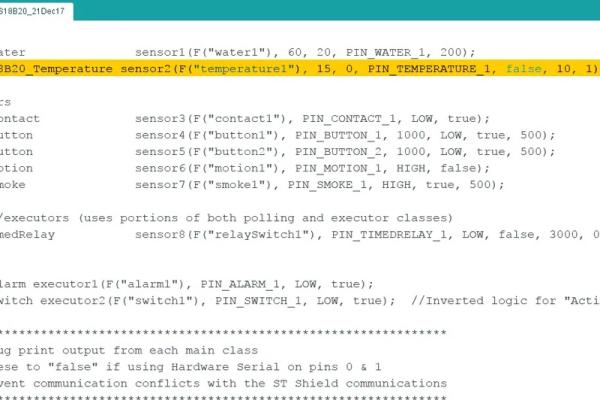
- Refer to the attached screenshots for the (2) ST_Anything device specific changes. (For NodeMCU 0.9 version…Change Pin D7 to Pin D3) and commenting out any devices/libraries that you may not want to install at this time.
- The attached sketch has the D7 to D3 changes and the commented out extras.
NOTE: If you disconnected the jumper from D#, reconnect after sketch has been loaded. - Open your SmartThings Mobile App. If you still need to add details as per the steps here, do so now.
- Take a look in your list of devices within your SmartThings Mobile App, you should now see a DS18B20 listed with your current temperature.
Source: ESP8266/ESP-12 Arduino Powered SmartThings DS18B20 Temp. Sensor
- What is required to build this smart sensor?
You need an ESP8266 ESP12 NodeMCU SOC, DS18B20 Temperature Sensor, NodeMCU Base, Samsung SmartThings 2.0 Hub, and a USB Micro Cable. - How do I connect the DS18B20 data line?
Attach the DS18B20 Data to pin D3 rail on the Node Base. - Can I use a resistor with the DS18B20?
The author did not use a resistor but advises readers to use their own judgement as they do not endorse specific examples. - Which software tools are needed for setup?
You need Arduino IDE, Samsung SmartThings IDE, SmartThings Android App, and GITHub access. - What should I do if I disconnected the data jumper?
If you disconnected the jumper from D#, you must reconnect it after the sketch has been loaded. - Does the pin configuration change for different NodeMCU versions?
Yes, for the NodeMCU 0.9 version you must change Pin D7 to Pin D3. - Where can I find help with the initial configuration?
The SmartThings Forum for this project is a great place for tips and advice. - How do I verify the sensor is working?
Open your SmartThings Mobile App and check your list of devices to see the DS18B20 listed with current temperature.