
Summary of ESP32 Web Server – Arduino IDE
This article guides users in building a standalone web server using an ESP32 and the Arduino IDE to remotely toggle two LEDs via a browser. The project involves installing ESP32 board support, writing code to handle WiFi connections and HTTP requests, and connecting hardware components to control the LEDs based on user input from a generated web interface.
Parts used in the ESP32 Web Server Project:
- ESP32 Dev Module
- Arduino IDE
- Two LEDs
- Computer (for uploading code)
- WiFi Network (with SSID and Password)
In this project you’ll create a standalone web server with an ESP32 that can toggle two LEDs using the Arduino IDE programming environment. If you want to learn more about the ESP32 dev board, read my Getting Started Guide with ESP32.
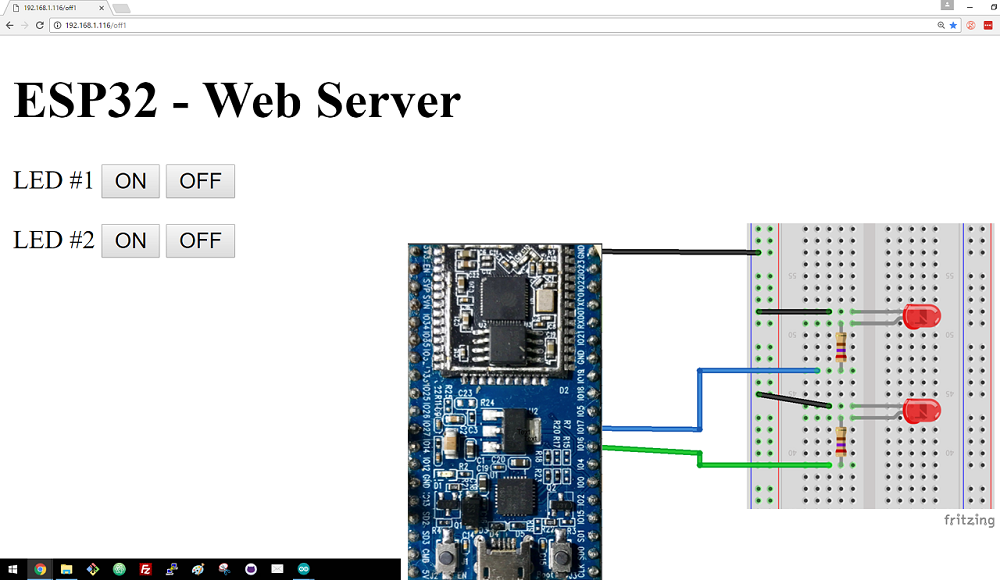
First, watch the video demonstration below
Preparing the ESP32 board in Arduino IDE
There’s an add-on for the Arduino IDE that allows you to program the ESP32 using the Arduino IDE and its programming language. Follow this tutorial to prepare your Arduino IDE:
- Windows instructions – Installing the ESP32 Board in Arduino IDE
- Mac and Linux instructions – Installing the ESP32 Board in Arduino IDE
Uploading the code
In this example, you’re going to connect two LEDs to the ESP32 that can be controlled remotely through a browser.
Copy the following code to your Arduino IDE to upload it to your ESP32 Dev Module.
/* * Rui Santos * Complete Project Details http://randomnerdtutorials.com */ #include <WiFi.h> // Replace with your network credentials const char* ssid = "YOUR_SSID"; const char* password = "YOUR_PASSWORD"; WiFiServer server(80); const int led1 = 16; // the number of the LED pin const int led2 = 17; // the number of the LED pin // Client variables char linebuf[80]; int charcount=0; void setup() { // initialize the LEDs pins as an output: pinMode(led1, OUTPUT); pinMode(led2, OUTPUT); //Initialize serial and wait for port to open: Serial.begin(115200); while(!Serial) { ; // wait for serial port to connect. Needed for native USB port only } // We start by connecting to a WiFi network Serial.println(); Serial.println(); Serial.print("Connecting to "); Serial.println(ssid); WiFi.begin(ssid, password); // attempt to connect to Wifi network: while(WiFi.status() != WL_CONNECTED) { // Connect to WPA/WPA2 network. Change this line if using open or WEP network: delay(500); Serial.print("."); } Serial.println(""); Serial.println("WiFi connected"); Serial.println("IP address: "); Serial.println(WiFi.localIP()); server.begin(); } void loop() { // listen for incoming clients WiFiClient client = server.available(); if (client) { Serial.println("New client"); memset(linebuf,0,sizeof(linebuf)); charcount=0; // an http request ends with a blank line boolean currentLineIsBlank = true; while (client.connected()) { if (client.available()) { char c = client.read(); Serial.write(c); //read char by char HTTP request linebuf[charcount]=c; if (charcount<sizeof(linebuf)-1) charcount++; // if you've gotten to the end of the line (received a newline // character) and the line is blank, the http request has ended, // so you can send a reply if (c == '\n' && currentLineIsBlank) { // send a standard http response header client.println("HTTP/1.1 200 OK"); client.println("Content-Type: text/html"); client.println("Connection: close"); // the connection will be closed after completion of the response client.println(); client.println("<!DOCTYPE HTML><html><head>"); client.println("<meta name=\"viewport\" content=\"width=device-width, initial-scale=1\"></head>"); client.println("<h1>ESP32 - Web Server</h1>"); client.println("<p>LED #1 <a href=\"on1\"><button>ON</button></a> <a href=\"off1\"><button>OFF</button></a></p>"); client.println("<p>LED #2 <a href=\"on2\"><button>ON</button></a> <a href=\"off2\"><button>OFF</button></a></p>"); client.println("</html>"); break; } if (c == '\n') { // you're starting a new line currentLineIsBlank = true; if (strstr(linebuf,"GET /on1") > 0){ Serial.println("LED 1 ON"); digitalWrite(led1, HIGH); } else if (strstr(linebuf,"GET /off1") > 0){ Serial.println("LED 1 OFF"); digitalWrite(led1, LOW); } else if (strstr(linebuf,"GET /on2") > 0){ Serial.println("LED 2 ON"); digitalWrite(led2, HIGH); } else if (strstr(linebuf,"GET /off2") > 0){ Serial.println("LED 2 OFF"); digitalWrite(led2, LOW); } // you're starting a new line currentLineIsBlank = true; memset(linebuf,0,sizeof(linebuf)); charcount=0; } else if (c != '\r') { // you've gotten a character on the current line currentLineIsBlank = false; } } } // give the web browser time to receive the data delay(1); // close the connection: client.stop(); Serial.println("client disconnected"); } }
Don’t forget to add your network credentials in the preceding code (SSID and Password).
Plug your ESP32 Dev Module to your computer and follow these next instructions:
Read more: ESP32 Web Server – Arduino IDE
-
How do I prepare the Arduino IDE for the ESP32?
You must install the ESP32 Board add-on for the Arduino IDE using specific instructions for Windows, Mac, or Linux. -
Can I control the LEDs through a browser?
Yes, the code connects two LEDs to the ESP32 so they can be controlled remotely through a web browser. -
What pins are used for the LEDs?
The code defines pin 16 for LED #1 and pin 17 for LED #2. -
Does the server close the connection after sending data?
Yes, the code includes the header Connection: close to ensure the connection closes after the response is completed. -
How do I turn LED 1 ON via the web interface?
Clicking the ON button link /on1 sends a request that sets digital pin 16 to HIGH. -
What happens if the WiFi status is not connected?
The code enters a loop that prints dots to the serial monitor with a 500ms delay until the network connects. -
Do I need to modify the code before uploading?
Yes, you must replace YOUR_SSID and YOUR_PASSWORD in the code with your actual network credentials. -
What library is required for this project?
The project requires the WiFi.h library to handle network connectivity.
