
This DIY project creates a smartphone-guided obstacle-avoidance navigation device for blind users using an Arduino, 1Sheeld text-to-speech shield, and ultrasonic sensors mounted on a belt. The 1Sheeld handles speech with minimal code, while two ultrasonic sensors detect obstacles and send alerts through the Android app. The Arduino and shield are housed in a custom case attached to a belt for wearable navigation.
- Arduino board (example: UNO)
- 1Sheeld
- Ultrasonic sensors (two recommended)
- Male-female Arduino jumpers or wires
- Belt
- Android smartphone (Android V2.3 and above)
- Laser-cut case or enclosure (optional)
In this project you can cover your eyes and let your smartphone navigate you to avoid obstacles, the application is mainly a DIY navigation device for blind people.
I knew that 1Sheeld is about to launch a new text to speech shield, and so I contacted them to let me use it in this project and they accepted since I’m one of the early Kickstarter backers 😀
By using 1sheeld I made the text to speech part by only 1 line of code!
All you need to get started
1. Any Arduino board (here i used UNO)
2. 1sheeld
3. Ultrasonic sensor (I used two for better navigation)
4. Male-female arduino jumbers or wires
5. Your belt
6. Any smart phone that runs Android V2.3 and above.
Download 1sheeld application to your android smart phone from here
Download 1sheeld library from here and put it in the libraries folder in your Arduino folder.
Step 1: Wiring and electronics setup
1. Connect your 1sheeld to your arduino board
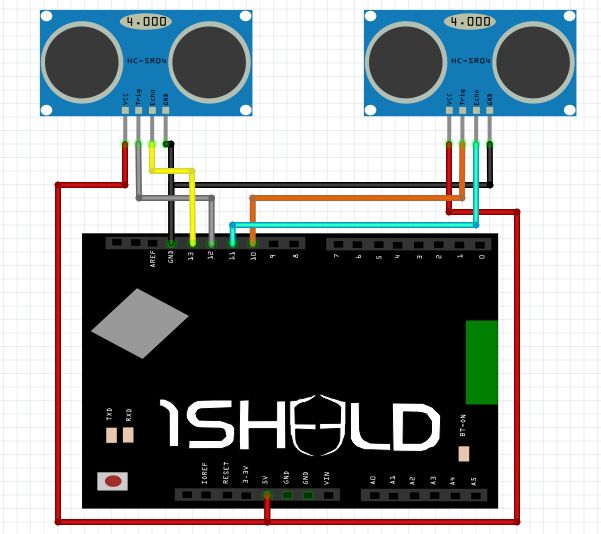
2. Connect your ultrasonics as shown in figure
VCC ==> to the 5V in your 1sheeld
GND ==> to your GND in 1sheeld
ECHO ==> to any i/o pin here i used 11 and 13 for the two ultrasonics
Trigger ==> to any i/o pin here i used 10 and 12 for the two ultrasonics
If you have the 5 pin ultrasonic make the same wiring and put the out pin on SC.
(OUT ==> to your GND on 1sheeld)
Step 2: Belt setup
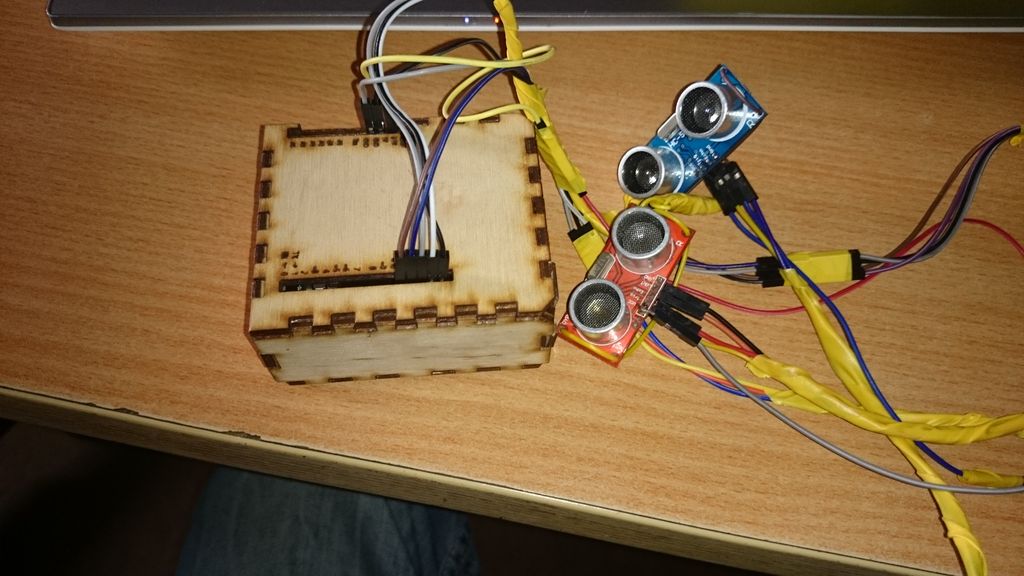
I needed to put the Arduino and 1Sheeld in a cover, I couldn’t find any plastic box so I got this laser cut case from Fablab Egypt.
You can make a case with a laser cutter like this one also.
I used wires to mount the case and sensors to my belt.
For more detail: DIY navigation device for blind people using Arduino and Android smart phone
- What is the main purpose of this project?
To create a DIY wearable navigation device that uses a smartphone to guide blind users and help them avoid obstacles. - What components are required to build this device?
An Arduino board, 1Sheeld, ultrasonic sensors (two recommended), male-female jumpers or wires, a belt, an Android smartphone, and an enclosure or case. - How does the text to speech feature work?
Text to speech is handled by the 1Sheeld text to speech shield integrated with the Arduino, requiring only one line of code for speech output. - Which pins are used for the ultrasonic sensors in the example?
ECHO pins are connected to digital pins 11 and 13, and TRIGGER pins are connected to digital pins 10 and 12 in the example. - How should power and ground be connected for the ultrasonics?
VCC of the ultrasonic sensors goes to 5V on the 1Sheeld and GND goes to GND on the 1Sheeld. - Can a 5-pin ultrasonic sensor be used?
Yes; wire VCC and GND as usual and put the OUT pin on SC, with OUT connected to GND on the 1Sheeld as described. - What smartphone requirements are there?
Any Android smartphone running Android version 2.3 or above. - Is a special enclosure required for the Arduino and 1Sheeld?
No special enclosure is required; the author used a laser-cut case but you can use any suitable cover to mount components to a belt.
