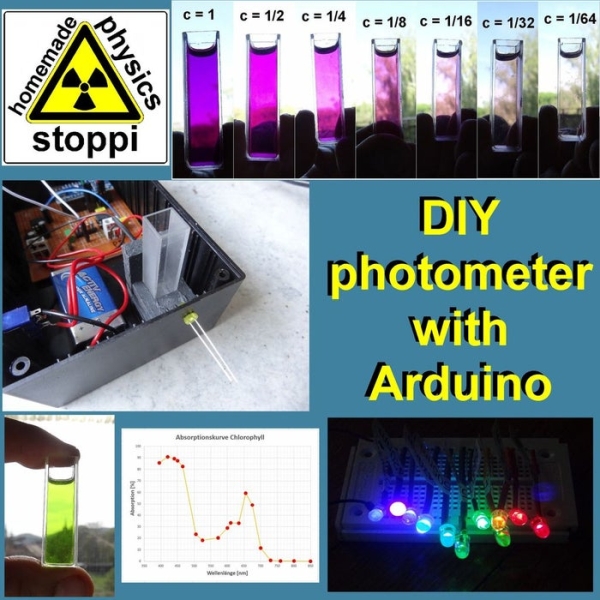
Summary of DIY LED-photometer With Arduino for Physics or Chemistry Lessons
This article details the construction of a DIY LED photometer using an Arduino Nano to measure light absorption in liquids. The device uses colored LEDs and a photodiode to calculate transmission and absorption factors, enabling experiments like analyzing chlorophyll and potassium permanganate concentrations based on the Lambert-Beer law. It is designed as an educational tool for physics and chemistry lessons.
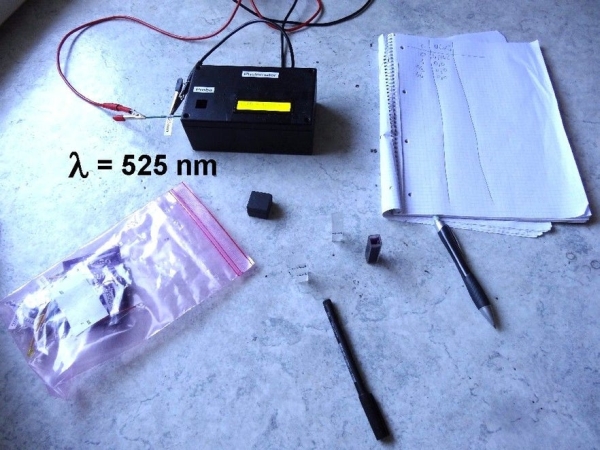
Parts used in the DIY LED Photometer:
- A black case with dimensions 160 x 100 x 70 mm
- An Arduino Nano
- An operational amplifier LF356
- 3 capacitors with a capacity of 10μF
- 2 capacitors with C = 100nF and one capacitor with 1nF
- One voltage inverter ICL7660
- One photodiode BPW34
- 6 resistors with values 100, 1k, 10k, 100k, 1M, and 1M ohms
- An I²C 16x2 display
- A 2x6 rotary switch
- A 9V battery holder and a 9V battery
- A switch
- Glass cuvettes
- LEDs with different colors
- A simple 0-15V power supply
- Wood for the cuvette-holder
Liquids or other objects appear colored because they
reflect or transmit certain colors and in turn swallow (absorb) others. With a so-called photometer, those colors (wavelengths) can be determined, which are absorbed by liquids. The basic principle is simple: with a LED of a certain color you first shine through a cuvette filled with water or another solvent. A photodiode measures the incoming light intensity and converts it into a proportional voltage U0. This value is noted. Thereafter, a cuvette with the liquid to be examined is placed in the beam path and again measures the light intensity or voltage U. The transmission factor in percent is then simply calculated by T = U / U0 * 100. To get the absorption-factor A you just have to calculate A = 100 minus T.
This measurement is repeated with differently colored LEDs and determines in each case T or A as a function of the wavelength (color). If you do this with enough LEDs, you get an absorption curve.
Step 1: The Parts
For the photometer you need the following parts:
* A black case with the dimensions 160 x 100 x 70 mm or similar: housing
* An Arduino Nano: ebay arduino nano
* An operational amplifier LF356: ebay LF356
* 3 capacitors with a capacity of 10μF: ebay capacitors
* 2 capacitors with C = 100nF and a capacitor with 1nF: ebay capacitors
* One voltage inverter ICL7660: ebay ICL7660
* One photodiode BPW34: ebay BPW34 photodiode
* 6 resistors with 100, 1k, 10k, 100k, 1M and 10M ohms: ebay resistors
* an I²C 16×2 display: ebay 16×2 display
* a 2×6 rotary switch: rotary switch
* a 9V battery holder and a 9V battery: battery holder
* a switch: switch
* Glass cuvettes: ebay cuvettes
* LEDs with different color: f.e. ebay LEDs
* a simple 0-15V power supply to power the LEDs
* wood for the cuvette-holder
Step 2: The Circuit and the Arduino-code
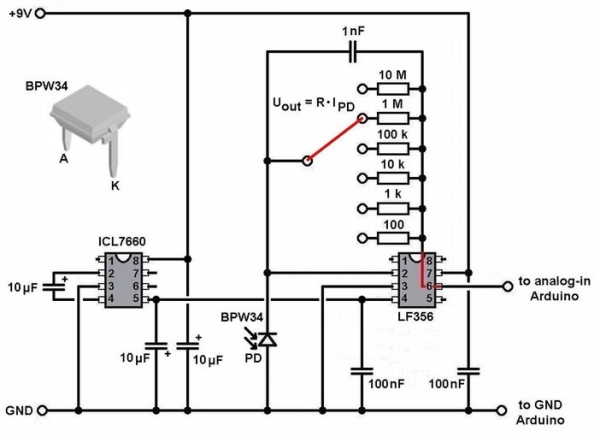
The circuit for the photometer is very simple. It consists of a photodiode, an operational amplifier, a voltage-inverter and some other parts (resistors, switches, capacitors). The principle of this type of circuit is to convert the (low) current from the photodiode into a higher voltage, which can be read by the arduino nano. The multiplication-factor is determined by the value of the resistor in the feedback of the OPA. To be more flexible I took 6 different resistors, which can be chosen with the rotary switch. The lowest “magnification” is 100, the highest 10 000 000. Everything is powered by a single 9V battery.
Step 3: First Experiment: the Absorption-curve of Chlorophyll
For the measuring procedure: A cuvette is filled with water or another
transparent solvent. This is then placed in the photometer. The cuvette is being covered with a light-tight lid. Now set the power supply for the LED so that a current of about 10-20mA flows through the LED. After that, use the rotary switch to select the position at which the output voltage of the photodiode is around 3-4V. The fine tuning of the output voltage can still be done with the adjustable power supply. This voltage U0 is noted. Then take the cuvette containing the liquid to be examined and place it in the photometer. At this point the voltage of the power supply and the position of the rotary switch must remain unchanged! Then cover the cuvette again with the lid and measure the voltage U. For the transmission T in percent the value is T = U / U0 * 100. To get the absorption coefficient A you just have to calculate A = 100 – T.
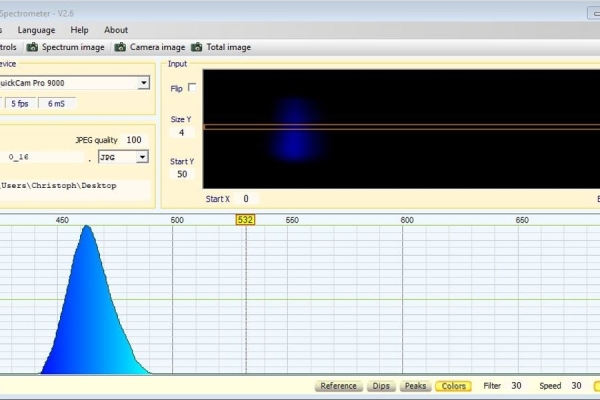
I bought the different colored LEDs from Roithner Lasertechnik which is located in austria, my home country. For these, the respective wavelength is given in nanometers. To be really sure one can check the dominant wavelength with a spectroscope and the Theremino software (theremino spectrometer). In my case, the data in nm agreed with the measurements quite good. When selecting the LEDs, you should achieve as even coverage of the wavelength range from 395nm to 850nm.
For the first experiment with the photometer I chose chlorophyll. But for this you’ll have to pluck grass from a meadow hoping that no one is watching you …
This grass is then cut into small pieces and put together with propanol or ethanol in a pot. Now you crush the leaves with a mortar or a fork. After a few minutes, the chlorophyll has dissolved nicely in the propanol. This solution is still too strong. It needs to be diluted with sufficient propanol. And to avoid any suspended the solution has to be filtered. I took a common coffee-filter.
The result should look like as shown in the picture. A very translucent green-yellowish solution. Then you repeat the measurement (U0, U) with each LED. As it can be seen from the obtained absorption curve, theory and measurement agree quite well. Chlorophyll a + b absorbs very strongly in the blue and red spectral range, while green-yellow and infrared light can penetrate the solution almost unhindered. In the infrared range, the absorption is even close to zero.
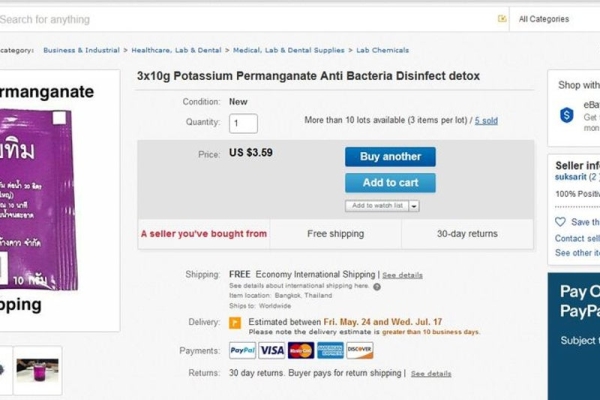
Step 4: Second Experiment: the Dependence of the Extinction on the Concentration of Potassium Permanganate
As a further experiment, the determination of the extinction depending on
the concentration of the solute offers. As a solute, I use potassium permanganate. The light intensity after penetrating the solution follows the Lambert-Beer law: It reads I = I0 * 10 ^ (- E). I0 is the intensity without solute, I the intensity with solute and E the so-called extinction. This extinction E depends (linearly) on the thickness x of the cuvette and on the concentration c of the solute. Thus, E = k * c * x with k as the molar absorption coefficient. To determine the extinction E you just need I and I0, because E = lg (I0 / I). When the intensity is reduced to, for example, 10%, the extinction E = 1 (10 ^ -1). With a weakening to only 1%, E = 2 (10 ^ -2).
If one applies E as a function of the concentration c, we would expect to obtain a rising straight line through the zero point.
As you can see from my extinction curve, it is not linear. At higher concentrations, it flattens, specifically from concentrations greater than 0.25. This means that the extinction is lower than would be expected according to the Lambert-Beer law. However, considering only lower concentrations, for example between 0 and 0.25, results in a very nice linear relationship between the concentration c and the extinction E. In this range, the unknown concentration c can be determined from the measured extinction E. In my case, the concentration has only arbitrary units, since I have not determined the initial amount of dissolved potassium permanganate (it has been only milligrams, which couldn’t be measured with my kitchen-scale in my case, dissolved in 4 ml water for the starting solution).
Step 5: Conclusions
This photometer is particularly suitable for physics and chemistry lessons.
The total cost is only around 60 Euro = 70 USD. The different colored LEDs are the most expensive part. On ebay or aliexpress you will certainly find cheaper LEDs but usually you do not know which wavelengths the LEDs have. Seen in this way, purchasing from a specialist retailer is recommended.
In this lesson you learn something about the relation between the colour of liquids and their absorption-behavior, about the important Chlorophyll, the Lambert-Beer law, exponentials, transmission and absorption, calculation of percents and the wavelengths of the visible colours. I think this is quite a lot…
So have fun also making this project in your lesson and Eureka!
Last but not least I’d be very happy if you could vote for me in the classroom-science-contest. Thank’s for that…
And if you are interested in further physics experiments, here’s my youtube-channel:
https://www.youtube.com/user/stopperl16/videos?
Source: DIY LED-photometer With Arduino for Physics or Chemistry Lessons
- How does the photometer calculate the transmission factor?
The transmission factor in percent is calculated by dividing the measured voltage U by the initial voltage U0 and multiplying by 100 (T = U / U0 * 100). - What formula is used to determine the absorption-factor A?
The absorption-factor A is calculated by subtracting the transmission percentage T from 100 (A = 100 minus T). - How are the amplification levels selected in the circuit?
Six different resistors are used in the feedback of the operational amplifier and can be chosen via a rotary switch to set magnification factors ranging from 100 to 10,000,000. - Which law describes the relationship between light intensity and solute concentration?
The Lambert-Beer law states that light intensity follows the formula I = I0 * 10 ^ (- E), where extinction depends linearly on concentration and thickness. - Can the extinction curve be used to determine unknown concentrations?
Yes, within lower concentration ranges such as between 0 and 0.25, a linear relationship exists allowing the determination of unknown concentration c from measured extinction E. - Why might the extinction curve deviate from linearity at higher concentrations?
At concentrations greater than 0.25, the curve flattens, meaning the extinction becomes lower than expected according to the Lambert-Beer law. - What is the recommended method for preparing a chlorophyll solution?
Cut grass into small pieces, crush them with propanol or ethanol, filter the mixture through a coffee filter, and dilute with sufficient propanol to avoid suspended particles. - Is it necessary to check the dominant wavelength of the LEDs?
It is recommended to check the dominant wavelength with a spectroscope and Theremino software to ensure accuracy, although data from the supplier often agrees well. - What is the estimated total cost for building this photometer?
The total cost is approximately 60 Euro or 70 USD, with different colored LEDs being the most expensive component.