Summary of DIY ARDUINO BLUETOOTH CONTROLLED CAR 🙂
This article guides DIY enthusiasts through building a smartphone-controlled car using an Arduino Nano and Bluetooth technology. The project allows users to control the vehicle via any Android phone or tablet by integrating an HC-05 module with an L293D motor driver. It covers the complete process, from gathering parts and wiring circuits to mounting components, uploading code, and connecting the mobile app for real-time operation.
Parts used in the Arduino Smartphone Controlled Car:
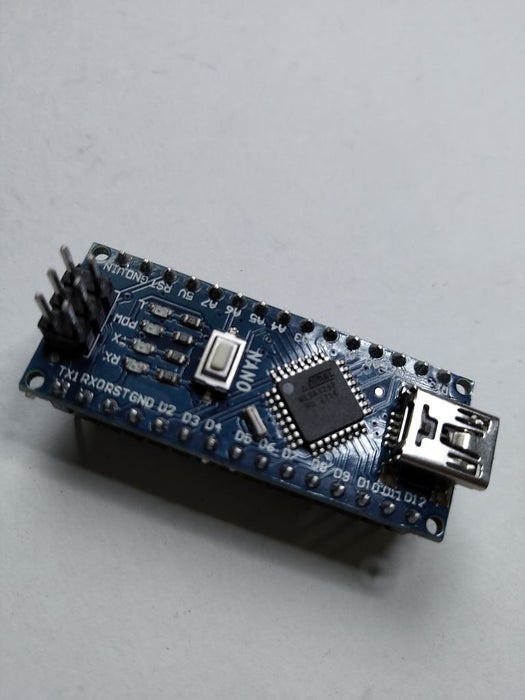
- Arduino Nano
- L293D Motor Driver
- HC05 Bluetooth Module
- 18650 Li-ion Battery (2 pieces)
- Old RC Car model frame
- Male To Female And Female To Female Jumper wires
- Wheels (4 pieces)
- Slide switch (1 piece)
- Connecting wires
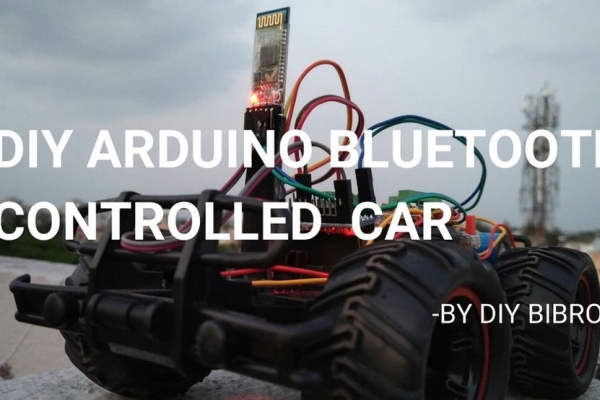
Hello, Guys! In this instructable tutorial, I’m going to make an Arduino nano based smartphone (Bluetooth) controlled car. All we know that Arduino is an excellent prototyping platform, principally because it uses a friendly programming language and there are a lot of extra incredible components that provide us great experiences. We can integrate the Arduino with different shields or modules and build fantastic projects. In this project i will show you how use the Bluetooth module to control a car through commands coming from a smartphone. So This car could be controlled via Bluetooth using any Android phone or tablets. This is an very interesting project. It’s simple to make, easy to program the arduino and also a great project for all diy lovers like me. So don’t waste your time and let’s make this cool project with me.
Here’s The Full Tutorial And Demonstration video :
Step 1: The Parts List :
Here’s The Parts List:
1. Arduino Nano
2. L293D Motor Driver
3. HC05 Bluetooth Module
4. 18650 Li-ion Battery(2ps)
5. Old RC Car model frame
6. Male To Female And Female To Female Jumper.
7. Wheels(4ps)
8.Slide switch(1ps)
9. connecting wires
Step 2: Wiring Diagram/Circuit Diagram:
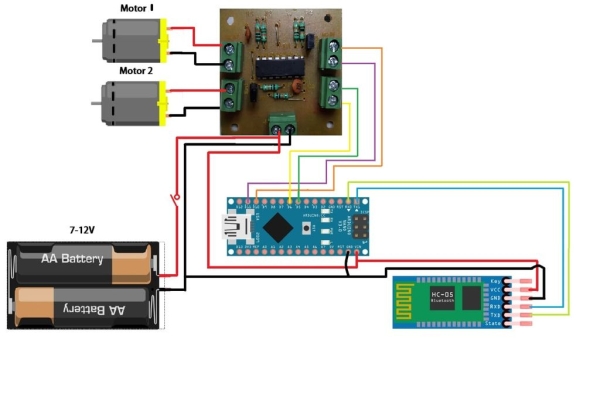
Here’s the entire circuit diagram: click for circuit diagram
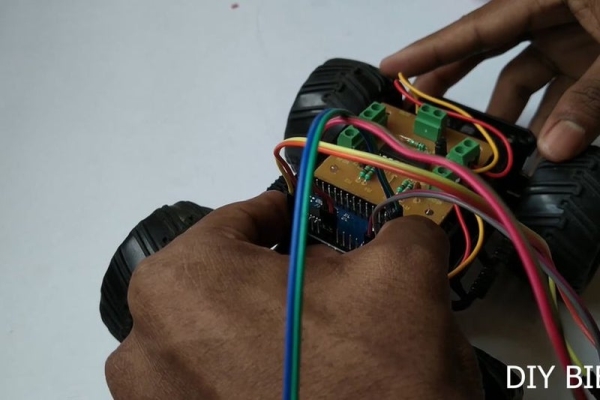
Step 3: Connect All the Modules & Soldering Wires:
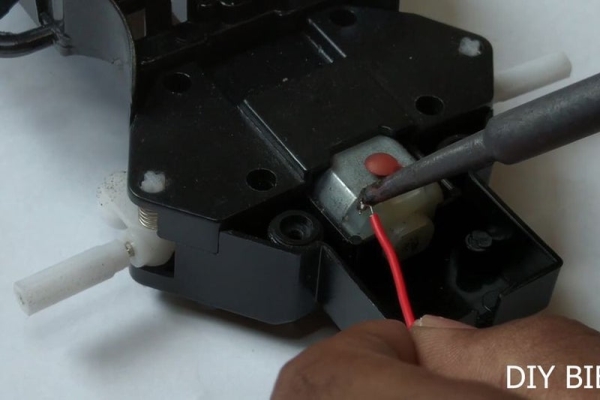
First, we’ll start off by connection the wheels into the model then soldering the motors then making the connection among all the modules.
At first, connect jumpers between motor driver and Arduino as follows .
D5>IN1
D6>IN2
D10>IN3
D11>IN4
Vin>5V OUT
GND>GND
Now Connect Bluetooth Module to Arduino And Motor Driver
Arduino –> Bluetooth Module :
TX>RX
RX>TX
Motor Driver –> Bluetooth Module:
5V OUT>5V IN
GND>GND
Now solder battery’s positive wire to switch, then connect it to the motor driver and connect negative wire of the battery to GND of the motor driver.
Step 4: Mounting All the Modules:
Now it’s time to mount all the modules. First, apply some hot glue mount motor driver. Next, we’ll mount Arduino and BT module. Then mount the battery. After mounting all the modules connect front and rear motor wires to the motor driver according to the circuit diagram.
Step 5: Upload the Code:

First, remove your bluetooth module then connect the Arduino to your pc, then upload the code.
link of the code:CLICK HERE FOR THE CODE
Step 6: Download the App & Connect to the Car :

Download the car controller app from google play store.
The app link: click here for app
Now Pair your Arduino Car to your Mobile phone in bluetooth setting on your phone
Open Aruino app Click ‘Connect’ button Select ‘HC-05’ or any name you set for your HC-05 .and finally Let’s play with your own made car 🙂 🙂
Step 7: We’re Done Now:
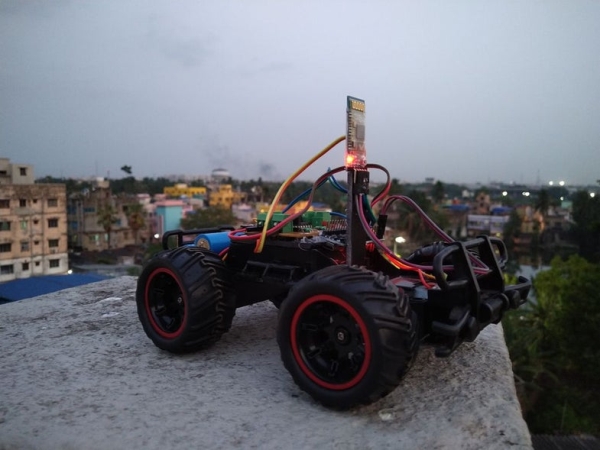
Finally, we’re done now. Have fun with this Arduino smartphone controlled car.
If you need the video tutorial then here’s The Full Tutorial And Demonstration video:
I hope you’ll like it. Don’t forget to follow me for my upcoming awesome projects .Thank you and all the best .keep smiling and keep learning 🙂
Source: DIY ARDUINO BLUETOOTH CONTROLLED CAR 🙂
- Can this car be controlled via Bluetooth?
Yes, the car can be controlled via Bluetooth using any Android phone or tablets. - What is the best way to connect the motors to the Arduino?
Connect jumpers between the motor driver and Arduino as follows: D5 to IN1, D6 to IN2, D10 to IN3, and D11 to IN4. - How do I connect the Bluetooth module to the Arduino?
Connect the Arduino TX pin to the Bluetooth RX pin and the Arduino RX pin to the Bluetooth TX pin. - Does the tutorial require soldering?
Yes, you must solder the motors and make connections among all modules during Step 3. - What should I do before uploading the code?
You must remove your Bluetooth module and then connect the Arduino to your PC before uploading the code. - Which app is needed to operate the car?
You need to download the car controller app from the Google Play Store. - How do I pair the car with my phone?
Pair your Arduino Car to your Mobile phone in the bluetooth settings on your phone. - Can I use a different name for the Bluetooth module?
Yes, when selecting the device in the app, you can choose HC-05 or any name you set for your HC-05.