Summary of Display Live Txts on Costume at Party w/ Scrolling LED Belt Buckle using arduino
This project converts a cheap scrolling LED belt buckle into a live SMS display by wiring its buttons to an Arduino with a USB Host Shield and using an Android app to forward incoming texts to the Arduino, which simulates button presses to set the display. It automates letter selection by toggling Arduino pins between input and low-output to mimic pushbutton grounding, and relies on Microbridge and demo code on both Arduino and Android.
Parts used in the Scrolling LED Belt Buckle SMS Display:
- Android phone (Android 2.3.3+)
- Scrolling LED belt buckle (approx. $13 at time of project)
- Arduino
- USB Host Shield (SparkFun used)
- Four wires (three for switches, one for ground)
- Microbridge Arduino Host Shield to Android Library (software)
- Demo Arduino code for LED writing and USB SMS reception
- Eclipse Android project code to pass SMS messages to Arduino
This project shows how to send SMS text messages to a cheap scrolling LED display via an Android app and arduino with USB host shield.
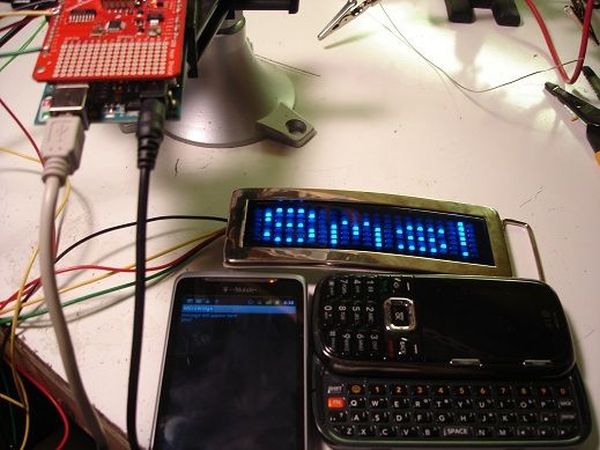
The project was originally inspired by a friend wanting to make a “sexting themed” costume, with a scrolling LED display of live texts sent from people at the party. We found a $13 LED belt buckle online, which looked cool, but only had a few buttons to manually enter in messages. A couple wires and lines of arduino code later, we were able to automate entry of messages.
We then added a host shield and wrote a small Android app to send txt messages on to the arduino.
Step 1: Required Parts and Code
Components:
–Android Phone (2.3.3+)
—Scrolling LED Belt Buckle ($13 at writing!)
–Arduino
–USB Host Shield (SparkFun one used here)
Code:
—Microbridge Arduino Host Shield to Android Library (Adb)
Step 2: Automate Message Entry on LED Display
The display has three buttons that you use to change the messages. It’s a long process, since you have to scroll to each letter one click at a time, and there’s no speed-scroll. We pop open the case to see if we can easily attach wires to the buttons in order to automate message setting.
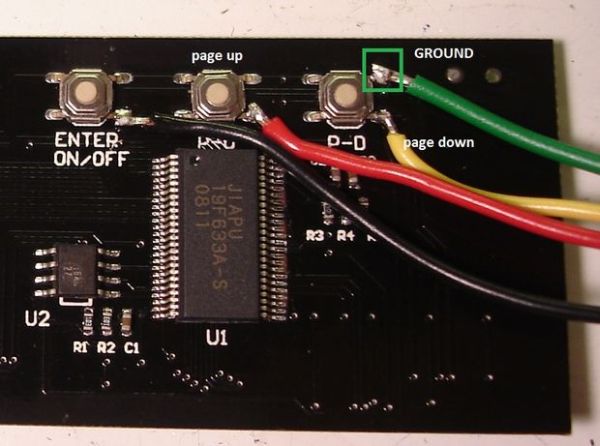
The three push button switches simply short the bottom side of the switch to ground when pressed. We’re going to simulate this action by switching the bottom side of the swtich between a high impedance pin (a digital input) and ground (a low digital out). This is easily done by switching the direction of the pin on an arduino, using pinMode(pin, INPUT) or pinMode(pin, OUTPUT). Just make sure the output is set Low before setting the pin to output (digitalWrite(pin,0)).
Four wires are attached, three for the switches, one for ground.
For more detail: Display Live Txts on Costume at Party w/ Scrolling LED Belt Buckle
- What does this project do?
It sends SMS messages from an Android phone to a scrolling LED belt buckle via an Arduino with a USB Host Shield, automating message entry. - Can a cheap LED belt buckle be used to display live texts?
Yes; the project uses a $13 scrolling LED belt buckle modified to accept messages sent from an Android phone. - How are the belt buckle buttons automated?
The Arduino simulates button presses by switching pins between input (high impedance) and output low to ground, mimicking the switch action. - What hardware is required on the Arduino side?
An Arduino, a USB Host Shield, and wires connected to the buckle's three switches and ground are required. - What software components are used?
The project uses the Microbridge Arduino Host Shield to Android Library, demo Arduino code, and an Eclipse Android project to forward SMS to the Arduino. - How many wires are attached to the display and why?
Four wires: three connected to the display switches and one for ground. - Do you need to open the buckle case to automate it?
Yes; the case is opened to access and attach wires to the pushbutton switches. - What Android versions are supported?
The project requires Android 2.3.3 or newer.