The HMC5883L magnetometer
This component (a small chip) HMC5883L, produced by Honeywell, bases its operation on AMR (Anisotropic Magnetoresistive) technology and allows you to be able to measure both the direction and the magnitude of the earth’s magnetic field. This magnetometer HMC5883L has within 3 magneto-resistive sensors arranged on three perpendicular axes (the Cartesian axes x, y and z). Here you can find the component datasheet.
The magnetic field affects these sensors modifying in some way the current flowing through them. Applying a scale to this current, you know the magnetic force (in Gauss) exerted on each sensor.
The component HMC5883L communicates with Arduino through the I2C protocol, a protocol very simple to use.
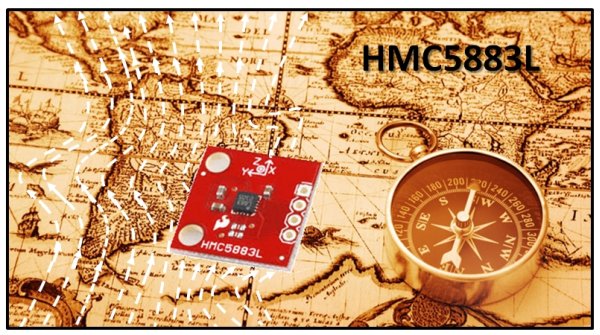
For our example with Arduino, I have bought the breakout board HMC5883L, distributed by Sparkfun (see here), in which the integrated chip is visible in the center (see Fig.2).
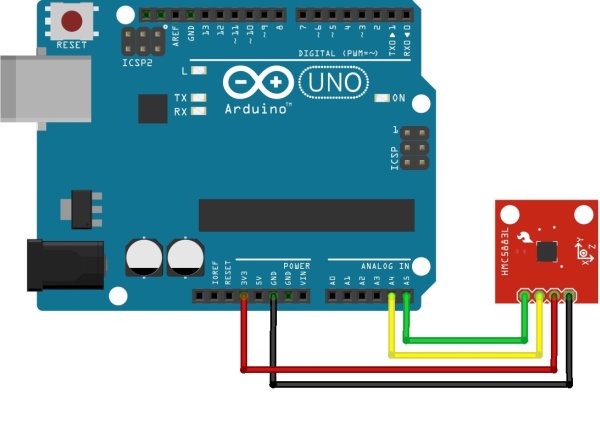
The circuit diagram
- Arduino GND -> HMC5883L GND
- Arduino 3.3V -> HMC5883L Vcc
- Arduino A4(SDA) -> HMC5883L SDA
- Arduino A5(SCL) -> HMC5883L SCL
The HMC5884L library for Arduino
In the internet you can find many libraries programmed specifically for use of this sensor. For the examples discussed in this article I have chosen to use a library downloaded from the website of LoveElectronics some time ago (although now I can not find the site) called just HMC5884L.
Click here to download the library. Once you download the zip file, extract the contents inside the Program Files > Arduino > LIbraries (if you are on Windows), that is a folder named HMC5883L.
Once you have extracted the contents you start the Arduino IDE. If everything is installed correctly you will find a new example loaded within the IDE (as shown in Fig.5).
The best way to learn how to use this library is to use it in simple examples, during which the commands and functions are explained gradually, their operation is that how to use them. For this purpose, in this article you will see two examples. First, you implement a digital compass, then we will use HMC5883L as a real magnetometer, collecting data and then use them in the representation of a vector field through MATLAB.
Let’s create a digital compass
All of you are familiar with this kind of objects. A small cylindrical box with a needle inside of ferrous material that affected by the Earth’s magnetic field, aligns itself according to field lines that run through the surface of the earth, thus indicating the north.
What we want to achieve with Arduino is the creation of a compass that will give us the value 0 ° when the sensor is pointed toward magnetic north, and 180 ° when in fact the sensor is pointing south.
The code that we are using is very common on the Internet and you can find it with endless small variations. I propose it because it is an example very useful to understand how to use this sensor, very simple and suitable as a whole to become familiar with commands of the HMC5883L library.
First you have to import the library HMC5883L.
#include <HMC5883L.h>
Since the HMC5883L board communicates with Arduino through the I2C protocol, you must also import the Wire library (see here for more information).
#include <wire.h>
After including all the required libraries, declare the instance HMC5883L as a global variable.
HMC5883L compass;
Now you can begin to define the content of the two setup() and loop() methods omnipresent in any Arduino sketch.
We begin, as logically, writing the setup() method. First we activate the I2C communication protocol between Arduino and the magnetometer.
void setup() {
    Wire.begin();
Also, since you need to display the values of the magnetometer readings somewhere, you will use the serial communication between Arduino and a PC. Then, specify:
Serial.begin(9600);
Serial.println("Serial started");
After all connections have been initialized, you can now also initialize the magnetometer by defining:
compass = HMC5883L();
The next step will be to configure the sensor according to your needs. First you need to define the gain (response scale) on which to work with the magnetometer.
Serial.println("Setting scale to +/- 1.3Ga");
int error = compass.SetScale(1.3);
if(error != 0)
    Serial.println(compass.GetErrorText(error));
Serial.println("Setting measurement mode to continuous.");
error = compas.SetMeasurementMode(Measurement_Continuous);
if(error != 0)
   Serial.println(compass.GetErrorText(error));
With these lines of code you have just set the gain at 1.3 Ga (end scale), that the measures should be between values of -1.3 and 1.3 Ga.
You can set only some end scale (gain) on the HMC5883L magnetometer, and these are: 0.88, 1.3, 1.9, 2.5, 4.0, 4.7, 5.6 and 8.1 gauss. Needless to say, if your measurements fall within a certain range, try to select a smaller scale can that contains it, as the precision of the measurement taken from your card will be higher.
Now you begin to define the content of the loop() function. The code written in this function will run continuously, and then each time it is performed, a measurement will be made by the sensor.
void loop(){
   MagnetometerRaw raw = compass.ReadRawAxis();
The ReadRawAxis() function returns the value obtained directly from the magnetometer. Thus the values obtained in this way have no reference to the true value of the magnetic field strength, but they are only proportional to it. So if you are interested in the true value of the magnetic field (in gauss) you should not consider this function, but replace it with the ReadScaledAxis() function.
In this case, however, you are interested in simulating the orientation of the magnetic needle of a compass, then the actual values do not interest us. So we can safely use the raw values of reading.
Recall that the magnetometer is able to detect simultaneously the measurements on the three Cartesian axes. To obtain these values, just call the following values belonging to the object variable MagnetometerRaw where they are stored. Here’s an example of how we can get the three values each for each axis (to not be included in the code).
int xAxis = raw.XAxis;
int yAxis = raw.YAxis;
int zAxis = raw.ZAxis;
Instead, if you wanted to use the actual values reported directly in scale (measures in Gauss). (to not be included in the code)
MagnetometerScaled scaled = compass.ReadScaledAxis();
int xAxis = scaled.XAxis;
int yAxis = scaled.YAxis;
int zAxis = scaled.ZAxis;
Now you can define the compass needle inside the loop() function.
float heading = atan2(raw.YAxis, raw.XAxis);
if(heading < 0)
    heading += 2*PI;
since the angle you get from this formula is in radians, convert it to degrees format that is most familiar to you and very readable.
float headingDegrees = heading * 180/M_PI;
Now you just have to see the value displayed on your PC while it is connected with the Arduino board via serial communication.
Serial.println(headingDegrees);
delay(1000);

Here’s the whole code:
#include <Wire.h>
#include <HMC5883L.h>

HMC5883L compass;

void setup()
{
   Wire.begin();
   Serial.begin(9600);
   compass = HMC5883L();

   Serial.println("Setting scale to +/- 1.3Ga");
   int error = compass.SetScale(1.3);
   if(error != 0)
     Serial.println(compass.GetErrorText(error));

   Serial.println("Setting measurement mode to continuous");
   error = compass.SetMeasurementMode(Measurement_Continuous);
   if(error != 0)
   Serial.println(compass.GetErrorText(error));
}

void loop()
{
   MagnetometerRaw raw = compass.ReadRawAxis();
   float heading = atan2(raw.YAxis, raw.XAxis);
   if(heading < 0)
      heading += 2*PI;
   float headingDegrees = heading * 180/M_PI;
   Serial.println(headingDegrees);
   delay(1000);
}
|
Now connect the Arduino to the PC and open a serial communication with which you can control your digital compass. Rotate the HMC5883 board until you get the 0 value. If you get 0 you are pointing the north (magnetic).
For more detail: Arduino: measuring the Earth’s magnetic field with the magnetometer HMC5883L

